It’s the end of a long dinner, and your KitchenAid dishwasher is ready to save the evening. You load in the plates, glasses, and silverware, press start, and walk away. But when the cycle ends, some glasses look cloudy and plates still have residue. Frustrating, isn’t it?
Most people assume the dishwasher is at fault, but the real issue often lies in how it’s loaded. KitchenAid dishwashers are engineered with powerful wash arms, adjustable racks, and advanced sensors, but even the most advanced technology needs proper loading to perform perfectly.
When you understand where to place each dish, how to angle cookware, and how to balance the racks, your KitchenAid will deliver spotless, streak-free results every time.
This guide explains everything from rack positioning to detergent tips so you can clean smarter, save energy, and extend your appliance’s life.
Let’s dive into the perfect method to load your KitchenAid dishwasher and get sparkling results from every cycle.
Understanding Your KitchenAid Dishwasher Design
KitchenAid dishwashers are known for their powerful cleaning systems and flexible rack design. Inside, you’ll find a lower rack, an upper rack, and often a third-level utensil tray for extra space. Each zone is designed for specific types of items to ensure efficient cleaning.
The bottom rack handles larger, heavier dishes like plates, pots, and pans. The upper rack accommodates glasses, mugs, and smaller bowls. The third rack is ideal for utensils, measuring cups, or other flat items that usually take up too much space below.
KitchenAid models often include ProWash or Dynamic Wash arms that adjust pressure automatically. This technology senses how dirty the dishes are and adapts the water intensity to match. But even this feature can’t work properly if items are placed incorrectly.
Each spray arm must have enough clearance to spin freely. Tall items or handles that block movement can reduce water coverage and leave dishes dirty. Before closing the door, always rotate each arm manually to check clearance.
Some KitchenAid models feature Bottle Wash jets or targeted spray zones. Place narrow containers or bottles directly over these jets for deep cleaning. Utilizing these features properly ensures top-notch results every time.
Understanding your dishwasher’s layout and capabilities is the first step toward mastering how to load it. Once you know where each item belongs, you’ll see cleaner, shinier dishes with every wash.
Prepping Dishes Before Loading
Prepping dishes the right way can make your KitchenAid run more efficiently. Contrary to old habits, you don’t need to pre-rinse everything. Modern KitchenAid dishwashers detect food residue automatically, so scraping is usually enough.
Before loading, check the filter at the bottom for debris. Removing small particles keeps water flowing freely through the spray arms. This prevents odor and maintains cleaning strength.
Scrape off excess food and rinse extremely greasy pans lightly. Heavy grease can redeposit on other items during the wash. A quick rinse in warm water ensures balanced cleaning results.
Run the kitchen tap until hot water flows before starting the dishwasher. This helps your KitchenAid begin the cycle with already-heated water, which improves detergent activation.
Always separate dishwasher-safe and non-dishwasher-safe items. Wood, cast iron, and delicate crystal pieces should be hand washed. These materials can warp, rust, or crack under high temperatures.
Lastly, check for stickers or paper labels on new dishes. These can detach, clog filters, and stick to other items during the wash. A few seconds of prep can save hours of frustration later.
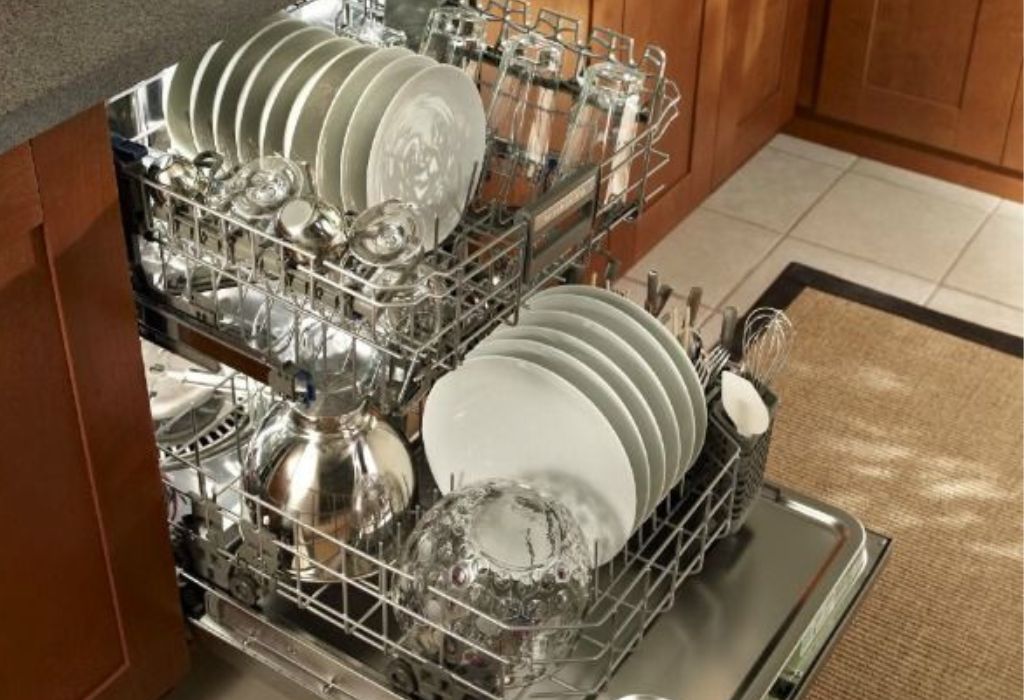
How to Load the Bottom Rack Correctly
The bottom rack is the cleaning powerhouse of your KitchenAid dishwasher. This is where the strongest spray jets and highest water pressure work on tough stains. Proper loading here ensures every item comes out spotless.
Place large dinner plates vertically between tines and angle them slightly toward the center spray arm. Avoid stacking or overlapping, which blocks detergent flow. Angled positioning also improves drying.
Bowls should be placed face-down or at an angle to let water drain easily. Larger mixing bowls or pans should go along the sides to prevent blocking the detergent dispenser. Always check that tall pots don’t hit the upper spray arm.
Pots, pans, and casserole dishes should face downward for maximum spray coverage. Avoid laying them flat across the rack—this traps water and prevents full cleaning.
Use foldable tines for large cookware or baking sheets. These adjustable sections give you space flexibility while maintaining water circulation.
If your KitchenAid includes a ProScrub zone, place heavily soiled items there. These jets provide extra scrubbing power to handle stuck-on food.
Once loaded, spin the bottom spray arm by hand to confirm it moves freely. A quick check guarantees your setup is perfect before running the cycle.
Should I rinse dishes before loading my KitchenAid dishwasher?
No. Just scrape off large food debris—KitchenAid sensors and filters handle the rest.
Can I place baking trays flat on the bottom rack?
Avoid it. Instead, stand them upright along the sides to keep water flow unobstructed.
Why are my plates not fully clean?
Check that spray arms spin freely and the detergent dispenser isn’t blocked.
Can I wash cast iron in a KitchenAid dishwasher?
Never. It will rust and lose its seasoning when exposed to detergent and heat.
Should I place nonstick pans in the dishwasher?
No, prolonged exposure can damage the coating. Hand wash them for safety.
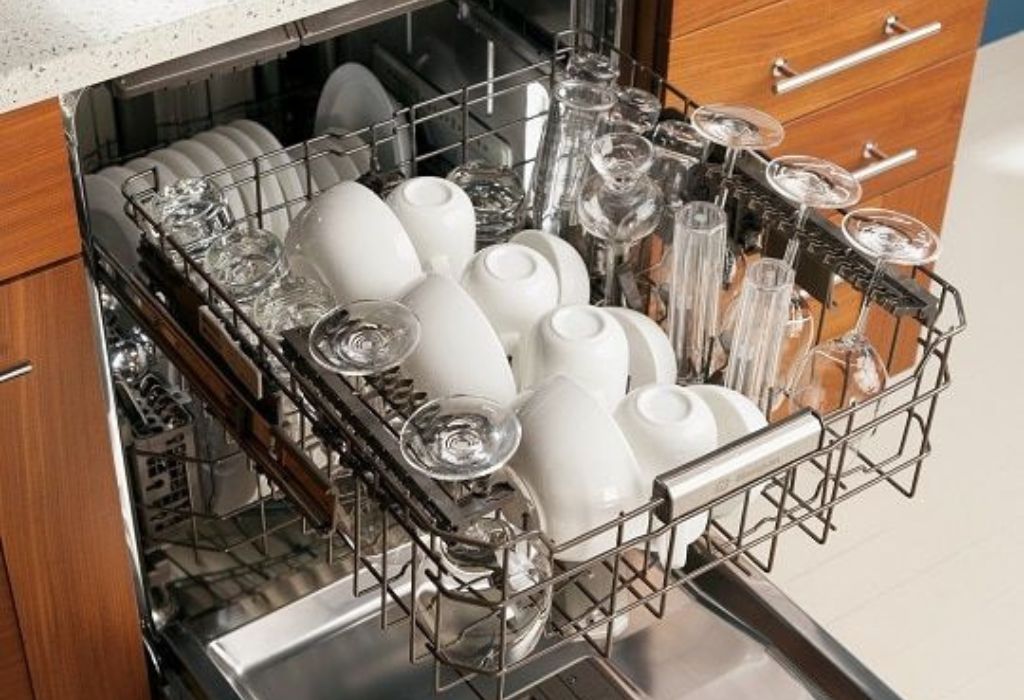
How to Load the Top Rack Properly
The top rack of your KitchenAid dishwasher is designed for lighter and more delicate items. This includes cups, mugs, glassware, and small bowls. Arrange them securely between tines so they don’t shift during washing.
Position cups and glasses upside down at a slight angle. This helps water drain off and prevents water spots after drying. Keep items from touching each other to avoid scratches or chips.
Use adjustable rack height features if your model includes them. Raising or lowering the top rack helps fit taller items below or above. Adjusting properly gives you the best cleaning coverage.
Plastic items labeled “dishwasher-safe” should always go on the top rack. The heating element below can warp or melt them if placed on the bottom. Lightweight pieces can be clipped or tucked securely to prevent flipping.
Avoid crowding the rack. Overloading restricts airflow and detergent movement, leading to dull finishes. Even spacing ensures efficient washing and faster drying.
If your model includes a third rack, use it for long utensils, spatulas, or measuring spoons. It provides more room for bulky items in the lower racks.
Before starting the cycle, spin the upper spray arm to confirm nothing is in its way. Unobstructed rotation is key to spotless dishes every time.
Silverware Basket and Utensil Placement
The silverware basket is often underestimated, but it plays a big role in your KitchenAid’s cleaning performance. Mix forks, spoons, and knives evenly across the basket to prevent nesting. Alternating handles up and down helps water reach all surfaces.
Sharp knives should always be loaded handle-up for safety. If your model has a covered silverware tray, use it for knives and small accessories. This prevents accidental cuts during unloading.
Avoid crowding too many utensils in one section. Overstuffing limits water circulation and leaves residue behind. Proper spacing ensures thorough cleaning.
Separate stainless steel and silver utensils to avoid discoloration. When these metals touch, they can react under heat and detergent, causing dark stains.
Use the third-level rack if your model offers it. It’s perfect for flat utensils like tongs, spatulas, and serving spoons. Keeping them separated improves water reach.
Ensure no utensil extends above the top of the basket. Protruding handles can block spray arm movement and cause incomplete cleaning. A quick check before starting makes all the difference.
By organizing silverware correctly, you ensure better cleaning and longer-lasting shine on every utensil.
Should utensil handles face up or down?
Alternate them. Handles up for safety, handles down for better cleaning reach.
Why do spoons stick together?
They’re nesting. Mix utensil types and separate similar shapes.
Can I wash wooden spoons or utensils?
No. Wood absorbs moisture, causing cracks and swelling.
Why are my knives dull after washing?
Repeated dishwasher cleaning can dull blades over time. Hand washing is recommended.
Is it okay to put silver-plated utensils in the dishwasher?
It’s best to avoid it. The detergent and heat can cause tarnish and damage.
Loading Large Cookware and Odd-Shaped Items
KitchenAid dishwashers are built with space flexibility in mind. Large cookware like pots, pans, and baking sheets fit easily if positioned correctly. Place them at an angle to expose all surfaces to water jets.
Never lay flat pans horizontally across the bottom. This blocks water from reaching other dishes and traps detergent. Upright placement allows water to flow freely.
Use the foldable tines for oddly shaped dishes or mixing bowls. This customization helps you load efficiently without compromising spray coverage.
If your KitchenAid model includes Bottle Wash or ProScrub jets, align narrow containers directly over them. These targeted sprays clean bottles, jars, and vases thoroughly.
For delicate cookware such as glass lids or ceramic bakeware, choose the gentle cycle. This lowers water pressure and temperature to protect fragile items.
Always check that the spray arms spin freely before starting the cycle. If something blocks them, rearrange large items slightly. Proper placement ensures everything gets cleaned evenly.
Avoid stacking smaller items inside larger ones. Trapped water and detergent can cause stains or cloudy finishes. Give each piece room to breathe for flawless cleaning.
Detergent and Rinse Aid Tips for KitchenAid Users
Detergent plays a key role in cleaning performance. Use only high-quality dishwasher detergent pods or powder made for automatic dishwashers. Cheap alternatives often leave film or streaks.
Measure detergent according to load size and water hardness. Too much soap can cause oversudsing, while too little leaves residue. KitchenAid dispensers are calibrated for precise timing, so never overfill them.
Rinse aid is equally important. It reduces water spots and speeds up drying by allowing water to glide off dishes. Refill the dispenser whenever the indicator shows low.
If your area has hard water, consider using a water softener or detergent booster. This prevents mineral deposits that dull glassware. Whirlpool Corporation, which makes KitchenAid, recommends using approved additives for best results.
Avoid combining detergent types such as pods and liquid in one cycle. The formulations may clash and reduce cleaning power. Stick to one consistent type per load.
Eco-friendly detergents work well too but may need slightly higher temperatures. KitchenAid’s sensors automatically adjust cycle heat to optimize performance.
Finally, wipe detergent compartments occasionally to remove residue buildup. Clean openings ensure proper release and consistent wash results.
Are pods better than powder detergent?
Yes, pods offer pre-measured doses and dissolve completely for consistent cleaning.
How often should I refill rinse aid?
Usually every 20–30 cycles. Check the indicator light regularly.
Why do my glasses have white spots?
This is caused by hard water or too much detergent. Adjust rinse aid and consider a water softener.
Can I use hand dish soap in my KitchenAid dishwasher?
Never. It creates excess suds that can flood the appliance.
Are eco detergents safe for KitchenAid dishwashers?
Absolutely, just ensure you use the correct temperature settings for best performance.
Final Pre-Cycle Checks Before Running the Dishwasher
Before pressing Start, take a quick moment to inspect the setup. Spin the spray arms manually to confirm free movement. Blocked rotation leads to poor cleaning coverage.
Ensure that the detergent dispenser and rinse-aid compartments are properly closed. Misalignment can delay or prevent soap release.
Check that nothing protrudes beyond the racks. Handles or utensils that extend too far can hit the door or spray arms during operation. Adjust placement if needed.
Select the correct cycle for your load. Use Normal or ProWash for everyday dishes and Heavy for pots or pans. KitchenAid’s sensors will automatically adjust water and temperature.
Run the kitchen tap until it turns hot. This primes the dishwasher with heated water from the start, improving detergent performance.
Distribute items evenly to prevent rattling noise. Balanced racks ensure quiet and stable operation throughout the wash.
Lastly, confirm the door closes smoothly and seals tightly. A proper seal prevents leaks and guarantees consistent pressure during cleaning.
Regular Maintenance and Cleaning Tips
Routine maintenance keeps your KitchenAid dishwasher performing like new. Clean the filter monthly to remove trapped food particles and prevent odors. Rinse it under warm running water for best results.
Wipe door seals and the interior edges regularly with a damp cloth. Grease and food can collect here, creating smells and mold. Consistent cleaning keeps the dishwasher hygienic.
Once a month, run a cleaning cycle with a cup of white vinegar on the top rack. This dissolves limescale and soap scum from the tub and spray arms.
Check the spray arms for blockages or mineral buildup. Remove them periodically and rinse out debris. Clear jets ensure strong water pressure and even coverage.
Inspect the drain area for residue or small objects. A clogged drain reduces water removal and can cause standing water. Keeping it clear ensures smooth operation.
If your KitchenAid has a stainless-steel interior, polish it with a microfiber cloth. This prevents water marks and keeps it shiny. Avoid using harsh cleaners or abrasives.
After each load, leave the door slightly open to let moisture escape. This prevents odor and mold formation inside the tub.
How often should I clean my KitchenAid dishwasher filter?
Once a month or more if you frequently wash heavily soiled dishes.
Can I use vinegar to clean the dishwasher regularly?
Yes, it safely removes grease and limescale buildup without harming the machine.
Why does my dishwasher smell bad?
Food residue in filters or gaskets is the usual cause. Clean these parts regularly.
Should I leave the door open after cycles?
Yes, it allows moisture to evaporate and prevents mold growth.
How can I restore the shine inside my stainless-steel tub?
Wipe with a soft cloth and vinegar solution or a stainless-steel-safe cleaner.
Conclusion
Loading your KitchenAid dishwasher correctly ensures the best cleaning and drying performance every time. Each rack and feature is designed to work efficiently when used as intended. Proper placement improves water flow, saves energy, and keeps dishes spotless.
Regular cleaning, using the right detergent, and performing quick inspections can prevent most common problems. Your KitchenAid is a premium appliance—treating it with care guarantees lasting performance.
Follow this step-by-step guide to get crystal-clear dishes and perfect results after every wash. With the right loading habits, your KitchenAid dishwasher will always deliver its professional-grade promise.
I’m Emma J. Caldwell, the founder, lead writer, and home-cooking enthusiast behind KitchenGuideCo.com. With a background in culinary arts and over a decade of cooking experience in both professional and personal kitchens, I created this platform to demystify recipes, offer smart kitchen gadget reviews, and guide readers through meal prep with confidence and clarity.