After a long ride on a sunny day, you toss your mud-splattered bike bottle into the dishwasher, hoping for a quick clean.
Minutes later, you open the door to find a misshapen bottle or a warped lid that no longer fits. It’s a frustrating moment for every cyclist who cares about gear durability and safety.
Bike water bottles may look simple, but they’re built from different materials like polyethylene, polypropylene, or stainless steel, and each reacts differently to dishwasher heat.
While some are labeled dishwasher safe, others warp, leach chemicals, or lose shape after just one cycle. Understanding this difference is essential for keeping your bottle clean and safe to use.
In this guide, you’ll learn exactly which bike bottles can withstand a dishwasher, which brands recommend handwashing, and how to remove mold and odor without melting your gear.
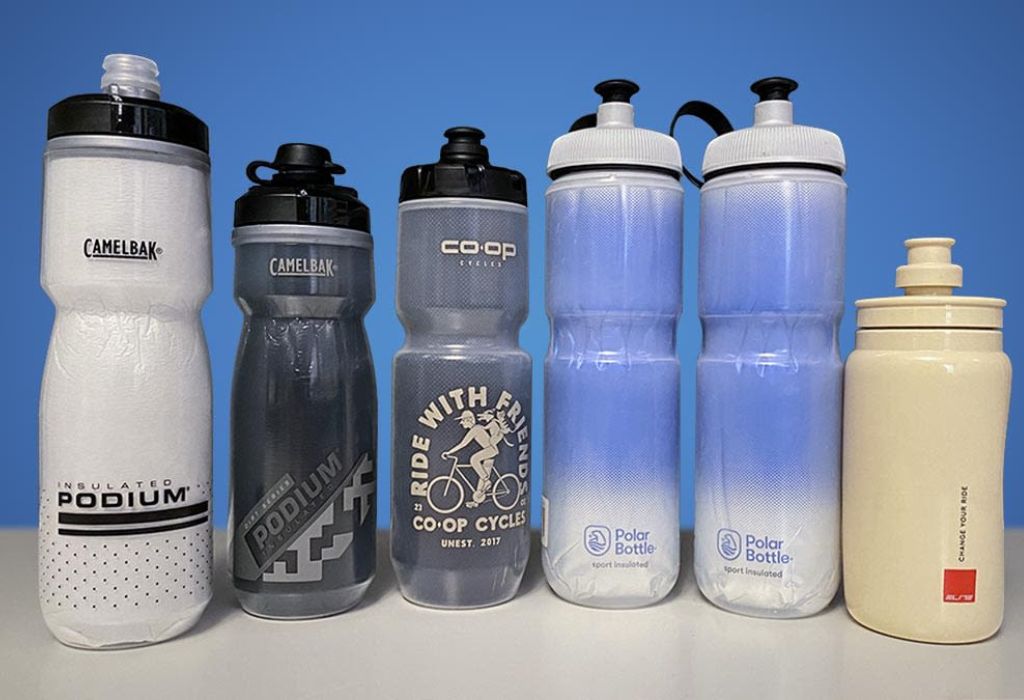
Whether you ride with CamelBak, Specialized, Trek, or Polar bottles, you’ll find brand-specific tips to make cleaning easy and safe.
Let’s start by understanding the materials that make up your cycling bottle — because that’s what decides if it can survive the dishwasher or not.
Understanding the Materials of Bike Water Bottles
Bike water bottles are made from various materials that determine their durability and heat resistance. The most common options are polyethylene (PE), polypropylene (PP), Tritan plastic, and stainless steel. Each material behaves differently under dishwasher heat and detergents.
Polyethylene is lightweight and squeezable, popular among cyclists for its flexibility. However, it softens at temperatures above 110 °F (43 °C), making it risky for dishwashers that can reach 150–160 °F. Repeated exposure may cause warping and brittleness.
Polypropylene is slightly stronger and used in many premium cycling bottles. It can withstand moderate dishwasher temperatures but may deform if placed on the bottom rack where heat is highest. Top-rack washing is usually safe.
Tritan plastic, used in brands like CamelBak and Nalgene, is BPA-free and highly resistant to heat. It’s explicitly rated as dishwasher safe and maintains its shape and clarity for years. This material is ideal for cyclists who prefer plastic but want reusability.
Stainless steel bottles handle heat very well and don’t leach chemicals, but the painted or powder-coated finish can fade over time. They also retain heat from dry cycles, so removing them early prevents burn marks on rubber grips.
Knowing which material your bottle is made of is the first step to deciding whether it’s dishwasher safe or better off handwashed.
What Happens to Plastic in a Dishwasher
Dishwashers use high heat and powerful detergents to sterilize dishes and remove grease. While effective for ceramics and glass, these conditions can be harsh on plastic. Bike bottles often suffer when exposed to prolonged heat and harsh chemicals.
Heat softens low-density plastics, causing them to warp or collapse slightly. This distortion can affect the fit of the lid and the seal of the valve, leading to leaks during rides. Once deformed, it’s nearly impossible to restore the original shape.
Detergents contain alkaline agents that break down organic residue — but they can also degrade the surface of plastic. Over time, this makes the material cloudy and more likely to absorb odors.
Repeated dishwasher exposure can also cause logos and measurement markings to fade. If you rely on these for mixing electrolyte drinks, it’s better to hand wash the bottle.
For safety, always use the top rack if you must dishwash a plastic bottle. Heat elements sit at the bottom of the machine, and placing bottles higher keeps them away from direct exposure.
By understanding how plastic reacts to heat and detergent, you can avoid unintended damage and extend the life of your cycling gear.
Are All Bike Water Bottles Dishwasher Safe?
The short answer is no — not all bike water bottles are dishwasher safe. Whether they are depends on the type of plastic and the manufacturer’s guidelines. Ignoring these instructions can lead to warped bottles or even chemical leaching.
Look for a dishwasher-safe symbol on the bottom of your bottle. It usually appears as a small plate with water droplets or heat waves above it. If you don’t see this mark, hand washing is the safest choice.
Some brands design bottles for specific temperatures and cycles. For example, CamelBak and Trek bottles are safe on the top rack, while others recommend only warm water and mild soap. Always check product labels or official websites for details.
If your bottle has a soft bite valve or rubber nozzle, remove it before dishwashing. High heat can dry out or crack silicone parts. Cleaning these separately ensures they stay flexible and sanitary.
Some cyclists choose insulated or metal bottles for their durability. While these handle dishwashers better, painted exteriors and rubber bands can still wear down. Avoid dry cycles to prevent discoloration.
If you’re uncertain about your bottle’s material, hand washing is always the safer option. It preserves shape, color, and performance for years of riding.
How can I tell if my bike bottle is dishwasher safe?
Check the bottom for a dishwasher symbol or refer to the manufacturer’s website for cleaning guidelines.
Can I wash insulated bike bottles in the dishwasher?
Some stainless-steel models are safe, but avoid putting them through the dry cycle to protect painted coatings.
Why did my plastic bike bottle warp after washing?
It was likely exposed to too much heat or placed on the bottom rack near the heating element.
Do dishwasher detergents affect plastic taste?
Yes, residues can cling to rough plastic surfaces and alter taste over time — rinse thoroughly after washing.
Are rubber nozzles and caps dishwasher safe?
Usually not; it’s better to remove and hand wash them with warm soapy water to avoid cracks.
Brand-Specific Guidelines for Popular Cycling Bottles
Each cycling brand designs bottles with unique materials and tolerances. Knowing their manufacturer instructions helps you clean confidently without damaging valves or coatings.
CamelBak bottles made from BPA-free Tritan Renew plastic are top-rack dishwasher safe. Always remove the bite valve and straw before washing to prevent deformation. These parts can be cleaned separately with mild soap and air-dried overnight.
Specialized Purist bottles use an internal glass-like liner fused to flexible LDPE plastic. They’re technically top-rack safe, but repeated hot cycles can weaken the lining. Gentle handwashing extends clarity and prevents odor retention.
Trek and Bontrager bottles are similar in composition to Specialized. The soft squeeze body can tolerate one or two warm cycles but will gradually lose elasticity. Washing in lukewarm water with a bottle brush keeps them fresher longer.
Polar Bottles are insulated with a thin metallic layer and polyethylene walls. These should never go in high-heat cycles; extreme heat can separate the insulation layers. Stick to cold or warm handwashing only.
Stainless-steel brands like Hydro Flask or ThermoFlask can handle dishwashers but may discolor if left through heated drying. For longest life, wash on the top rack and let them air-dry.
Every brand prints its cleaning instructions beneath the base or on the packaging. When in doubt, default to top-rack or handwashing to protect structure and safety.
Best Way to Clean Bike Water Bottles Without Damage
Handwashing remains the safest way to keep bottles fresh and odor-free. It’s gentle on plastics, preserves valves, and prevents chemical breakdown from harsh detergents. With a few simple tools, it’s quick and effective.
Start by filling the bottle halfway with warm water and adding a drop of mild dish soap. Secure the lid, shake vigorously, then scrub the interior with a long bottle brush. Rinse thoroughly until no bubbles remain.
Remove the cap, valve, and straw if present. These small parts collect bacteria easily. Soak them in a bowl of warm, soapy water for ten minutes before scrubbing gently with a small brush or cotton swab.
For deep cleaning, mix a tablespoon of baking soda with warm water and let it sit overnight. This neutralizes odors and removes sugar residue from sports drinks. Rinse completely to avoid leaving an aftertaste.
Never use boiling water directly inside plastic bottles. High heat softens plastic and can deform threads or cap seals. Warm-to-hot tap water (under 120 °F / 49 °C) is sufficient for sanitation.
After washing, allow bottles to dry completely with the lid off. Storing them closed traps moisture and leads to mold. Place them upside-down on a rack for best air circulation.
By establishing this simple routine, you’ll keep your bottles clean, odorless, and ready for your next ride without risking heat damage.
What’s the safest cleaning method for plastic bike bottles?
Warm water, mild soap, and a bottle brush — avoid boiling water or harsh detergents.
Can I soak bottles in vinegar?
Yes, a 1:3 vinegar-to-water mix removes stains and kills bacteria, but rinse well afterward.
Do dishwasher pods harm plastic bottles?
They can if used repeatedly; their alkaline strength may dull or cloud plastic surfaces.
Is bleach safe for cleaning cycling bottles?
A heavily diluted bleach solution (1 tsp per liter of water) works for disinfection, followed by thorough rinsing.
Should I close the lid while drying?
No. Keep lids off to allow airflow and prevent mold growth inside threads and valves.
How to Remove Odors and Mold from Your Bottle
Even dishwasher-safe bottles can develop smells after storing energy drinks or sugary mixes. The key is addressing residue before it becomes bacterial growth.
Fill the bottle with warm water and add two tablespoons of baking soda. Let it sit overnight, then scrub with a brush. Baking soda neutralizes acidic residue that creates unpleasant odors.
If mold appears around the spout or valve, use a diluted vinegar solution. Soak for 15 minutes to kill spores, then rinse with soap and water. Avoid leaving vinegar on metal caps for too long since it can tarnish them.
For stubborn black or orange stains, mix equal parts hydrogen peroxide and water. This natural sanitizer removes discoloration without damaging plastic. Rinse thoroughly afterward.
Boiling isn’t recommended for plastic bottles. However, you can pour hot (not boiling) water inside and shake for a few seconds to help loosen buildup.
Always dry bottles upright and uncapped in a well-ventilated area. Trapped humidity is the number-one cause of recurring odor.
Regular maintenance after each ride prevents both smell and bacterial growth, saving you from needing harsh chemical cleaners.
Safety Tips When Using Dishwasher for Bike Bottles
If you prefer dishwasher cleaning, follow these safety precautions to protect materials and health. Correct placement and cycle selection make a big difference.
Place bottles on the top rack only. The bottom rack reaches much higher temperatures and can warp or melt thin plastic. Top-rack washing keeps them away from the heating element.
Avoid high-heat or “sanitize” cycles. These reach 160 °F (71 °C) — too hot for most sports plastics. Choose “normal” or “eco” settings with air-dry options for gentle cleaning.
Secure bottles so they don’t fall during the cycle. Lightweight plastic can flip over and block spray arms. Nest them between tines or use a cage holder if your dishwasher has one.
Remove soft bite valves, silicone nozzles, and rubber seals before washing. These components degrade quickly in prolonged heat and lose flexibility.
After the cycle ends, open the dishwasher door slightly to let steam escape. Removing bottles early prevents condensation odors.
Inspect bottles for signs of warping, cracks, or faded graphics. If the shape feels uneven, stop using it immediately and switch to handwashing next time.
By following these tips, you’ll get the convenience of machine washing without sacrificing your bottle’s durability or safety.
Which rack should I use for washing bike bottles?
Always the top rack; it’s cooler and safer for plastics.
Can I use the sanitize cycle?
No, it’s too hot for most plastic cycling bottles and may warp them.
Do I need to remove the cap before washing?
Yes, separate the cap and valve to ensure every part is cleaned properly.
Can I dry bottles in the dishwasher?
Let them air-dry; avoid heated drying cycles to protect seals and graphics.
How can I prevent bottles from flipping during washing?
Use rack supports or wedge them between larger dishes for stability.
Environmental and Health Considerations

Beyond convenience, how you clean bottles affects both your health and the environment. Choosing the right method ensures safety and sustainability.
Old plastics that aren’t BPA-free can leach micro-particles when heated repeatedly. These tiny contaminants can mix into your drinks. If your bottle is older than five years or unlabeled, consider replacing it with a newer BPA-free option.
Frequent dishwashing also uses significant energy and water. Handwashing one or two bottles takes less than half the resources, especially if you use lukewarm water efficiently.
Reusable bottles already reduce plastic waste compared to single-use alternatives. Proper care extends their life further, lowering your carbon footprint.
Avoid harsh chemical cleaners that release harmful residues into wastewater. Natural options like vinegar or baking soda are safer for both you and the planet.
If your bottle starts to smell even after deep cleaning, it’s a sign the inner surface has degraded. Bacteria cling to micro-cracks invisible to the eye — replacement is the healthiest choice.
Keeping sustainability in mind turns regular maintenance into a long-term environmental habit that benefits every cyclist.
When to Replace Your Bike Water Bottle
Even the best-maintained bottles eventually wear out. Recognizing early signs of damage helps you replace them before they pose health risks.
If your bottle has visible cracks, scratches, or cloudiness that won’t wash away, it’s time for a new one. These imperfections trap bacteria and are nearly impossible to sanitize completely.
Persistent odors that return after thorough cleaning indicate plastic breakdown. Once the inner layer becomes porous, it starts absorbing flavors permanently.
Watch for lid or nozzle leaks. A warped cap or dried seal can cause drips during rides, especially under pressure. Replacement parts are cheap, but if unavailable, replace the whole bottle.
Stains caused by sports drinks or mold can weaken material over time. Even if they appear minor, they’re warning signs of surface damage.
Manufacturers usually recommend replacing plastic bottles every 1–2 years — or sooner if used daily in sunlight. UV exposure accelerates plastic fatigue and chemical degradation.
For metal bottles, inspect coatings annually. Peeling paint or dented walls can hide rust, which affects both hygiene and taste.
Replacing bottles at the right time ensures you stay hydrated safely without ingesting bacteria or micro-plastics.
How often should I replace my bike water bottle?
Every 12–24 months for plastic and every 3–5 years for stainless steel, depending on use.
Can discoloration indicate bacteria?
Yes. Persistent stains often mean residue buildup where microbes thrive.
Is it safe to use an old bottle if it looks clean?
Not always. Micro-cracks may harbor bacteria even if the surface appears spotless.
Does sunlight shorten a bottle’s lifespan?
Absolutely. UV light weakens plastic polymers and speeds up material fatigue.
What’s the best replacement type for daily cyclists?
BPA-free Tritan plastic or stainless steel — durable, heat-resistant, and easy to sanitize.
Conclusion
Whether or not bike water bottles are dishwasher safe depends on their material, brand, and age.
Many modern bottles made from BPA-free Tritan plastic or stainless steel handle gentle dishwasher cycles, while soft LDPE types still need hand care. Understanding these differences protects your health and prolongs each bottle’s life.
For the best results, remove caps and valves, use the top rack only, and skip high-heat or dry cycles. Handwashing with warm water and mild soap remains the safest routine for everyday cleaning.
Cyclists who care for their bottles properly enjoy fresher taste, fewer odors, and longer usability. Cleaning smartly also saves money and reduces plastic waste — a win for both riders and the environment.
Your bike bottle works hard to keep you hydrated. Give it the right care, and it’ll serve you ride after ride without losing its shape, safety, or shine.
I’m Emma J. Caldwell, the founder, lead writer, and home-cooking enthusiast behind KitchenGuideCo.com. With a background in culinary arts and over a decade of cooking experience in both professional and personal kitchens, I created this platform to demystify recipes, offer smart kitchen gadget reviews, and guide readers through meal prep with confidence and clarity.