The kitchen is quiet as the oven begins to warm, and a gently risen dough waits patiently on the counter. Its surface is smooth, slightly glossy, and full of hidden air bubbles created over hours of fermentation.
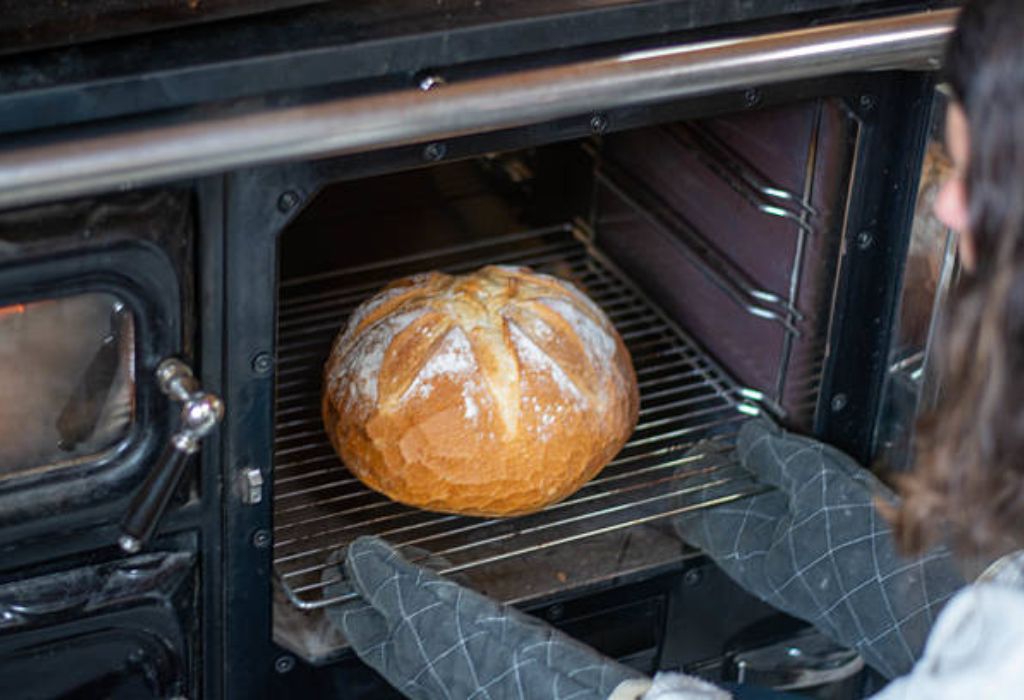
The moment the oven door opens, heat rushes out, and anticipation builds for what will soon become a crackling loaf of sourdough.
Baking sourdough in a home oven feels simple, but it carries unique challenges that differ from commercial bakery environments.
Home ovens behave differently with heat circulation, moisture control, and temperature stability. Without understanding these differences, many home bakers struggle with pale crusts, dense crumb, or loaves that spread instead of rising.
Sourdough is alive with natural fermentation, and the oven is the final stage where that life transforms into structure and flavor. The interaction between steam, heat, and dough expansion determines whether the crust becomes blistered and crisp or dull and chewy.
Baking sourdough successfully at home is not about expensive tools. It is about mastering timing, understanding heat behavior, and controlling moisture inside the oven chamber.
When those elements come together, a home oven can produce bakery-quality sourdough with remarkable consistency.
What Makes Sourdough Baking Different
Sourdough baking differs from commercial yeast baking because it relies entirely on natural fermentation. Wild yeast and lactic acid bacteria work together to create gas, flavor, and dough strength. This slower biological process changes how the dough behaves in the oven.
Natural fermentation strengthens gluten over time instead of fast chemical leavening. The dough structure becomes more elastic and extensible. This elasticity allows better oven spring during the early minutes of baking.
Sourdough also develops higher acidity than yeasted dough. That acidity affects crust color, crumb texture, and overall shelf life. It also increases dough strength during high heat expansion.
Baking sourdough requires greater attention to timing. Proofing too long weakens structure, while under-proofing causes tight crumb and bursting. Oven behavior directly determines the final result.
Heat transfer plays a larger role in sourdough crust formation. Rapid heat causes trapped gas to expand quickly, producing dramatic oven rise. Without strong initial heat, the loaf spreads flat.
Moisture retention is another major difference. Sourdough needs steam in early baking stages to allow proper expansion before crust sets. Home ovens must replicate this effect intentionally.
Understanding Sourdough Starter Strength
Starter strength defines how powerfully the dough will rise in the oven. A strong starter produces consistent fermentation, balanced acidity, and stable dough structure. Weak starter causes dense crumb and limited oven spring.
A healthy starter doubles in size within a predictable time window after feeding. This behavior signals active yeast and bacteria populations. Sluggish rise indicates insufficient fermentation power.
Temperature heavily affects starter performance. Warm environments accelerate activity, while cold slows fermentation. Home bakers must adjust feeding schedules based on kitchen temperature.
Hydration level of the starter also controls fermentation behavior. Thick starters ferment slowly and develop sharper acidity. Thin starters ferment faster with milder flavor.
Flour choice influences microbial diversity in the starter. Whole grain flours introduce more natural yeast and bacteria than refined flour. This can strengthen fermentation over time.
Using an underdeveloped starter leads to many home oven failures. Loaves remain tight, under-aerated, and uneven in structure. Starter health is the foundation of successful sourdough baking.
Dough Hydration and Flour Selection
Hydration level controls dough softness, extensibility, and crumb openness. Higher hydration produces larger holes and lighter crumb. Lower hydration yields tighter crumb and easier shaping.
Home ovens generally perform better with moderate hydration dough. Very high hydration dough requires precise steam and temperature control. Without proper control, dough spreads instead of rising.
Flour protein content directly affects gluten strength. High-protein bread flour supports better gas retention. Low-protein flour weakens the dough structure.
Whole wheat and rye flours ferment faster due to higher enzyme activity. They also absorb more water than white flour. Hydration must be adjusted when using these grains.
Blending multiple flour types balances flavor, strength, and fermentation speed. Many home bakers use a mix of bread flour and whole wheat flour. This improves both oven spring and taste.
Improper hydration creates structural instability during baking. Too wet leads to collapse, while too dry restricts expansion. Balanced hydration is essential for predictable oven behavior.
Shaping, Proofing, and Dough Readiness
Shaping controls how gas is distributed inside the dough before baking. Proper shaping creates surface tension that supports upward expansion in the oven. Poor shaping causes flat loaves.
Proofing allows gas to accumulate inside the dough structure. It must reach a balanced point between elasticity and expansion. Over-proofed dough loses strength and spreads easily.
Under-proofed dough resists expansion and bursts unpredictably in the oven. It often forms dense crumb with thick crust. The balance between strength and gas pressure determines outcome.
Finger poke testing is commonly used to assess readiness. Slow spring-back indicates proper proofing. Immediate spring-back indicates under-proofing.
Temperature of proofing environment affects fermentation speed. Warm rooms shorten proof time, while cool rooms extend it. This timing must be adjusted carefully for consistent results.
Cold proofing in a refrigerator improves flavor complexity and dough strength. It also allows easier scoring and better oven spring. Many home bakers rely on cold proofing for stability.
Home Oven Setup for Sourdough Baking
Home ovens differ from bakery ovens in heat retention and steam control. Most home ovens vent moisture aggressively. This makes steam management essential for sourdough baking.
Preheating is critical for developing strong initial heat. Baking surfaces such as pizza stones or steel plates must reach full temperature. This provides rapid bottom heat transfer.
Rack position controls air circulation and crust development. Middle rack placement produces balanced top and bottom heat. Lower racks increase bottom browning intensity.
Convection fan behavior must be evaluated carefully. Some ovens circulate air too aggressively. This can dry crust prematurely and limit oven spring.
Door opening during early baking stage releases steam and heat. This disrupts crust formation. Door discipline during first 15 minutes is extremely important.
Baking vessels such as Dutch ovens, combo cookers, or inverted metal bowls create micro steam chambers. These help replicate professional oven environments within a home kitchen.
Steam Creation Methods in Home Ovens
Steam plays a critical role during the first stage of sourdough baking. It delays crust formation and allows maximum oven spring. Without steam, the crust sets too early and restricts expansion.
Home ovens do not naturally hold steam well. Most models are designed to vent moisture for safety. This forces bakers to create steam manually using different methods.
One common method is placing a preheated metal tray at the bottom of the oven. Hot water is poured into the tray immediately after loading the dough. The sudden evaporation creates a burst of steam.
Another effective method is baking inside a Dutch oven or heavy covered vessel. The moisture released from the dough gets trapped inside. This creates a natural steam chamber around the loaf.
Spraying the oven walls with water is also used by some bakers. This method creates initial moisture but dissipates quickly. It is less reliable than tray or vessel methods.
Steam must be present only during the early phase of baking. After the loaf expands fully, steam should be released to allow proper crust drying and browning. This balance defines the final crust texture.
Why is steam necessary for sourdough baking?
Steam delays crust setting and allows full loaf expansion. It directly improves oven spring and crust quality.
Can sourdough bake without steam in a home oven?
Yes, but oven spring and crust texture will be reduced. Steam greatly improves overall results.
Is a Dutch oven the best way to create steam?
Yes, it traps natural moisture from the dough effectively. It requires no additional water input.
Does spraying water inside the oven work?
It creates temporary steam but dissipates quickly. It is less consistent than other methods.
When should steam be removed during baking?
Steam should be removed after initial expansion. This allows the crust to brown and harden properly.
Temperature Control and Preheating Strategy
Proper temperature control is essential for sourdough success in a home oven. Sourdough requires strong initial heat for oven spring. Weak heat leads to flat and dense loaves.
Most sourdough loaves bake best between 450 and 500 degrees Fahrenheit. This high temperature helps rapid gas expansion inside the dough. It also promotes proper crust development.
Preheating should last at least 45 to 60 minutes. Baking stones or steels require deep heat saturation. Short preheating causes heat loss when the dough is loaded.
Temperature fluctuations are common in home ovens. Cycling elements cause brief drops and spikes during baking. These fluctuations must be anticipated during timing adjustments.
Oven thermometers help verify actual internal temperature. Many home ovens run hotter or cooler than the display setting. Correct calibration prevents underbaking or burning.
Temperature should be lowered slightly after the initial spring phase. This allows the interior crumb to set without over-darkening the crust. Controlled temperature progression improves texture.
Baking Without a Dutch Oven
Baking sourdough without a Dutch oven is completely possible in home ovens. It only requires proper steam and heat management. Many bakers prefer open-bake methods for larger loaves.
The towel and tray method is one effective option. A soaked towel placed in a metal pan produces steady steam. This method releases moisture gradually during early baking.
Another method uses inverted roasting pans as steam covers. The cover traps moisture around the loaf. After initial expansion, the cover is removed.
Direct stone baking also works when sufficient steam is present. The stone supplies strong bottom heat. Combined with steam, it supports excellent oven spring.
Without a Dutch oven, crust color may develop faster. Steam timing becomes more sensitive. Bakers must monitor crust development closely during mid-bake.
Open baking allows better crust blistering in some ovens. It also enables baking multiple loaves at once. This makes it ideal for home batch baking sessions.
Can sourdough be baked without a Dutch oven at all?
Yes, open baking works well with proper steam control. A Dutch oven is helpful but not mandatory.
What is the best steam method without a Dutch oven?
The hot tray and boiling water method is very effective. It creates strong initial steam.
Does open baking change crust texture?
Yes, crust often becomes thinner and crisper. Steam timing strongly affects this outcome.
Can I bake multiple loaves without Dutch ovens?
Yes, open baking allows multiple loaves on one stone. This is efficient for batch baking.
Is stone baking necessary without a Dutch oven?
It is not mandatory but strongly recommended. It improves bottom heat transfer and oven spring.
Crust, Crumb, and Internal Doneness
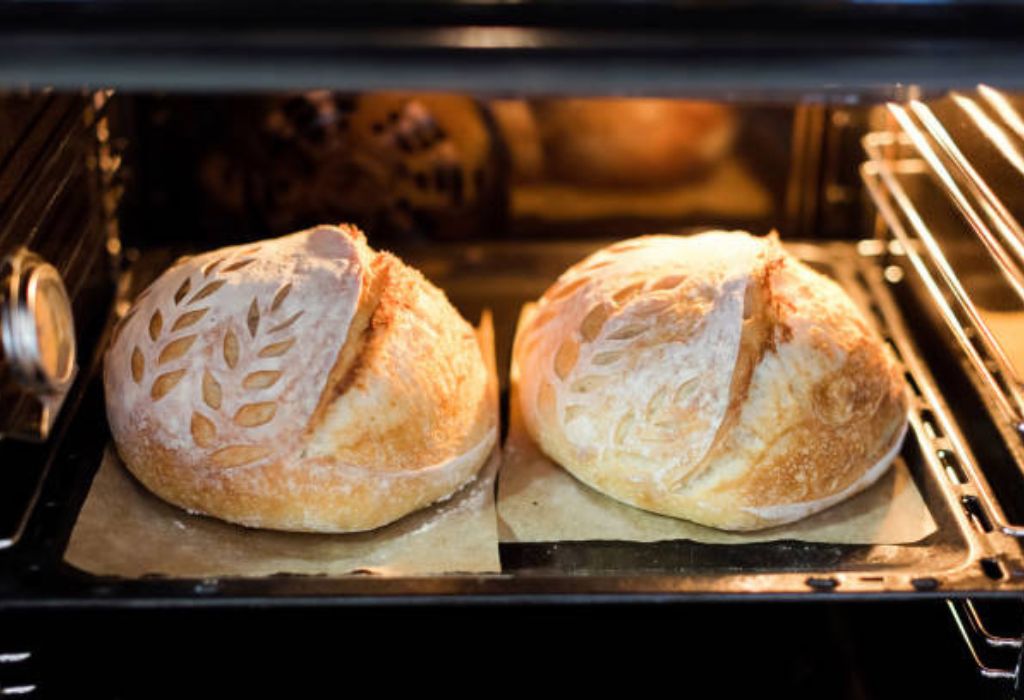
Crust formation begins in the first minutes of baking. Steam keeps the surface flexible during expansion. Once steam escapes, the crust begins to harden.
Crumb structure depends on fermentation strength and hydration. Strong fermentation produces open airy crumb. Weak fermentation results in tight dense crumb.
Internal doneness must be verified before cooling. Most sourdough loaves finish between 208 and 212 degrees Fahrenheit internally. This confirms proper starch gelatinization.
Underbaked loaves feel gummy inside after slicing. Overbaked loaves become dry and brittle. Internal temperature is the most reliable doneness indicator.
Cooling is also part of the baking process. Steam redistributes inside the loaf during cooling. Cutting too early collapses internal crumb structure.
Crust continues to harden as moisture escapes during cooling. This final drying phase improves crust crunch. True sourdough texture develops fully after complete cooling.
What causes pale crust on sourdough?
Insufficient heat or steam causes pale crust. Proper steam and high temperature improve browning.
Why is my sourdough crumb dense?
Dense crumb comes from weak fermentation or under-proofing. Starter strength and timing must be corrected.
What internal temperature confirms doneness?
Between 208 and 212 degrees Fahrenheit indicates full doneness. Below this range risks gummy crumb.
Should sourdough cool before slicing?
Yes, at least one full hour is recommended. This allows crumb structure to fully set.
Can overbaking ruin sourdough texture?
Yes, overbaking dries the crumb excessively. It also produces overly thick crust.
Common Home Oven Sourdough Baking Mistakes
One common mistake is rushing proofing time. Under-proofed dough lacks proper gas development. This leads to tight crumb and weak oven spring.
Another frequent mistake is insufficient preheating. Baking stones and steel require deep heat saturation. Without it, bottom crust remains pale and undercooked.
Excess flour during shaping weakens surface tension. This prevents proper upward expansion. Dough spreads wide instead of rising tall.
Opening the oven door during early baking releases steam. This stops proper expansion immediately. The loaf loses potential height and volume.
Incorrect scoring also affects oven expansion. Shallow or misplaced scores restrict controlled expansion. This forces random cracking across the surface.
Inconsistent timing between bakes creates unpredictable results. Reproducibility depends on stable routine. Sour dough demands consistent process control.
Why does my sourdough spread flat in the oven?
Flat loaves come from over-proofing or weak shaping. Surface tension must be properly built.
Is short preheating a serious baking error?
Yes, it prevents effective bottom heat transfer. This reduces oven spring significantly.
Does too much flour affect oven rise?
Yes, excess flour interferes with surface tension. This weakens structural support.
Why should I avoid opening the oven early?
Opening releases heat and steam instantly. This stops controlled dough expansion.
Can bad scoring ruin oven spring?
Yes, incorrect scoring restricts expansion paths. It causes random cracking instead of controlled bloom.
Conclusion
Baking sourdough in a home oven is a skill that blends fermentation science with heat control and timing.
The oven becomes the final transformation chamber where natural fermentation turns into structure, texture, and flavor. Without proper steam, heat, and timing, even well fermented dough can fail in its final moments.
Every stage from starter strength and dough hydration to shaping, proofing, and steam control influences the final loaf.
Home ovens lack the natural humidity and heat stability of commercial decks. This makes manual steam creation and extended preheating absolutely essential for success.
Crust and crumb develop together through controlled expansion and proper doneness. Internal temperature, cooling discipline, and slicing timing complete the process. Each step works together as one connected system.
When these elements are balanced correctly, a home oven becomes fully capable of producing bakery-level sourdough.
With consistency, patience, and process control, sourdough baking becomes repeatable instead of unpredictable. Mastery comes not from tools alone but from understanding how heat, moisture, and fermentation interact.
I’m Emma J. Caldwell, the founder, lead writer, and home-cooking enthusiast behind KitchenGuideCo.com. With a background in culinary arts and over a decade of cooking experience in both professional and personal kitchens, I created this platform to demystify recipes, offer smart kitchen gadget reviews, and guide readers through meal prep with confidence and clarity.