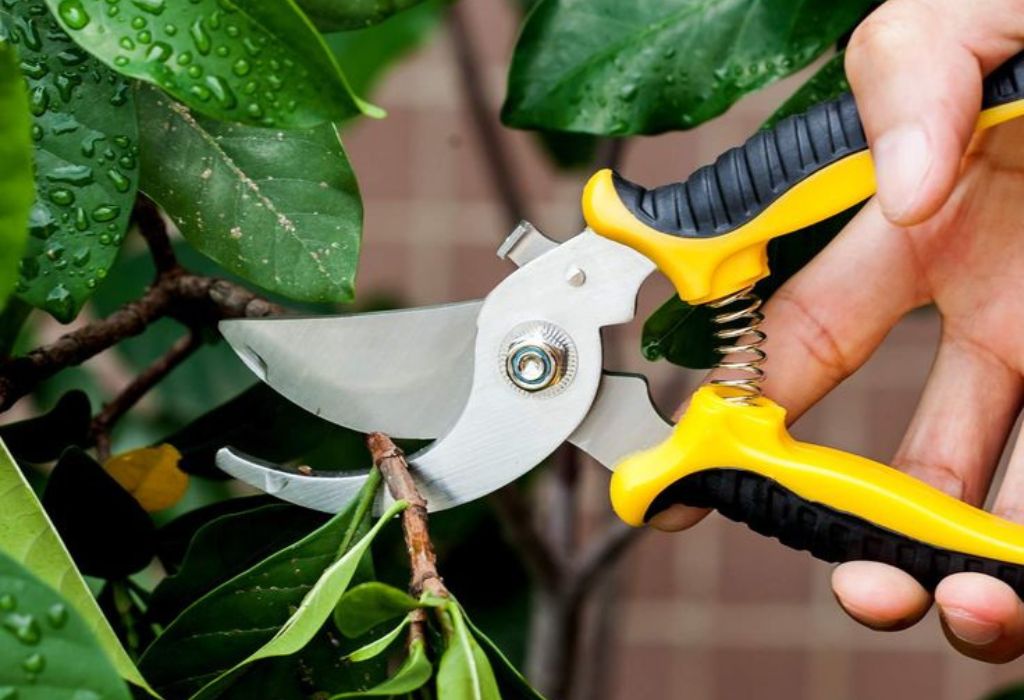
Every gardener knows the frustration of reaching for pruning shears only to find them sticky with sap, dulled by rust, or clogged with dirt. Instead of slicing cleanly through stems, the blades crush and tear, leaving behind ragged wounds that harm plants more than help them.
The reality is that pruning shears endure some of the toughest conditions in the garden. From constant exposure to plant juices and soil particles to damp environments that encourage corrosion, these simple tools face daily wear that shortens their life if left untreated.
The problem extends beyond tool performance. Dirty blades can spread fungal spores and bacterial pathogens from one plant to another.
According to horticultural research, contaminated tools are responsible for a significant portion of disease transmission in home gardens and orchards, with sanitization reducing the risk by up to 40% (University of Minnesota Extension).
This makes cleaning more than just a maintenance step—it becomes an essential practice for plant health.
The good news is that cleaning and protecting pruning shears is far easier than most assume. With just a few household supplies and a consistent routine, blades can stay sharp, rust-free, and ready for years of reliable use.
Regular maintenance not only prevents corrosion but also reduces the force needed during pruning, saving the gardener’s hands from unnecessary strain.
Why Clean Pruning Shears Matters
Pruning shears may look like simple hand tools, yet their cleanliness determines how well they perform and how long they last. Blades that are left dirty after use quickly lose efficiency, and the damage extends to both tool and garden.
When shears are not cleaned, sap builds up along the cutting edge. This sticky residue hardens over time, creating drag on each cut. Even a thin layer of sap reduces sharpness and makes pruning twice as difficult. The blades no longer glide but instead crush, forcing the gardener to apply more pressure.
Rust is an even greater threat. Moisture trapped in joints or left on the blade surface corrodes metal within days. Rust roughens the cutting edge, leaving scratches that weaken the blade and shorten its life. If left unchecked, corrosion can eat into the metal so deeply that replacement becomes the only option.
Cleanliness is also vital for plant health. Bacteria, fungi, and viruses often cling to the surface of blades after cutting infected plants. Without disinfection, these pathogens move from one plant to another, spreading disease through an entire garden. Clean blades reduce this risk dramatically by ensuring each cut starts fresh.
Regular cleaning also improves safety. Dull or dirty blades require more force to cut, which increases the chance of slipping and accidental injury. Clean, sharp blades cut with less effort, reducing strain on hands and wrists while giving the gardener better control.
Finally, caring for pruning shears protects long-term value. Quality shears are an investment, and simple cleaning habits prevent premature wear, meaning fewer replacements and more seasons of reliable use. Clean blades are sharper, safer, healthier, and more economical.
Tools & Supplies Needed for Cleaning & Disinfection
Cleaning pruning shears requires only a handful of inexpensive supplies, most of which are already available in the average household. The goal is to remove sap, sanitize the surface, prevent rust, and protect the moving parts, all while avoiding harsh chemicals that could damage the blades.
The foundation of cleaning is warm, soapy water. Dish soap mixed with water dissolves sticky plant residue and softens dirt. A small bucket or sink is usually enough for soaking, while a sponge or cloth handles surface cleaning. For tougher buildup, a stiff brush helps scrub debris from crevices.
To remove rust and stubborn stains, more abrasive tools are required. Steel wool, wire brushes, or fine sandpaper gently scrape corrosion from the surface without cutting too deeply into the metal. For those who prefer a less abrasive option, a paste of baking soda or a soak in vinegar can also loosen rust.
Disinfection is another step, especially when pruning diseased plants. A spray or wipe with 70% isopropyl alcohol kills most pathogens instantly and evaporates quickly without residue. For gardeners who prefer traditional methods, a 10% bleach solution is also effective, though it requires thorough rinsing afterward to prevent corrosion. Hydrogen peroxide is another option for safe, fast sanitization.
Lubrication protects metal parts after cleaning. Light machine oil, mineral oil, or specialty tool oils keep blades moving smoothly and create a barrier against moisture. Camellia oil, commonly used in woodworking, is also popular for garden tools because of its rust-preventive qualities.
Lastly, protective gear is important. Gloves prevent accidental cuts and shield skin from cleaners, while safety glasses protect eyes from rust flakes or cleaning splashes. Having all supplies ready before beginning ensures a smooth process that restores tools without interruption.
Step-by-Step Process: How to Clean Pruning Shears and Prevent Rust Fast
Cleaning pruning shears involves several stages: removing debris, disinfecting, addressing rust, drying thoroughly, and applying protective oil. Each step builds on the previous one to ensure the tool is not just clean but also protected from future damage.
Pre-Cleaning and Removing Sap
The first step is to remove any dirt, leaves, or sap clinging to the blades. Warm water with dish soap works best for loosening residue. A sponge or brush can scrub away buildup, while rubbing alcohol is effective for dissolving stubborn sap. Plant resins are sticky and acidic, so removing them quickly prevents corrosion and staining.
Soaking the shears for a few minutes softens hardened sap, but long soaks should be avoided to prevent moisture from seeping into joints. Once residue is removed, rinse with clean water to eliminate any soap film. This prepares the blades for disinfection.
Disinfecting the Blades
Disinfection is essential when pruning plants that may carry disease. Spraying or wiping blades with isopropyl alcohol kills most bacteria and fungi instantly. Unlike bleach, alcohol evaporates quickly and does not need rinsing.
For stronger treatment, especially after cutting infected branches, a dip in 10% bleach solution is effective. However, bleach can corrode metal if left on too long, so blades must be rinsed and dried thoroughly afterward. Hydrogen peroxide offers a gentler alternative, safe for metal yet strong enough to sanitize effectively.
Removing Rust
If rust is visible, it must be removed before lubrication. A wire brush or steel wool scrubs off surface corrosion, while fine sandpaper smooths the blade’s surface. For light rust, a vinegar soak or baking soda paste loosens particles so they can be wiped away.
It is important to work carefully, avoiding aggressive grinding that could damage the cutting edge. The goal is to restore smooth metal, not remove excessive material. Once rust is cleared, the blade should feel smooth to the touch.
Drying and Lubricating
Drying is the most crucial step to prevent future rust. Every part of the shear, including the pivot bolt and joints, must be dried completely with a clean cloth. Moisture left behind is the leading cause of corrosion.
Once dry, lubrication seals the surface. A thin layer of oil applied to blades, pivot points, and springs creates a barrier against air and moisture. Excess oil should be wiped away to prevent sticky buildup. This protective layer keeps the shears moving smoothly and rust-free until the next use.
Final Storage
After cleaning, disinfecting, and oiling, proper storage ensures long-lasting protection. Shears should be kept in a dry place, away from damp floors or condensation. Hanging them on a wall or storing in a toolbox with silica gel packets helps control moisture. Some gardeners even store shears in a bucket of sand mixed with oil, which both cleans and coats the blades every time they are inserted.
Common Mistakes & Trouble Spots
Even with the right supplies, mistakes during cleaning can undo the effort. The most common error is leaving tools damp. Water trapped in joints quickly causes rust, which then spreads across the blade. Drying thoroughly after every wash is essential.
Another mistake is relying too heavily on bleach. While bleach is an effective disinfectant, it corrodes metal if not rinsed quickly. Alcohol or hydrogen peroxide are safer for frequent use.
Using abrasive materials too aggressively also causes damage. Heavy grinding with coarse sandpaper or metal files removes too much material, leaving the blade thin and fragile. Rust should be removed carefully, preserving the original edge.
Neglecting the pivot and spring is another oversight. Sap and dirt collect in these moving parts, making the shears stiff even if the blades are sharp. Cleaning and oiling the joints ensures smooth performance.
Storage is often overlooked as well. Leaving shears in a damp shed or on the ground invites rust no matter how well they were cleaned. Proper storage in a dry environment completes the cleaning process and protects the effort invested.
Frequency of Cleaning & Maintenance Schedule

The frequency of cleaning depends on how often the shears are used and the conditions in which they operate. For heavy use, especially during pruning season, blades should be cleaned after every session to prevent sap buildup and pathogen spread.
Light use requires less frequent attention, though blades should still be wiped clean after contact with plants. At minimum, pruning shears should be disinfected at the end of each season, with a deep cleaning before long-term storage.
Climate also influences cleaning needs. In humid or rainy areas, rust forms faster, requiring more frequent drying and oiling. Shears used in dry climates may not rust as quickly but still benefit from regular disinfection.
Developing a routine helps prevent neglect. A quick wipe after each use, combined with seasonal deep cleaning, keeps tools reliable. End-of-season maintenance should always include full cleaning, disinfection, oiling, and storage in a dry location.
Advanced Tips & Products
Experienced gardeners often use advanced methods to extend the life of their tools. Stropping the blade with leather after cleaning polishes the edge and removes microscopic burrs, ensuring smoother cuts.
Guided sharpening systems can also be used after cleaning to restore factory-level sharpness. These devices maintain the correct angle for the blade, reducing user error.
For rust prevention, specialty oils and sprays are available. Silicone-based sprays create a long-lasting protective layer, while camellia oil offers a natural, non-toxic option. Some gardeners also use WD-40 for quick protection, though dedicated tool oils last longer.
Investing in quality pruning shears also pays off. Stainless steel blades resist rust better than carbon steel, though both require regular cleaning. Premium shears often come with replaceable parts, making it easier to maintain them over decades.
Conclusion
Clean pruning shears are the key to healthy plants and long-lasting tools. Dirt, sap, and rust not only slow performance but also spread disease and shorten tool life. By learning how to clean pruning shears step by step—removing debris, disinfecting, drying, oiling, and storing—gardeners ensure every cut is smooth and safe.
Maintenance is not complicated or time-consuming. A few minutes of care after each use prevents hours of frustration later. The result is sharper blades, healthier plants, and tools that last for many years.
Now is the time to check the shears waiting in storage. Clean the blades, apply protective oil, and give them the care they deserve. A consistent routine keeps every cut crisp, every plant healthier, and every gardening season more rewarding.
I’m Emma J. Caldwell, the founder, lead writer, and home-cooking enthusiast behind KitchenGuideCo.com. With a background in culinary arts and over a decade of cooking experience in both professional and personal kitchens, I created this platform to demystify recipes, offer smart kitchen gadget reviews, and guide readers through meal prep with confidence and clarity.