Figuring out how much water for rice cooker can trip up many new cooks. It’s a common stumbling block, right? Too much water and your rice turns into a mushy mess. Too little, and it’s dry and crunchy. Don’t worry, though! It’s easy once you know the basics. This guide will give you a simple, step-by-step solution so you can cook perfect rice every time. Let’s get started and explore the best method!
The Basics: Water-to-Rice Ratio
The correct water-to-rice ratio is the cornerstone of great rice. It’s the most important factor in achieving perfect results with your rice cooker. This ratio isn’t a fixed number; it’s a guide, and slight adjustments might be needed based on the type of rice and even the altitude you’re cooking at. Measuring the ingredients accurately is more important than using a specific brand or fancy techniques. Let’s get into the main factors to achieve that perfect rice!
Understanding Different Rice Types
Different types of rice absorb water at different rates, directly influencing the amount of water needed. For example, long-grain rice like basmati or jasmine typically needs a different water-to-rice ratio than short-grain rice like sushi rice or Arborio. When you’re ready to cook rice, start by exploring the package for specific instructions, but understanding general guidelines is really helpful.
- Long-Grain Rice (Basmati, Jasmine): These types usually require a water-to-rice ratio of 1:1.5 or 1:2. This means for every 1 cup of rice, you’ll use 1.5 to 2 cups of water. It results in fluffy, separate grains, ideal for dishes like biryani or simple side dishes.
- Short-Grain Rice (Sushi, Arborio): Short-grain rice, known for its stickier texture, often requires less water. A ratio of 1:1 is often sufficient. This stickiness is perfect for sushi rolls, risotto, and rice puddings.
- Medium-Grain Rice: This is the middle ground, where you can cook rice with 1:1.5 cups of water for every cup of rice.
- Brown Rice: Because of the bran layer, brown rice needs more water than white rice. Expect to use a ratio of 1:2 or even a bit more. It also takes longer to cook.
Remember that the recommended ratios are always starting points. The ideal water amount also depends on factors like the age of the rice and even how humid it is where you are cooking.
Using the Right Measuring Tools
Using the correct measuring tools is essential. Rice cookers often come with their own measuring cup, which may not be the same size as a standard US cup. Always use the cup that came with your rice cooker for consistent results. This prevents you from using too much or too little water.
- Rice Cooker Cup: This is the key tool. The rice cooker’s cup is typically smaller than a standard cup, around 180 ml (6.1 fl oz). Stick with this.
- Liquid Measuring Cups: If you need to measure the water separately, use a liquid measuring cup that has clear markings.
- Accuracy: Make sure the measurements are precise, especially when measuring water.
If you don’t have the cup that came with your rice cooker, don’t stress. A regular measuring cup is usually fine, but you might need to adjust the water amount slightly based on the type of rice.
The Pot Method for Water Ratio
If you have not got a rice cooker and prefer cooking in a pot, the “finger method” can be a super helpful way to work out how much water for rice cooker. Pour the rice into the pot, level it out. Then, add water until it reaches the first knuckle on your index finger when the finger is resting on the rice. This method gives you a basic 1:2 ratio, but you might need a bit more or less based on the rice. It’s a good starting point!
- Leveling the Rice: Spread the rice evenly in the pot before adding water. This helps with even cooking.
- Water Level: The water should cover the rice and reach your first knuckle.
- Adjustments: After the first cook, adjust as needed. If the rice is too dry, add a little more water next time. If it’s too wet, use slightly less.
The finger method is especially helpful if you’re cooking rice on the stovetop and don’t have a rice cooker. It’s also a good way to check whether you need to adjust your water ratio, even if you are using a rice cooker.
Step-by-Step Guide to Cooking Rice
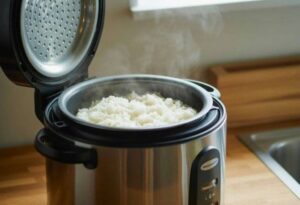
Now, let’s explore a simple, easy-to-follow guide to cooking rice in a rice cooker. We’ll go over everything, from preparing the rice to the final serving. This process is straightforward, and following these steps will help you achieve perfect rice every time.
Preparing the Rice
Proper preparation is key. This step helps remove excess starch, which can make your rice sticky. It also cleans the rice, removing any dust or debris. It’s a simple, but helpful step that makes a difference in your final results.
- Measure the Rice: Use the cup that came with your rice cooker to measure the right amount of rice.
- Rinse the Rice: Place the rice in a bowl and cover it with cold water. Gently swirl the rice with your hand. The water will become cloudy.
- Drain and Repeat: Drain the water, then repeat the rinsing process until the water runs clear. This usually takes two to three times.
- Transfer to the Cooker: Place the rinsed rice in the rice cooker pot.
Rinsing the rice is a basic, but it removes excess starch. This helps keep your rice from getting overly sticky, resulting in better texture. It’s a quick step that significantly improves the final product.
Adding Water and Cooking
After rinsing, it’s time to add the correct amount of water. This step is about getting the ratio right. Once you’ve added the water, the rice cooker will do the rest. Here is what you must do.
- Add Water: Use the measuring cup or follow the instructions for your rice cooker. For white rice, the ratio is commonly 1:1. For brown rice, you’ll usually need more water.
- Let It Rest: Before starting, let the rice sit for about 15-30 minutes. This allows the grains to absorb some of the water.
- Start the Cooker: Close the lid and press the “cook” button. Most rice cookers automatically switch to “warm” mode once the rice is done.
- Do Not Lift the Lid: Resist the temptation to open the lid during cooking, which can release steam and affect the final texture.
Make sure you select the correct setting on your rice cooker based on the type of rice you’re cooking. Many rice cookers have special settings for white, brown, and other rice types. This guarantees that your rice cooks properly.
Fluffing and Serving
After the rice cooker has finished cooking, there’s one more key step: fluffing. This breaks up the grains and helps release excess steam. It prevents the rice from clumping together. This simple step makes a big difference.
- Wait: Let the rice sit in the cooker for about 10 minutes after it’s finished cooking. This allows the steam to redistribute.
- Fluff the Rice: Use a rice paddle or fork to gently fluff the rice. Break up any clumps.
- Serve: Serve immediately or keep it warm in the rice cooker until ready to eat.
If you don’t have a rice paddle, a fork works just as well. Gently fluffing keeps the rice from becoming a sticky mass. It’s a simple way to achieve the perfect texture.
Troubleshooting Common Rice Cooker Problems
Even with the best instructions, you might encounter issues. Let’s explore common problems and how to solve them. Knowing how to troubleshoot can make sure you cook great rice every single time.
Rice Too Mushy
Mushy rice is a sign of too much water. It can result from using the wrong water-to-rice ratio, or the rice cooker pot might have been overfilled. Here’s how to fix it.
- Reduce Water: Next time, use less water. If using a rice cooker, try adjusting the water level slightly.
- Check Your Measurements: Ensure you are using the correct measuring cup.
- Cooking Time: Be aware that overcooking can result in mushy rice.
If your rice is too mushy, it’s likely a water problem. Always double-check your measurements, and try to adjust the water level. This will improve your chances of getting the right texture.
Rice Too Dry or Burnt
Dry or burnt rice is often a result of too little water. It can also happen if the rice cooker is set for too long or if the cooker is not working well. Here’s what to do.
- Add More Water: Next time, add a bit more water to the rice.
- Check the Cooker: Make sure your rice cooker is working as expected.
- Rice Type: Using the wrong rice type can also result in dry rice.
Always make sure you’re using the recommended water amount for the rice type. If it still comes out dry, add a little extra water next time. This will improve your results.
Sticky Rice
Sticky rice isn’t always a bad thing, but it’s often a sign of excess starch. Some rice varieties are naturally stickier, but excess starch makes it even more clumpy. These are the steps to improve it.
- Rinse Well: Always rinse your rice thoroughly before cooking to remove surface starch.
- Ratio: Ensure you’re using the recommended water ratio for the type of rice.
- Fluff Gently: After cooking, fluff the rice gently with a fork or rice paddle.
Rinsing the rice is a super effective way to cut down on stickiness. Always fluff the rice well after cooking. This will help you get the best texture.
Adapting to Different Rice Cooker Models
Not all rice cookers are the same. Some come with extra features. Knowing how to use these features can make your rice cooking even better. Here’s how to adjust for these variations.
Advanced Settings
More complex rice cookers often have advanced settings like timers and different cooking modes. This will help you customize your rice cooking. Learning about these functions will greatly improve your results.
- Timers: Use timers to cook rice at a specific time.
- Cooking Modes: Try the “Quick Cook” or “Slow Cook” options.
- Pressure Cooking: Some cookers have pressure cooking functions that can cook rice very quickly.
Check the instructions for your specific rice cooker to get the most out of these settings. Experiment with different settings until you find what works best.
Specialty Rice Cookers
Different specialty rice cookers are designed to handle specific types of rice or cooking methods. Knowing their special features can improve your cooking.
- Induction Heating: These cookers provide even heating for more consistent results.
- Fuzzy Logic: These cookers automatically adjust cooking times and water amounts.
- Multi-Cookers: These cookers can cook more than just rice, often including a steamer.
Each model has its own unique features. Read the manual to discover the best way to utilize your specific appliance.
Beyond the Basics: Flavor and Additions
Once you’ve mastered the basic water ratio, explore ways to add flavor and ingredients. Rice is a great base for many dishes, so why not explore these tasty tips?
Adding Flavor to Your Rice
You can greatly improve your rice by adding flavorings directly to the cooking water. This infuses the rice with flavor. Experiment with spices, herbs, or broths.
- Broth: Use chicken, vegetable, or beef broth instead of water for extra flavor.
- Spices and Herbs: Add bay leaves, garlic cloves, or other spices.
- Salt: A pinch of salt enhances the natural flavor.
Simple additions can make a huge difference. Don’t be afraid to experiment to find what you prefer. This will help you find tasty combinations.
Adding Ingredients During Cooking
You can cook other ingredients with your rice. This method saves time and adds different flavors and textures. It is an easy way to improve your recipes.
- Vegetables: Add chopped vegetables to the rice cooker.
- Protein: Cook chicken or other proteins. Make sure the protein is fully cooked.
- Dried Fruits and Nuts: These can be added to the cooked rice for a sweet flavor.
Make sure you adjust the water ratio slightly if adding more ingredients. Start by adding small amounts and explore as you gain more experience.
| Ingredient | Added | Effect |
|---|---|---|
| Chicken Broth | Water Replacement | Adds savory flavor |
| Bay Leaf | During Cooking | Subtle aroma |
| Chopped Vegetables | During Cooking | Adds texture |
Frequently Asked Questions
Question: What if my rice cooker doesn’t have a measuring cup?
Answer: If your rice cooker doesn’t have a measuring cup, you can use a standard measuring cup. However, you might need to adjust the water amount slightly based on your rice cooker’s instructions.
Question: Can I add salt to the rice while it’s cooking?
Answer: Yes, you can add a pinch of salt to the rice while it’s cooking. Salt enhances the flavor of the rice.
Question: Should I open the lid while the rice is cooking?
Answer: Try to avoid opening the lid while the rice is cooking. Opening the lid can release steam, which could affect the final texture of the rice.
Question: How can I prevent the rice from sticking to the bottom of the cooker?
Answer: Rinsing the rice before cooking helps prevent sticking. Also, using the correct water ratio and fluffing the rice after it cooks can help.
Question: Can I use tap water for cooking rice?
Answer: Yes, you can generally use tap water for cooking rice. However, if your tap water has a strong taste or smell, you might want to consider using filtered water.
Final Thoughts
Getting the right amount of water is the key to perfect rice. Using the right water-to-rice ratio, rinsing your rice, and following a step-by-step cooking guide will make the process easier. Remember to use the measuring cup that came with your rice cooker, if you have it. The different types of rice need different amounts of water, so know the basics. Start with the recommended ratios and adjust according to your tastes. Explore adding flavorings and ingredients. Once you get a feel for it, you will get the hang of it quickly! Now go and cook some rice!
I’m Emma J. Caldwell, the founder, lead writer, and home-cooking enthusiast behind KitchenGuideCo.com. With a background in culinary arts and over a decade of cooking experience in both professional and personal kitchens, I created this platform to demystify recipes, offer smart kitchen gadget reviews, and guide readers through meal prep with confidence and clarity.