Every gardener knows the frustration of trying to cut through branches with dull pruning shears. Instead of a clean slice, the stems are crushed and torn, leaving plants vulnerable and making the task exhausting.
The problem often starts unnoticed. Shears that once cut effortlessly slowly lose their edge until pruning becomes a battle with every squeeze.
This dullness is not just inconvenient. Research shows that plants with ragged cuts heal up to 30% slower than those with clean edges, making them more prone to disease and pest invasion (University of Florida IFAS).
The curiosity lies in how simple the solution can be. Many gardeners believe sharpening shears requires special equipment or professional help, yet basic tools and a few easy steps are enough to restore razor-sharp performance.
Learning how to sharpen pruning shears properly is not just about plant health. It also extends the lifespan of your tools, saving money and reducing the need for frequent replacements.
According to industry reports, regular maintenance can extend the working life of garden tools by more than 40% (National Gardening Association). That means a small investment of time pays back with seasons of smooth, efficient cutting.
The real benefit is felt in every cut. Sharp pruning shears glide through branches effortlessly, leaving behind tidy wounds that heal quickly and encourage new growth.
Why Sharp Pruning Shears Matter
Pruning shears may look simple, yet their condition has a powerful effect on garden health. A sharp blade makes the difference between thriving plants and slow-healing wounds.
When blades are dull, they crush stems instead of slicing cleanly. This tearing creates jagged edges that invite bacteria, fungi, and pests into the plant tissue.
The damage often spreads invisibly. Small infections that begin at a ragged cut can weaken an entire shrub or tree over time.
Sharp pruning shears prevent this hidden threat by producing smooth, precise cuts. Clean edges allow plants to seal wounds quickly, reducing the chance of disease and decay.
A sharp edge also protects the gardener. Dull blades require more force, which increases the risk of slips, muscle strain, and accidental injury.
Efficiency is another benefit. With razor-sharp blades, branches snap cleanly with minimal effort, turning what once felt like a chore into a fast, satisfying task.
Tool maintenance is equally important. A well-sharpened pair of pruning shears lasts far longer, avoiding premature wear on the blade, pivot, and handle.
Replacing tools repeatedly becomes expensive. Investing a few minutes in sharpening extends their lifespan and saves money across many seasons.
Professional gardeners often emphasize sharpness as a mark of care and skill. It signals not only commitment to plant health but also pride in workmanship.
Learning how to sharpen pruning shears transforms gardening from a struggle into a craft. The benefits reach from the soil to the gardener’s hands.
What happens if pruning shears are dull?
They crush and tear plant tissue, which weakens growth and increases disease risk.
How does a clean cut help the plant?
It heals faster, sealing the wound efficiently and limiting pest entry.
Does sharpening pruning shears save tool life?
Yes, it reduces stress on the blade and prevents unnecessary replacement.
How often should pruning shears be sharpened?
Light use may need seasonal sharpening, while heavy use requires monthly care.
Is sharpness important for safety?
Yes, sharp shears cut easily, while dull blades demand more force and increase injury risk.
Tools & Supplies Needed
Sharpening pruning shears does not require complicated or expensive equipment. A few essential tools can bring even the dullest blades back to life.
The most important supply is a sharpening stone or diamond file. These tools grind the blade’s bevel to restore a razor-sharp edge.
Different grits serve different purposes. A coarse grit removes nicks and reshapes the edge, while a fine grit polishes for a smooth, clean finish.
For smaller adjustments, a pocket sharpener or whetstone is often enough. Gardeners who sharpen frequently often prefer diamond files for speed and durability.
Before sharpening begins, cleaning tools are also needed. A stiff brush, warm soapy water, or steel wool can remove dirt, sap, and rust from the blade surface.
Rust removers or vinegar solutions are effective for stubborn corrosion. This step is vital because debris left on the blade interferes with sharpening.
Lubricating oil is another must-have supply. Light machine oil, camellia oil, or mineral oil keeps the pivot smooth and prevents future rusting.
A screwdriver or wrench may be required if the shears need disassembly. This allows deeper cleaning and access to hidden areas of the pivot.
Protective gear should never be ignored. Gloves protect against accidental slips, and eye protection guards against small filings or rust flakes.
Having all supplies ready ensures the sharpening process flows smoothly. Preparation saves time and guarantees professional-quality results.
What kind of sharpening stone or file is best?
A coarse stone repairs very dull edges, while a fine or diamond file provides a polished, lasting finish.
Can pruning shears be sharpened without disassembling them?
Yes, though taking them apart helps with deeper cleaning and more precise sharpening.
What lubricant should be used after sharpening?
Light machine oil, camellia oil, or mineral oil protects the blade and pivot from rust.
Why is cleaning before sharpening important?
Dirt, sap, and rust block proper contact with the stone and can damage the edge.
Is protective gear really necessary for sharpening?
Yes, gloves and safety glasses reduce the risk of cuts or flying debris.
Step-by-Step Process: How to Sharpen Pruning Shears

Sharpening pruning shears is a process of restoring the blade’s edge, cleaning the surfaces, and ensuring the tool works smoothly. Each step matters, from removing rust to lubricating the pivot, and skipping one can reduce effectiveness.
The process can be broken into four stages: cleaning and rust removal, sharpening and honing, adjusting tension and alignment, and final lubrication and protection.
Cleaning and Rust Removal
Begin by cleaning the shears thoroughly. Dirt, sap, and rust prevent smooth sharpening and can dull the stone or file.
Warm soapy water and a stiff brush work well for basic cleaning. For stubborn sap, rubbing alcohol or vinegar loosens residue without harming the blade.
Rust requires more attention. A soak in a vinegar solution followed by scrubbing with steel wool or a rust eraser removes most corrosion.
Dry the blades immediately to prevent new rust from forming. Once clean, the shears are ready for sharpening.
How do you remove sap safely?
Use warm water and a mild solvent like rubbing alcohol for stubborn buildup.
What’s the best method for rust removal?
Soaking in vinegar and scrubbing with steel wool or a rust eraser works effectively.
Is cleaning before sharpening necessary?
Yes, debris interferes with sharpening and damages the edge.
Can pruning shears be soaked overnight?
Yes, but only in mild solutions such as vinegar to avoid damaging the metal.
Sharpening and Honing the Blade
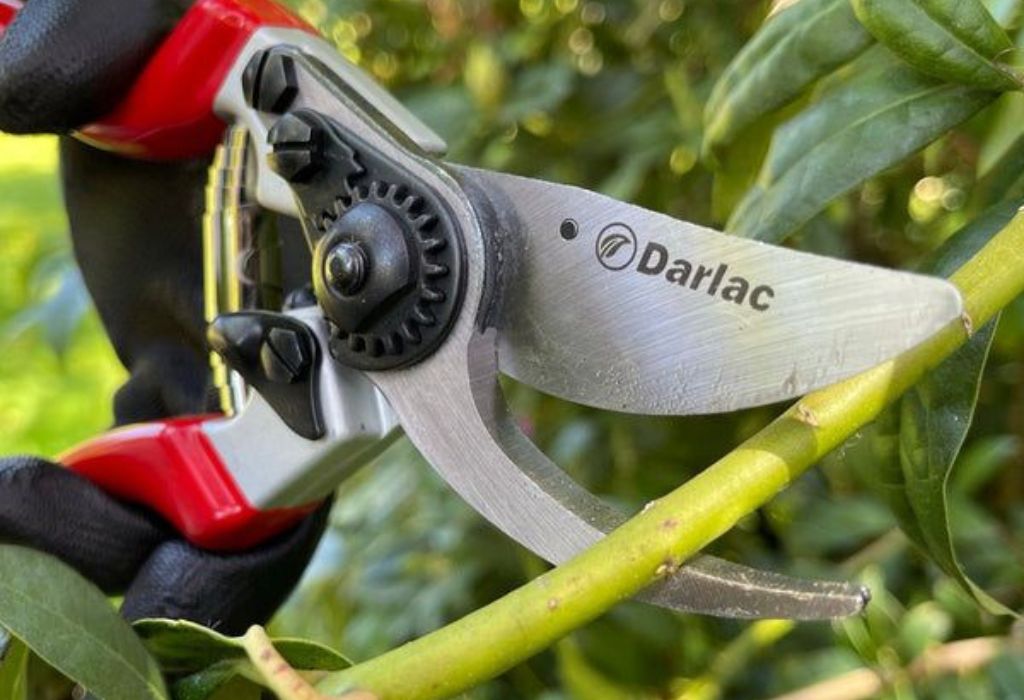
Locate the bevelled edge on the pruning shear blade. This is the angled side that requires sharpening.
Hold the sharpening stone or diamond file at the correct angle, usually 15–25 degrees. Maintaining this angle ensures the blade regains its sharp, precise edge.
Make smooth strokes along the bevel, moving from the base of the blade to the tip. Apply steady, even pressure and repeat 4–6 times depending on dullness.
Switch to a finer grit to polish the edge. This final step removes scratches and prepares the blade for burr removal.
On the flat side, gently slide the stone once or twice to remove burrs. Over-filing this side weakens the blade and should be avoided.
What angle should be used for bypass pruners?
Around 20 degrees is standard, though some designs vary slightly.
How many strokes are needed to sharpen properly?
Four to six strokes usually restore the edge; very dull blades may need more.
What is a burr, and why remove it?
A burr is excess metal that forms along the flat side; removing it prevents rough cuts.
Can a pocket sharpener replace a whetstone?
Yes, for light maintenance, but stones and diamond files give better results.
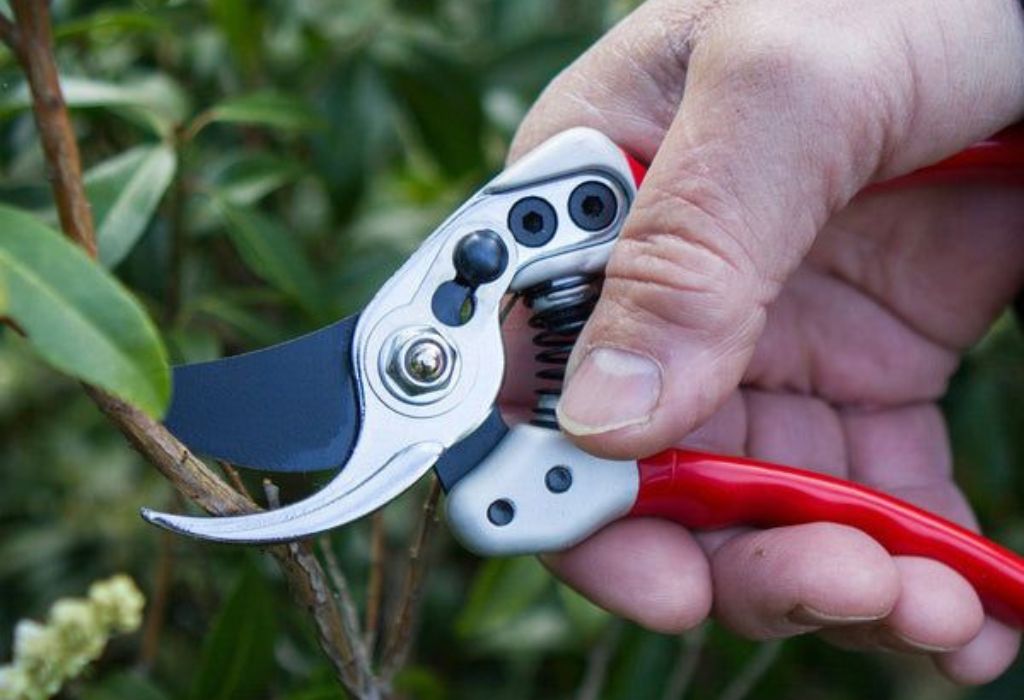
Adjustments, Tension, and Alignment
After sharpening, check the tension screw and pivot point. If too loose, blades will not cut cleanly, and if too tight, the tool may bind.
Tighten or loosen the pivot screw until the blades close smoothly without gaps. Alignment ensures the cutting edge meets properly with every squeeze.
Inspect the nut and bolt for wear. If damaged, replace them to restore full function.
Testing the shears on a small twig confirms correct adjustment. The cut should be clean, with no crushing or tearing.
What if blades still feel loose?
Adjust the pivot screw until movement feels smooth but secure.
Is blade alignment really important?
Yes, even a small gap prevents proper cutting and weakens performance.
How do you test sharpness quickly?
Cut a piece of paper or a small branch; a sharp blade cuts cleanly without force.
Can damaged screws be repaired?
They usually need replacing, since worn threads prevent proper tension.
Lubrication and Protection After Sharpening
Once sharpened and aligned, lubrication is the final step. Apply a few drops of light machine oil or camellia oil to the pivot and blade surface.
Lubrication prevents rust, reduces friction, and extends the lifespan of the tool. Wipe off excess oil to avoid sticky buildup during use.
Store pruning shears in a dry, safe location. Covering the blade or using a sheath provides added protection.
Periodic oiling after use keeps the tool sharp and ready for the next job. With this final step, the sharpening process is complete.
What oil prevents rust best?
Light machine oil, mineral oil, or camellia oil are most effective.
How often should pruning shears be lubricated?
After every sharpening and ideally after each heavy pruning session.
Should oil be applied to the entire blade?
Yes, a light coating protects both the edge and flat surfaces.
What’s the best way to store pruning shears?
In a dry place, preferably covered, and always cleaned after use.
Common Mistakes & Troubleshooting
Sharpening pruning shears may look simple, yet small mistakes can undo all the effort. Understanding these errors prevents wasted time and damaged tools.
One of the most common issues is filing at the wrong angle. If the bevel is too steep, the blade becomes weak, and if too shallow, the edge remains dull.
Another mistake is over-sharpening the flat side of the blade. This can remove too much metal, leading to uneven edges and shorter tool life.
Failing to clean before sharpening is also a frequent problem. Dirt, sap, or rust trapped between the stone and blade causes scratches and weakens the cutting edge.
Many gardeners also forget to check the pivot tension. Even with sharp blades, misaligned or loose pivots create poor, jagged cuts.
Rushing through the process is another hidden culprit. Quick, uneven strokes leave the edge rough and often result in burrs that tear plant tissue.
Sometimes the issue is not technique but tools. Using a worn file or low-quality stone delivers poor results no matter how carefully the blade is handled.
After sharpening, failing to lubricate is a costly error. Without oil, the blade rusts quickly, and the pivot becomes stiff.
The final mistake is skipping regular maintenance. Waiting until blades are completely dull or rusted means more effort and greater risk of permanent damage.
With careful attention, each of these problems can be avoided. Good habits ensure sharpening produces consistent, professional-quality results every time.
Why are my pruning shears still dull after sharpening?
The wrong angle or failure to remove burrs usually causes the blade to stay blunt.
What happens if the flat side is sharpened too much?
It removes excess metal, shortens blade life, and prevents clean cuts.
Can rust damage be fixed during sharpening?
Light rust can be removed, but severe corrosion may require blade replacement.
Why do blades cut poorly even when sharp?
Loose or misaligned pivots prevent the edges from meeting properly.
What if my sharpening stone is worn out?
A dull or uneven stone cannot restore edges effectively and should be replaced.
Frequency of Sharpening & Maintenance Schedule
Sharpening pruning shears should not be a one-time task. Regular attention ensures they cut smoothly and remain reliable season after season.
The frequency depends largely on usage. Heavy pruning in orchards or dense shrubs dulls blades faster than occasional trimming of small plants.
Gardeners who prune daily may need to sharpen every few weeks. For moderate use, once or twice per season is usually enough to maintain performance.
Climate also plays a role in tool care. Humid or wet conditions accelerate rust, requiring more frequent cleaning and sharpening.
Wood type makes a difference as well. Hard, woody stems wear edges down faster than soft, green growth.
A good habit is to inspect the shears before each major pruning job. If they do not cut cleanly, it is time to sharpen.
Maintenance goes beyond sharpening alone. Regular cleaning after use prevents sap and dirt from hardening on the blade.
Applying oil after every session is also important. Lubrication keeps the pivot smooth and shields the metal from moisture.
Tension checks should be part of the routine. Adjusting the screw ensures blades remain aligned and cut efficiently.
Seasonal care completes the schedule. At the end of the pruning season, shears should be cleaned, sharpened, oiled, and stored in a dry location.
How often should pruning shears be sharpened?
Heavy use requires monthly sharpening, while light use may need only seasonal care.
Does climate affect maintenance frequency?
Yes, humid and wet environments speed rust and demand more regular cleaning.
What daily maintenance helps extend blade life?
Wiping off sap, cleaning dirt, and applying a light oil coating after each use.
Should tools be serviced at the end of each season?
Yes, seasonal maintenance ensures they stay ready and rust-free during storage.
How do I know sharpening is overdue?
If blades crush or tear rather than slice cleanly, sharpening is needed immediately.
Advanced Tips & Tools for Pros
Once the basics are mastered, advanced sharpening methods can take pruning shears to professional levels of precision. These techniques ensure the cleanest cuts and longest tool life.
One method is stropping the blade after sharpening. Stropping with leather or fine abrasive paste polishes the edge and removes microscopic burrs.
Some professionals use guided sharpening systems. These devices hold the blade at a fixed angle, guaranteeing consistency with every stroke.
For very dull or damaged blades, a slow-speed belt grinder may be used. The grinder restores the bevel quickly but requires caution to avoid overheating.
High-end diamond stones are another upgrade. They last longer than traditional stones and work effectively on hardened steel found in premium pruning shears.
Another advanced practice is replacing blades instead of repeatedly sharpening. Many professional-grade shears offer spare parts to restore factory performance.
Pros also emphasize the importance of testing sharpness. Cutting paper or making a clean slice through a twig shows whether the blade is truly ready.
Attention to detail separates advanced care from basic sharpening. These techniques maximize precision, efficiency, and durability for demanding gardening tasks.
What is stropping, and why is it useful?
Stropping polishes the blade edge, refining sharpness and removing micro-burrs.
Are power tools safe for sharpening shears?
Yes, if used carefully at low speeds to avoid overheating the blade.
When should a blade be replaced instead of sharpened?
If it is chipped, bent, or worn too thin, replacement is better than sharpening.
Do professionals use special sharpening systems?
Yes, guided systems keep the blade at a consistent angle for precise results.
Are diamond stones worth the investment?
Yes, they cut faster, last longer, and handle hardened steel better than standard stones.
Conclusion
Pruning shears are one of the most important tools in any garden. Their sharpness determines not only the ease of work but also the health of plants.
Dull blades crush and tear, while sharp blades cut cleanly and heal faster. Knowing how to sharpen pruning shears ensures every cut supports growth rather than damage.
The process is simple when broken into steps. Cleaning, sharpening at the correct angle, adjusting tension, and applying oil transform an old tool into one that feels brand new.
With regular maintenance, shears can last for years. A few minutes of care prevents rust, extends blade life, and saves money on replacements.
Advanced methods such as stropping or using guided systems bring even greater precision. These practices provide professional-level sharpness that keeps tools performing at their best.
The key is consistency. A maintenance schedule keeps blades ready for every pruning season and protects both plants and gardener.
Now is the perfect time to check the tools waiting in storage. Sharpen the blades, oil the pivot, and experience how much smoother and safer pruning becomes.
I’m Emma J. Caldwell, the founder, lead writer, and home-cooking enthusiast behind KitchenGuideCo.com. With a background in culinary arts and over a decade of cooking experience in both professional and personal kitchens, I created this platform to demystify recipes, offer smart kitchen gadget reviews, and guide readers through meal prep with confidence and clarity.