If you’re new to juicing, you might be wondering about the best way to handle the cleanup. One of the most common questions is how to clean juicer filter effectively. It can seem tricky at first because those filters have so many tiny holes! Don’t worry, it’s easier than you think. This guide will show you simple, step-by-step instructions. Let’s get started, and you’ll be juicing and cleaning like a pro in no time.
The Importance of Cleaning Your Juicer Filter
Keeping your juicer filter clean is vital for several reasons. A clean filter ensures the best juice quality, extracting the maximum nutrients and flavor from your fruits and vegetables. Residue buildup can clog the filter’s tiny holes, reducing efficiency and making your juice less palatable. A dirty filter also promotes bacteria growth, which is a health hazard. Regular cleaning prevents these problems, extending the life of your juicer and improving your juicing experience. Proper maintenance ensures your machine runs smoothly and delivers the best possible results.
Why Cleaning Matters
Imagine trying to drink juice with bits of old pulp and buildup – not very appetizing, right? A clean filter is the foundation for delicious, nutrient-rich juice. When the filter’s holes get clogged, your juicer has to work harder, which can wear down the motor over time. Furthermore, food particles left in the filter can attract mold and bacteria, posing a health risk. Cleaning isn’t just about good juice; it’s about good health and extending your juicer’s lifespan.
- Maximum Juice Yield: A clean filter allows for optimal extraction, giving you the most juice from your produce. A clogged filter traps juice within the pulp, reducing efficiency.
- Enhanced Flavor: Freshly cleaned filters prevent the transfer of old flavors and odors from previous juicing sessions, preserving the fresh taste of each juice you make.
- Preventing Bacteria Growth: Cleaning regularly helps to eliminate any food particles that might have accumulated on the filter, preventing bacterial or mold growth.
The Risks of a Neglected Filter
Ignoring the cleaning process can lead to several undesirable outcomes. Over time, a dirty filter will become less effective at separating the pulp from the juice, resulting in a pulpy, less appealing beverage. The build-up of old produce can attract bacteria, posing a health hazard. Eventually, the filter’s performance will decrease, and you may notice your juicer struggling, reducing its lifespan. By cleaning the filter after each use, you safeguard your health and get the best results from your machine.
- Reduced Juice Quality: A neglected filter results in lower-quality juice, with less nutrients and an unpleasant taste.
- Damage to the Juicer: Continuous use with a clogged filter can put additional stress on the motor, leading to malfunctions or total failure.
- Health Concerns: Accumulated food particles can encourage the growth of bacteria, potentially leading to foodborne illnesses.
Effective Ways to Clean Juicer Filters
Learning how to clean juicer filter doesn’t have to be a chore. It is simpler than it appears. The key is to start immediately after juicing, while the pulp is still moist and easier to remove. The following methods describe different strategies, each designed to make the cleaning process quick and easy. With the right tools and steps, you can keep your juicer filter in perfect condition, ready for your next juicing session. The method you choose may depend on the juicer type and your personal preference.
Quick Rinse and Scrub Method
This is the most common approach and perfect for daily cleaning. After taking your juicer apart, immediately rinse the filter under warm running water. Use a soft brush, like the one that came with your juicer or a dedicated produce brush, to gently scrub away any pulp. Avoid harsh scrubbing or abrasive tools, which can damage the filter. A quick rinse followed by a gentle scrub will usually remove most residue and prepare your filter for the next use.
- Disassembly: Take your juicer apart as per the manufacturer’s instructions. This usually involves removing the pulp container, the filter, and the juicing screen.
- Rinse Under Warm Water: Hold the filter under warm, running water to dislodge loose pulp and residue. This step is best done immediately after juicing to prevent the pulp from hardening.
- Gentle Scrubbing: Use a soft brush to scrub the filter’s surface, both inside and out. Focus on the areas where pulp tends to accumulate, applying gentle pressure to avoid damaging the filter.
- Final Rinse: Give the filter a final rinse to ensure all particles are removed. Examine it under a light to see that all of the small holes are clear.
- Drying: Allow the filter to air dry completely before reassembling your juicer. This will prevent mold or bacteria growth.
Deep Cleaning With Soapy Water
Sometimes, a simple rinse and scrub aren’t enough, particularly if you juice frequently or deal with stickier produce. For a deeper clean, create a solution of warm water and mild dish soap. Soak the filter in this solution for a few minutes to loosen any stubborn residue. Scrub the filter gently with a soft brush and rinse it thoroughly. This method is effective for removing oily residue and ensuring your filter is completely clean. Consider using this method weekly or whenever your filter appears to need extra attention.
- Soaking: In a bowl or sink, prepare a mixture of warm water and a few drops of mild dish soap. Submerge the juicer filter in the soapy water. Let it soak for about 10–15 minutes. This will soften dried pulp and grease.
- Thorough Scrubbing: Use a soft brush (a toothbrush can work well) to scrub every part of the filter, paying attention to the holes. The soap helps dissolve oils and other residue.
- Rinsing: Rinse the filter thoroughly under running water, ensuring all traces of soap are gone. Soap residue could affect the taste of your next juice.
- Inspection: Hold the filter up to the light to look for any remaining particles. If you see any, repeat the scrubbing and rinsing process.
- Final Drying: Completely dry the filter before reassembling the juicer. This prevents mold and ensures the best juicing performance.
Dealing with Stubborn Stains and Residue
Certain produce, like beets and carrots, can stain the filter, and some sticky fruits leave behind hard-to-remove residue. For stubborn stains and residue, try soaking the filter in a solution of warm water and baking soda. The gentle abrasive properties of baking soda can help lift stains without damaging the filter. For extra-sticky residue, a mixture of vinegar and water can be effective. Soak the filter in this solution for a short time, then scrub and rinse thoroughly. Always ensure you rinse the filter well after using these solutions.
- Baking Soda Solution: Mix a few tablespoons of baking soda in warm water. Soak the filter in this solution for about 15–20 minutes.
- Vinegar Solution: For tougher stains, use a solution of equal parts white vinegar and warm water. Soak the filter for 10–15 minutes.
- Scrubbing Action: Use a soft brush or the designated juicer brush to gently scrub the filter. The baking soda or vinegar helps to loosen the residue.
- Rinsing Thoroughly: Rinse the filter under running water until all traces of the baking soda or vinegar solution are removed. This is important to avoid affecting the flavor of your juices.
- Air Drying: Allow the filter to completely air dry before putting the juicer back together.
Different Juicer Types and Cleaning Methods
The method for cleaning your juicer filter can be affected by the type of juicer you own. Centrifugal juicers, which are the most common type, usually have a filter that’s a fine mesh basket. Cold press juicers, or slow juicers, often have a different type of filter. Knowing the specifics of your juicer is a key factor. Using the right techniques for your specific machine will ensure a successful cleaning process.
Cleaning Centrifugal Juicer Filters
Centrifugal juicers are popular because they’re quick and easy to use. The filters in centrifugal juicers are often made of stainless steel mesh, designed to spin at high speeds to separate juice from pulp. Because of the fine mesh, it is important to clean the filter thoroughly after each use. Immediately rinsing and scrubbing the filter under warm water is usually sufficient. Pay attention to the center of the filter, where pulp may build up, and use a dedicated cleaning brush to help get into those hard-to-reach areas.
- Quick Rinse After Use: Immediately after juicing, remove the filter and rinse it under warm water. This removes the bulk of the pulp.
- Using the Right Brush: Employ the brush that came with your juicer or a dedicated filter cleaning brush. It often has a unique shape designed to fit perfectly.
- Scrubbing Techniques: Scrub both the interior and exterior surfaces of the filter using the brush. Ensure you reach all areas, paying attention to the smaller holes.
- Air Drying: Allow the filter to air dry completely before putting the juicer back together. This prevents the growth of mold or bacteria.
- Dealing with Stubborn Residue: Use the baking soda solution for tough stains or a mild soap solution for a deeper clean.
Cleaning Cold Press Juicer Filters
Cold press juicers, also known as slow juicers, gently crush and press produce to extract juice. Their filters are often made of a finer mesh or sometimes a solid auger with a screen. Because of their design, these filters often need a more intensive cleaning. Dismantling the juicer and carefully rinsing all parts is essential. Soaking the filter in warm, soapy water can help loosen trapped pulp. These juicers often come with specialized cleaning tools to help you reach all areas of the filter. Regular cleaning is essential to prevent buildup and maintain the juicer’s performance.
- Immediate Dismantling: Remove the filter and other components immediately after juicing. This makes cleaning much easier.
- Pre-rinse: Rinse the filter thoroughly under running water to eliminate loose particles.
- Soaking with Soapy Water: Soak the filter in warm, soapy water for 15-20 minutes to dissolve stuck-on particles.
- Detailed Scrubbing: Scrub the filter using a soft brush, ensuring all areas are addressed.
- Complete Drying: Make sure the filter is totally dry before reassembling.
Tips for Efficient Cleaning of Juicer Filters
Optimizing your approach can make how to clean juicer filter more efficient and less of a chore. One simple tip is to start the cleaning process immediately after juicing, while the pulp is still moist and less likely to stick to the filter. Having a dedicated brush for your juicer is also important. This brush is usually designed to fit the contours of your filter and clean the small holes more effectively. Regular cleaning and attention to detail will ensure your juicer performs at its best and lasts longer.
- Clean Immediately: Start the cleaning process as soon as you’re done juicing, while pulp is still fresh and moist.
- Use a Dedicated Brush: Employ the brush that came with your juicer or a specialized brush made for cleaning juicer filters. These brushes are made to fit properly.
- Pre-Rinse: Before scrubbing, rinse the filter under warm water to remove loose particles and reduce the time you spend scrubbing.
- Inspect Carefully: After washing, hold the filter up to the light to see that all the holes are clear.
- Regular Deep Cleans: For enhanced outcomes, provide your juicer with a thorough deep cleaning every few weeks.
Common Mistakes to Avoid
While cleaning your juicer filter isn’t difficult, it’s easy to make a few mistakes that could damage the filter or make cleaning more difficult. For example, using abrasive sponges or scouring pads is a big no-no. These can scratch or damage the filter mesh, making it less effective and more difficult to clean in the long run. Another error is neglecting to let the filter dry completely before reassembling the juicer, which can encourage mold growth. Also, using harsh chemicals can damage the filter material. By avoiding these common mistakes, you can keep your juicer filter in top shape and extend its lifespan.
Using Abrasive Cleaning Tools
Using abrasive tools like steel wool, scouring pads, or harsh scrub brushes on your juicer filter is a bad idea. These tools can scratch the metal mesh of the filter, creating tiny imperfections that can trap pulp and make cleaning more challenging. Over time, these scratches can also weaken the filter, reducing its effectiveness and possibly leading to rust or damage. Stick to using soft brushes or sponges specifically designed for cleaning juicer parts. This will protect your filter and ensure it continues to function properly.
- Damage to the Mesh: Abrasive materials can scratch the filter’s mesh, making it harder to clean.
- Reduced Efficiency: Scratches can reduce the filter’s capability.
- Rust and Corrosion: Scratches can lead to rust.
- Avoid Metal: Stay away from metal scrubbers, as these can easily damage the filter.
- Choose Soft: Stick with soft brushes and gentle sponges, to protect the filter.
Neglecting Thorough Drying
Failing to completely dry your juicer filter before reassembling your juicer is another common oversight. Moisture can encourage the growth of mold and bacteria. These microorganisms can make your juices unsafe and create an unpleasant smell. Always ensure your filter is completely dry, either by air drying or using a clean towel, before putting your juicer back together. This step is critical for maintaining hygiene and extending the lifespan of your juicer.
- Mold Growth: Remaining moisture is the perfect spot for mold and bacteria to grow.
- Unpleasant Odors: Bacteria and mold produce odors, changing the taste of your juices.
- Health Concerns: Consuming juices made with a moldy juicer poses health risks.
- Long-Term Damage: Prolonged exposure to moisture can lead to corrosion.
- Air Drying is Key: Always air dry the filter completely before storing or using.
Ignoring Manufacturer’s Instructions
Every juicer is different, and the manufacturer provides specific instructions on how to care for your model. Ignoring these instructions can lead to damaging your juicer or affecting its performance. Before cleaning your juicer filter, read the manual carefully. Make sure you follow the manufacturer’s suggestions on cleaning tools, cleaning solutions, and disassembly procedures. When in doubt, always refer to the manual to ensure you’re cleaning your juicer safely and effectively. This will help you avoid problems and make sure your juicer continues to function properly.
- Warranty Issues: Not following the manual may void the warranty.
- Damage Prevention: Manufacturers know the machine best, and following their instructions avoids damage.
- Efficiency: Following the instructions will help the machine to work as it was designed to.
- Longer Lifespan: You will extend the lifespan of your appliance.
- Best Practice: Always consult the user manual for optimal care.
Frequently Asked Questions
Question: How often should I clean my juicer filter?
Answer: Clean your juicer filter after every use. This will prevent pulp buildup and ensure optimal juicing performance. For deeper cleaning, do a thorough cleaning weekly or as needed, depending on how often you juice.
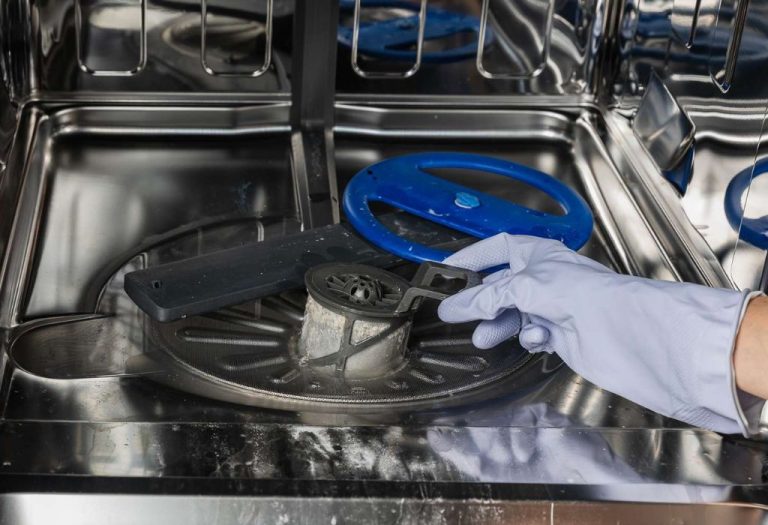
Question: Can I put the juicer filter in the dishwasher?
Answer: It depends on your juicer model. Check your manufacturer’s instructions. Some filters are dishwasher safe, while others should be cleaned by hand. Dishwashers can use abrasive detergents or high heat that may damage the filter.
Question: What’s the best way to remove stubborn stains?
Answer: For tough stains, soak the filter in a solution of warm water and baking soda for 15-20 minutes. Then, scrub with a soft brush. For extra-sticky residue, a mixture of vinegar and water can also be effective.
Question: How do I know if my filter is clean?
Answer: Hold the filter up to a light and look through the small holes. They should all be clear, with no remaining pulp or residue. Make sure all parts are completely clean before reassembling the juicer.
Question: Can I use harsh chemicals to clean the filter?
Answer: It’s best to avoid harsh chemicals. They can damage the filter material and may leave residue that affects your juice. Stick to mild dish soap, baking soda, and vinegar solutions for safe and effective cleaning.
Final Thoughts
So, there you have it – a clear guide on how to clean juicer filter, step by step. From quick rinses to more thorough deep cleans, it’s about finding the method that works best for your juicer and your routine. The key is regular cleaning. Don’t let those tiny holes intimidate you! With the correct tools and a little bit of time, you can maintain your juicer’s filter. This keeps your juicer running well and your juice tasting fresh and delicious. Now, you can enjoy your fresh juices and cleaning with confidence! So, grab your brush, and get juicing!
I’m Emma J. Caldwell, the founder, lead writer, and home-cooking enthusiast behind KitchenGuideCo.com. With a background in culinary arts and over a decade of cooking experience in both professional and personal kitchens, I created this platform to demystify recipes, offer smart kitchen gadget reviews, and guide readers through meal prep with confidence and clarity.