You open the dishwasher expecting to unload sparkling dishes, but instead you find a shallow pool of murky water at the bottom. It smells stale, looks cloudy, and instantly makes you wonder if something broke overnight. Before panic sets in, know that this is one of the most common issues every homeowner faces.
Most of the time, standing water doesn’t mean your dishwasher has failed. It’s usually a simple drainage blockage, grease buildup, or a small filter clog. These are issues you can fix at home with basic tools and a bit of patience.
Ignoring the water, however, can create bigger problems. Stagnant water attracts mold, leaves mineral stains, and can damage sensors or wiring inside the unit. Acting early prevents odors and extends your appliance’s lifespan.
In this complete guide, you’ll learn how to safely drain that water, clean each component, and prevent the problem from returning. The steps are simple, effective, and require no professional service. By the end, your dishwasher will be clean, dry, and running like new again.
Why Standing Water Collects in the Dishwasher Bottom
A dishwasher drains through a network of parts that all work together. When one part slows or stops, water has nowhere to go and collects in the tub. Understanding how these components interact helps you find the cause quickly.
The filter is the first checkpoint. It traps leftover food and grease before they reach the pump. Once it clogs, the water can’t flow out properly. Even a thin layer of residue can slow drainage.
Next comes the drain pump, a small motor that pushes water through the hose. When food scraps or glass fragments jam its impeller, the pump can’t create enough pressure to move the water. You might hear it humming but not draining.
The drain hose itself can kink or clog, especially if it sits behind the dishwasher in a tight space. When the hose collapses or bends sharply, water flow is restricted and backup begins.
Finally, if your dishwasher connects to a garbage disposal, a blocked disposal port or an unremoved knockout plug can completely stop drainage. Even if all else is clean, this small oversight can leave water sitting every time you run a cycle.
Knowing these causes means you can troubleshoot systematically instead of guessing, saving both time and effort.
Step 1 : Turn Off the Power and Remove Excess Water
Before starting any inspection, disconnect your dishwasher from electricity. Unplug it or switch off the circuit breaker to stay safe around water and wiring. Never begin cleaning or unclogging while power is connected.
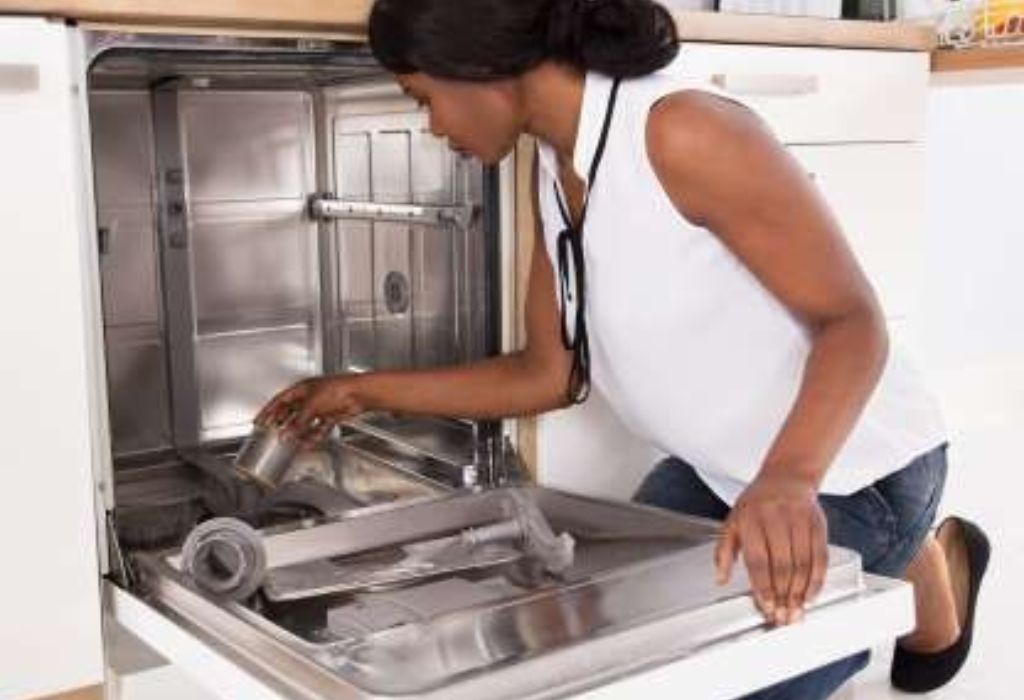
Remove all dishes and racks from the appliance. This gives you open access to the filter, pump, and sump area. Place the dishes aside on towels so they don’t drip on the floor.
Now focus on the standing water. Use a cup, ladle, or small bowl to scoop as much water out as possible. Pour it into a bucket or sink nearby. When most of it is gone, use a sponge or absorbent towels to soak up the rest.
This step lets you see what’s happening inside the base of the dishwasher. It also prevents spills while you work on internal parts. Once the bottom is nearly dry, you’re ready to clean the drain system safely.
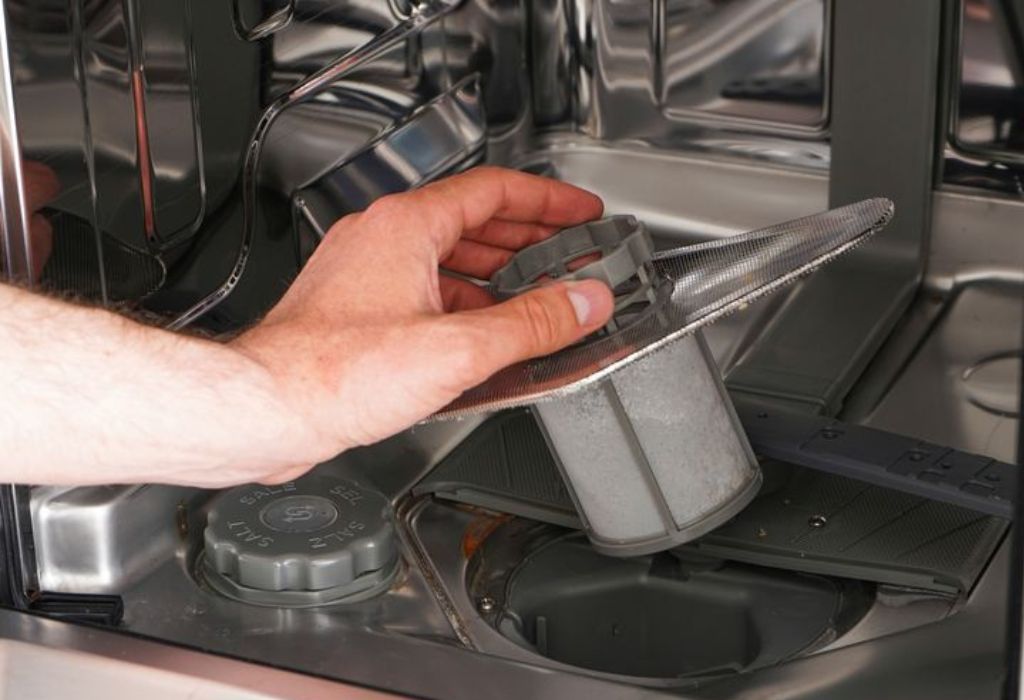
Step 2 : Clean and Inspect the Filter Assembly
The filter sits beneath the lower spray arm and collects debris during every wash. If not cleaned often, it becomes the number-one cause of standing water. Fortunately, it’s also the easiest fix.
Remove the bottom rack and locate the round or rectangular filter cover. Twist it counter-clockwise or lift it out, depending on your model. Beneath it, you’ll find a fine mesh cylinder and a coarse screen.
Rinse both parts under warm running water. Use a soft brush or toothbrush to remove grease and residue from every side. If you see white or chalky buildup, soak the filter in vinegar for fifteen minutes to dissolve minerals.
After cleaning, look into the filter cavity. Use a flashlight to check for foreign objects like bones, seeds, or bits of glass. Remove them gently with tweezers or a gloved hand.
Once everything looks clear, reinstall the filter securely. Make sure it locks into place; if it’s loose, debris can bypass it and clog the pump again. Run a quick rinse test. If water drains properly, you’ve solved the issue right here.
Step 3 : Check the Drain Hose for Clogs or Kinks
When the filter isn’t the issue, the next step is inspecting the drain hose. This flexible tube carries wastewater out to your sink drain or garbage disposal.
Pull the dishwasher slightly away from the wall to see behind it. Check whether the hose is bent sharply, compressed, or kinked. Straighten it gently to restore flow.
If the hose appears fine externally, detach it from the sink drain connection. Keep a small bucket underneath to catch leftover water. Run warm tap water through the hose to see if it flows freely.
If it doesn’t, insert a flexible pipe cleaner or drain-cleaning brush to clear any blockage. Grease and detergent residue can solidify inside over time, narrowing the hose diameter.
Reconnect the hose firmly once it’s clear. Then push the dishwasher back carefully without pinching the hose again. A clean, straight hose ensures unrestricted water movement every cycle.
Step 4 : Inspect and Clean the Drain Pump
The drain pump forces water out of the tub during the final stage of the wash. If it jams, the machine can’t empty completely. You can clean it yourself with basic tools.
Turn off power again for safety and remove the lower access panel or kick plate. Locate the pump, usually a small round motor near the front underside of the unit.
Detach the wires and remove the retaining screws or clips. Pull the pump slightly outward and check for debris in the impeller area. Seeds, paper, or bits of glass often wedge here.
Clean the impeller gently using a cloth or soft brush. Make sure it spins freely without resistance. If it’s stuck or makes grinding noises, replace the pump with an identical model from your dishwasher brand.
Once cleaned, reinstall the pump and reconnect the wiring. Restore power and run a rinse cycle. If the water drains completely, the pump was the problem.
Step 5 : Clear the Garbage Disposal and Air Gap
If your dishwasher connects to a garbage disposal, check that connection next. Food waste and grease often clog the small opening where the dishwasher hose attaches.
Disconnect the hose and look into the disposal port with a flashlight. Clean it with a small brush or wooden skewer until clear. Avoid using metal tools that can scratch the fitting.
If the disposal is newly installed, ensure the knockout plug has been removed. It’s a small plastic disk inside the port that must be punched out before attaching the hose. If left in, water can’t escape the dishwasher.
Now examine the air gap, if your kitchen has one. It’s a small cylindrical fitting beside your sink faucet. Remove the cap and clear any buildup inside with a pipe brush. Rinse with warm water and reattach the cap.
A blocked air gap or disposal port can make it seem like your dishwasher isn’t draining even when everything else works. Cleaning these connections often solves the issue instantly.
Step 6 : Flush the Drain Path with Vinegar and Baking Soda
After cleaning the mechanical parts, give the drainage system a final flush. This step removes any hidden grease or mineral residue that could slow future draining.
Pour one cup of white vinegar directly into the bottom of the dishwasher. Let it sit for five minutes to loosen buildup. Then sprinkle half a cup of baking soda over the area.
Run the hottest rinse or cleaning cycle available with no dishes inside. As the cycle runs, vinegar and baking soda react gently to dissolve grime, deodorize the interior, and clear narrow passages in hoses and pumps.
When the cycle finishes, open the door and check the bottom. The interior should be clean and dry, with no puddles left behind. If you still see water, repeat once more to ensure the path is fully clear.
This natural cleaning method also removes odors and keeps the machine fresh between uses. It’s an excellent monthly maintenance habit.
Step 7 : Test and Confirm Proper Drainage
With all the parts cleaned and reassembled, it’s time for a full test. Run a short wash or rinse cycle to confirm everything works as expected.
Listen carefully for the draining phase near the end of the cycle. You should hear a low humming sound from the pump followed by the sound of rushing water through the hose into the sink.
When the cycle completes, open the door and check the bottom of the tub. If it’s completely dry, your drainage system is functioning perfectly again.
If water remains, re-inspect the hose connections and the float switch that monitors water level. The float should move freely up and down. A stuck float can send false signals that stop the drain prematurely.
Once confirmed, wipe the interior dry and leave the door slightly open for ventilation. Your dishwasher is now clean, odor-free, and draining efficiently.
Preventive Maintenance to Avoid Future Water Issues
Prevention is far easier than repair. A few regular habits will keep your dishwasher free from clogs and standing water for years.
Clean the filter weekly by rinsing it under warm water. It only takes a minute and prevents the majority of drainage problems.
Run a vinegar cleaning cycle monthly to dissolve grease and detergent buildup inside hoses and pumps. This also removes mineral scale if you live in a hard-water area.
Inspect the drain hose every few months for bends or damage. Make sure it still forms a high loop behind the dishwasher to prevent sink water from flowing back inside.
Avoid pre-rinsing dishes under running water. Simply scrape off large food scraps into the trash before loading. Excess soap and diluted residue can actually make sensors less effective.
Finally, leave the door slightly open after every cycle. This allows moisture to evaporate, keeping the interior fresh and preventing mold.
By following these easy habits, you’ll save time, water, and money while keeping your dishwasher performing at its best.
Understanding the Role of the Float Switch
The float switch is a small but crucial part of your dishwasher’s drainage system. It sits near the bottom, usually under the lower spray arm or behind the front kick plate. Its job is to sense water levels and tell the control board when to fill or drain.
When the float moves up, it signals that the tub is full, and the water inlet valve closes. During draining, it drops down again, allowing the pump to push water out. If this switch gets stuck in the raised position, the dishwasher may think it’s still full and skip the drain cycle entirely.
Food particles, grease, or soap residue can cause the float to jam. Hard-water minerals can also form around its hinge or stem, making it less responsive. When this happens, standing water is inevitable no matter how clean your filters or hoses are.
To fix it, remove the bottom rack and locate the float. Lift it gently; it should move freely up and down. If it feels stiff, clean the area around it with warm soapy water or vinegar.
You can also test the switch for electrical continuity using a multimeter. If it shows no reading, replace it with an identical part. A functional float switch ensures your dishwasher never misreads water levels again.
Regularly wiping this component during monthly cleaning prevents buildup and helps your appliance drain correctly every time.
How to Reset the Dishwasher After Clearing Water
After cleaning and draining your dishwasher, a system reset helps clear leftover error codes and recalibrate sensors. Modern machines use digital boards that can become confused when drainage issues occur. Resetting brings everything back to normal.
Start by unplugging the dishwasher or switching off its circuit breaker for five minutes. This gives the control board time to discharge and refresh its memory. Plug it back in or flip the breaker on again.
Many brands also have built-in reset sequences. For instance, pressing and holding the Start/Cancel button for five seconds or the High-Temp + Heated Dry buttons together can reboot the system. Check your user manual for the exact combination.
Once reset, run a short rinse cycle with no dishes to test. Listen for the pump activating and check that the water drains completely at the end. This confirms that the internal sensors and float switch are functioning properly again.
If your dishwasher still fails to drain after a reset, double-check connections and ensure there’s no standing water inside. In rare cases, a damaged control board might need replacement.
Resetting your dishwasher after maintenance is like restarting a computer — it helps the appliance recognize that the issue has been fixed and allows it to operate normally again.
Common Mistakes That Make Standing Water Return
Even after fixing drainage problems, a few bad habits can make them come back. One of the most common mistakes is forgetting to clean the filter regularly. When food residue builds up again, it clogs the system faster than you expect.
Another mistake is overusing detergent. Too much soap creates thick suds that trap grease and slow draining. Over time, those bubbles turn into sticky residue inside hoses and pumps.
Improper loading also affects water circulation. When large pans or utensils block the lower spray arm, food particles don’t rinse off completely. They end up trapped near the filter, forming new clogs within days.
Many homeowners also neglect the garbage disposal connection. If the disposal port isn’t cleaned or used often, old food dries inside and hardens, reducing water flow between dishwasher and drain. Running your disposal for a few seconds before every wash helps keep it open.
Another easy-to-miss mistake is pushing the dishwasher too close to the wall. This can pinch the drain hose and restrict water movement. Always leave at least two inches of clearance behind the appliance.
Avoiding these small errors guarantees your dishwasher stays free of standing water long after the repair is done. Simple awareness keeps performance consistent and hassle-free.
Building a Long-Term Dishwasher Care Schedule

Consistency is the secret to a healthy, problem-free dishwasher. Instead of waiting for issues to appear, follow a regular maintenance schedule that keeps drainage smooth and performance strong.
Daily: After each use, check the bottom for leftover food particles and wipe the door edges with a soft cloth. Leaving bits of food inside can start buildup that later clogs filters.
Weekly: Remove and rinse the filter assembly under warm water. Wipe the rubber gasket and spray arms. This quick five-minute task prevents odor and residue before it starts.
Monthly: Run an empty cycle with vinegar on the top rack and baking soda sprinkled below. It naturally removes grease, soap scum, and mineral scale inside pumps and hoses.
Quarterly: Pull the dishwasher slightly forward and inspect the drain hose for kinks or buildup. Make sure the high-loop or air gap remains secure. This inspection ensures steady backflow prevention.
Biannually: Deep-clean the sump area, float switch, and door gasket using mild detergent and warm water. Replace worn-out seals or filters if needed.
Following this schedule helps maintain your dishwasher’s efficiency, prolongs its lifespan, and saves money on energy and water bills. With consistent care, your appliance will drain perfectly and deliver spotless dishes every single time.
FAQs About Removing and Preventing Standing Water
Why is there standing water in my dishwasher bottom?
It usually happens because of a blocked filter, kinked drain hose, or clogged garbage disposal port. Cleaning these areas restores normal flow.
Can I scoop the water out manually?
Yes. Use a small bowl or sponge to remove the pooled water first. This makes it easier to see and clean the clogged parts safely.
How often should I clean the filter?
Once a week is ideal for busy kitchens. Regular cleaning prevents buildup and ensures proper drainage after every cycle.
Is vinegar safe for dishwashers?
Absolutely. White vinegar naturally removes grease and mineral deposits without harming rubber seals or metal parts.
What if the water still doesn’t drain after cleaning?
The drain pump or float switch might be malfunctioning. If you’ve cleaned everything and the issue remains, test or replace those parts.
Can hard water cause drainage problems?
Yes. Minerals from hard water form deposits inside hoses and pumps. Running a descaler or vinegar rinse monthly helps prevent this.
Should I call a technician?
If electrical components like the pump motor or sensors fail, professional service is recommended. Most blockages, though, can be fixed at home.
Why does my dishwasher smell after water sits inside?
Stagnant water allows bacteria to grow. Cleaning with vinegar and baking soda eliminates odors and prevents them from returning.
How can I keep the air gap clean?
Remove the cap once a month and rinse the tube with warm water. A quick brush inside prevents clogs that affect draining.
What’s the easiest way to stop this from happening again?
Regular filter cleaning, a monthly vinegar cycle, and checking hose placement are the top three habits to keep your dishwasher problem-free.
Conclusion
Standing water at the bottom of your dishwasher might look worrying, but it’s almost always a fixable issue. By taking the time to clean the filter, hose, pump, and disposal connections, you restore proper drainage and prevent long-term damage.
Modern dishwashers are built to handle years of use when maintained correctly. Simple steps like rinsing the filter weekly, running a vinegar cycle monthly, and keeping the hose looped high make a huge difference.
With regular care, you’ll never open the door to an unexpected puddle again. Instead, you’ll find sparkling dishes, a fresh scent, and a spotless interior after every cycle.
Maintaining your dishwasher doesn’t just save repair costs — it saves water, energy, and peace of mind. Follow these steps consistently, and your appliance will stay reliable, efficient, and completely free of standing water for many years to come.
I’m Emma J. Caldwell, the founder, lead writer, and home-cooking enthusiast behind KitchenGuideCo.com. With a background in culinary arts and over a decade of cooking experience in both professional and personal kitchens, I created this platform to demystify recipes, offer smart kitchen gadget reviews, and guide readers through meal prep with confidence and clarity.