The smell of food fills the kitchen, the oven hums steadily, and everything feels under control. The timer is set, and you trust it to tell you exactly when your meal is ready. But suddenly, the beeping never comes.
Or worse, the timer shuts the oven off too early or refuses to start at all. In that moment, frustration replaces confidence, and a simple cooking task turns into a guessing game.
The oven timer is one of the most overlooked yet critical control systems in modern cooking. It manages cooking cycles, alerts you when time is up, and in many models, it even communicates directly with the main oven control board to regulate power.
When it fails, precision disappears, food gets ruined, and in some cases, safety risks can appear as well.
Learning how to fix oven timer problems is not just about restoring convenience. It is about regaining control over cooking accuracy, preventing electrical faults, and avoiding unnecessary repair costs.
This in-depth guide explains why oven timers fail, how to diagnose the exact problem, and which fixes you can safely perform at home.
How an Oven Timer Works Inside the Control System
An oven timer is not just a simple clock. In modern ovens, it operates as part of the main electronic control system. The timer communicates with the oven control board, which then activates relays that control heating elements, fans, and audible alarms.
In digital ovens, the timer uses a microcontroller, display circuit, input membrane buttons, and internal timing software.
When you press the timer button, electrical signals travel from the keypad to the control board. The board then counts down the programmed time using internal clock pulses.
In mechanical ovens, the timer uses a spring-driven clock mechanism or a synchronous motor. As the clock turns, it physically opens and closes electrical contacts that control power to the oven circuits.
If any part of this timing chain fails, the timer may stop working, reset randomly, lose accuracy, or fail to trigger the alarm or shutoff function. Understanding this chain helps identify where failure is most likely occurring.
Common Signs That Your Oven Timer Is Failing
A failing oven timer rarely stops working suddenly without warning. Most problems develop gradually through electrical wear, heat exposure, or keypad damage.
One common sign is when the timer display fades or flickers. This usually indicates a power supply issue or control board voltage instability. Another warning sign occurs when the timer counts down but the alarm never sounds.
Some timers reset themselves randomly during cooking. This happens when heat affects weak solder joints on the control board. Others freeze at a certain number and refuse to continue.
In mechanical units, ticking may slow down, become irregular, or stop entirely. If the oven shuts off unexpectedly without reaching the set time, the timer contacts may be burning out.
Recognizing these signs early prevents total oven shutdown and more costly electrical damage.
Safety Rules Before Attempting Any Oven Timer Repair
Before attempting any troubleshooting, safety must be the absolute first priority. Oven timers are connected directly to high-voltage electrical circuits.
The oven must always be completely disconnected from power before opening any panels. This means switching off the breaker at the electrical panel, not just unplugging the oven if it is built-in.
Capacitors inside control boards can hold residual voltage even after power is removed. Waiting several minutes before touching internal components reduces the risk of electrical shock.
Never work on a gas oven control panel while gas is flowing. If the oven uses both gas and electricity, both fuel and power must be turned off.
Repair attempts should only involve inspection, cleaning, wire reseating, keypad testing, and simple component replacement. Advanced board-level soldering should only be done by trained technicians.
Most Common Causes of Oven Timer Failure
Heat is the number one enemy of oven electronics. Continuous exposure to high temperatures weakens solder joints, degrades plastic connectors, and dries out capacitor electrolyte.
Moisture is another major threat. Steam from cooking enters control panels, causing corrosion on circuit traces and switch contacts.
Electrical surges damage microcontrollers and display drivers. A single power surge can permanently corrupt timing circuits.
Keypad wear also causes timer failure. Repeated finger pressure eventually damages membrane switches, preventing proper signal transmission.
In mechanical timers, worn clock gears, dried lubrication, and burnt electrical contacts account for most failures.
Understanding these causes helps determine whether the fix is simple or requires part replacement.
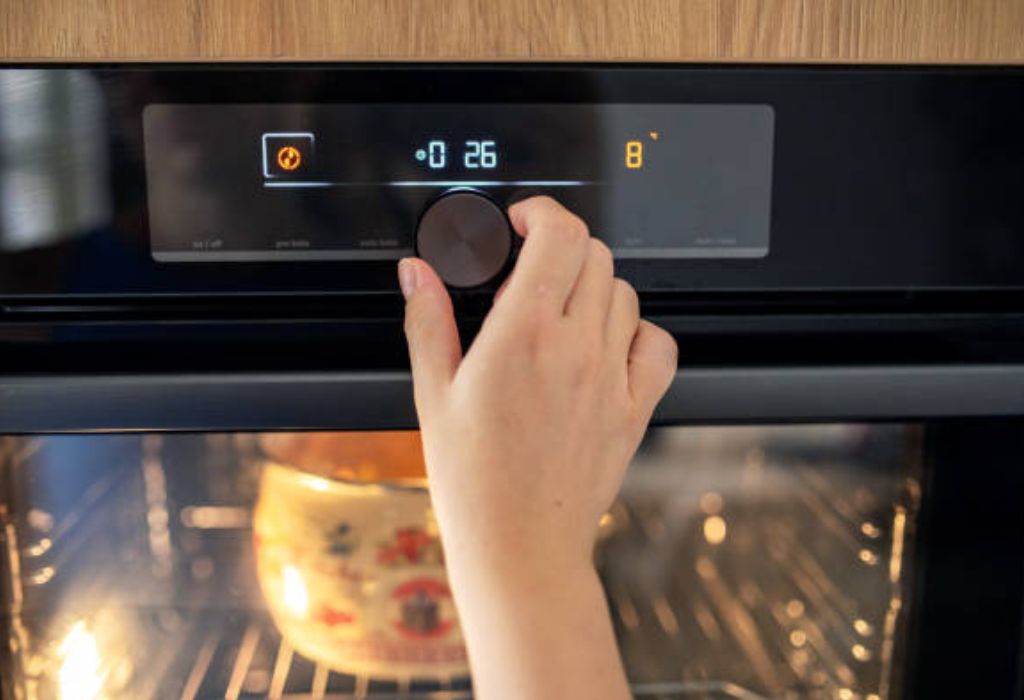
How to Reset an Oven Timer That Is Glitching
Many oven timer issues are caused by software glitches rather than hardware damage. Performing a full system reset often restores normal operation instantly.
To reset the oven timer, switch off the circuit breaker that supplies power to the oven. Leave it off for at least five full minutes. This allows internal capacitors to fully discharge and resets the microcontroller memory.
After restoring power, the oven display may flash or show default time values. Set the clock again and test the timer function.
If the timer works normally after reset, the issue was likely caused by a temporary software error or voltage spike.
If the problem returns shortly after reset, then a deeper hardware issue exists.
How to Test the Oven Timer Keypad and Buttons
A non-responsive timer is often caused by a failing keypad rather than the timer circuit itself. Grease, dirt, and heat slowly damage membrane switch layers.
To test the keypad, remove the control panel carefully after power is disconnected. Inspect the ribbon cable connecting the keypad to the control board. If the cable is loose, reseating it often restores functionality.
Use a multimeter in continuity mode to test each keypad contact. Press the timer button while measuring resistance across the switch terminals. A proper switch should show momentary continuity.
If the switch does not respond electrically, the keypad assembly must be replaced. Cleaning the surface may help in early stages, but damaged membranes cannot be repaired permanently.
How to Fix a Loose or Damaged Timer Wiring Connection
Timer failure can occur if even one small wire connector becomes loose. Heat expansion and vibration slowly weaken push-on terminals.
After disconnecting power, locate the timer wiring harness at the rear of the control panel. Gently tug each wire to confirm it is firmly attached.
Burnt or discolored connectors indicate overheating and must be replaced. Corroded pins increase electrical resistance and cause unstable timer behavior.
Loose grounds can also cause timers to reset randomly. Ensuring clean grounding points restores voltage stability to the control system.
Many oven timer problems are solved simply by reseating connectors properly.
Difference Between Digital Timer Failure and Mechanical Timer Failure
Digital timers fail mainly due to circuit board faults, keypad issues, power surges, or display driver damage. These failures cause loss of display, incorrect countdown, alarm failure, or total non-operation.
Mechanical timers rely on clock motors and mechanical contacts. Failures include slow ticking, incorrect timing accuracy, failure to turn off power, or complete motor stall.
Digital failures often trigger complete timer shutdown. Mechanical failures usually continue partially before stopping entirely.
Knowing which system your oven uses guides the correct troubleshooting path and prevents unnecessary component replacement.
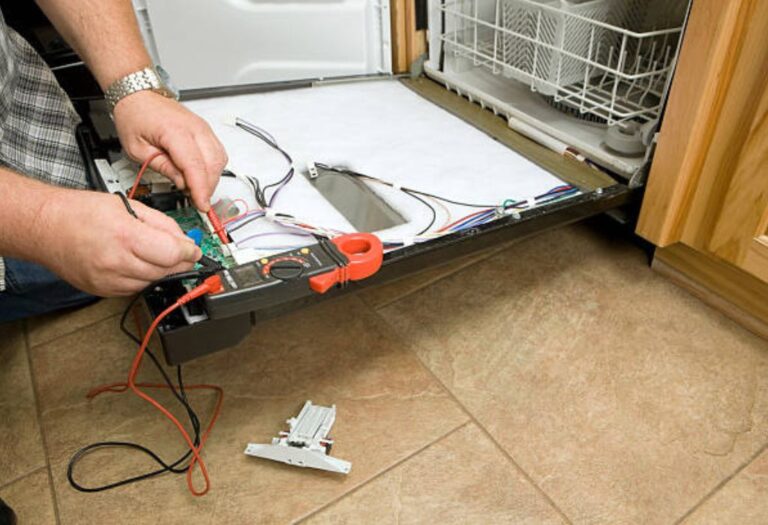
How to Test the Oven Timer With a Multimeter
Testing the oven timer with a multimeter helps confirm whether the fault is electrical, mechanical, or software-related. This step prevents unnecessary part replacement and saves significant repair cost.
After disconnecting power completely from the oven, remove the control panel carefully. Set your multimeter to continuity or resistance mode. Identify the timer terminals using the wiring diagram usually attached behind the control panel or inside the lower service drawer.
For digital timers, check continuity between the keypad ribbon connector and the control board input points. Press each timer-related button while measuring resistance. A working switch will show a brief closed-circuit signal.
For mechanical timers, place the multimeter probes on the timer motor input terminals. If there is no resistance reading, the internal motor winding may be burned out.
Next, test the electrical contacts that control oven shutoff. Turning the timer knob should open and close these contacts electrically.
If readings remain inconsistent or completely open, the timer assembly has failed and must be replaced. Multimeter testing gives absolute confirmation before spending money on parts.
How to Replace a Digital Oven Timer Control Board
Digital oven timers are usually integrated into the main electronic control board. When the board fails, the timer stops responding, resets randomly, or the display disappears.
After cutting power at the breaker, remove the screws securing the upper control panel. Carefully pull the panel forward without straining the wiring. Take clear photos of all wire connections before unplugging anything. This prevents wiring errors during reinstallation.
Unplug all harnesses gently from the old control board. The board is usually held in place with plastic tabs or small screws. Remove it carefully to avoid cracking the housing.
Install the new board in the same orientation. Reconnect all harnesses exactly as they were. Even a single misplaced connector can cause further electrical damage.
Once reassembled, restore power and reprogram the oven clock and timer. If the display functions normally and the timer responds correctly, the repair is complete.
How to Fix a Mechanical Oven Timer Motor
Mechanical timers use a small synchronous motor to rotate the internal clock gears. If this motor fails, the timer will not advance or will remain stuck at one time value.
To access the mechanical timer, disconnect the oven from power and remove the control panel. The timer will appear as a round metal assembly with rotating contacts.
Inspect the internal gears for broken teeth or dried lubrication. Sometimes, applying a small amount of electrical-contact-safe lubricant restores smooth movement. However, if the motor windings are burned, lubrication will not help.
Use a multimeter to test continuity across the motor terminals. If there is no resistance reading, the motor has failed internally and must be replaced.
In most cases, replacing the entire mechanical timer assembly is safer than attempting internal motor repair.
How to Fix an Oven That Keeps Turning Off Because of the Timer
If the oven shuts off before cooking time ends, the timer circuit may be sending false shutoff signals to the control board or relay system.
This problem is often caused by:
- Overheated relay contacts
- Cracked solder joints on the control board
- Weak internal timer switch contacts
Inspect the power relay connected to the timer circuit. Burn marks or heat discoloration indicate worn contacts. Replacing the relay usually restores proper operation.
For digital systems, reheating the solder joints using proper reflow techniques sometimes temporarily restores connection. However, permanent repair almost always requires board replacement.
If the oven shuts off randomly after heating for a long period, internal overheating of the timer board may be triggering a thermal shutdown condition.
How to Fix an Oven Timer That Does Not Sound the Alarm
A silent oven timer often indicates a failed buzzer or speaker rather than a failed timer circuit.
Locate the speaker terminals on the control board. Test continuity across the speaker using a multimeter. If the speaker shows no resistance, it is defective and must be replaced.
Some ovens use a piezo buzzer that receives direct voltage from the timer circuit. Measure output voltage during alarm activation. If voltage is present but no sound occurs, the speaker has failed.
If no voltage is present during alarm attempt, the failure is inside the control board’s sound driver circuit. In that case, full board replacement becomes necessary.
How to Fix an Oven Timer That Is Running Too Fast or Too Slow
Timing accuracy errors usually occur due to unstable clock frequency in the control board. This is commonly caused by failing capacitors or distorted voltage supply.
In mechanical timers, worn gears or weakened clock motors slow the rotation speed, causing long delays. Heat-damaged lubrication also increases friction.
In digital timers, capacitor failure affects oscillator timing. Replacing faulty capacitors requires board-level soldering and should only be done by trained technicians.
If timing accuracy is off by several minutes, replacing the timer control board or mechanical timer is the only stable long-term fix.
How to Fix an Oven Timer That Resets Itself Randomly
Random resets almost always point to unstable power delivery to the control board. This may result from:
- Loose neutral wire
- Burned power connector
- Defective internal power supply circuit
Check the incoming power connectors to the board. Loose terminals cause voltage drop and reset behavior. Heat often weakens these terminals over time.
Internal board power regulators may also fail due to heat stress. When this happens, the entire control board must be replaced.
Using a surge protector for electric ovens reduces future voltage damage significantly.
How to Decide Whether to Repair or Replace the Timer
Timer repair is ideal when:
- The keypad ribbon is loose
- A wiring connector is burnt
- The speaker has failed
- A mechanical contact is dirty
Timer replacement is necessary when:
- The display is completely dead
- The mechanical motor is burned
- The control board keeps resetting
- Timing accuracy is permanently incorrect
In most modern ovens, control board replacement is more reliable than attempting component-level electronic repair.
Conclusion
The oven timer plays a silent but critical role in kitchen safety, cooking accuracy, and overall appliance control. When it fails, timing becomes unreliable, cooking quality suffers, and in some cases, electrical risk increases.
From simple software resets and loose connections to full control board replacement and mechanical motor failure, timer faults follow predictable electrical and mechanical patterns.
By understanding how the timer works, how to test it safely, and which failures require replacement instead of repair, you can avoid unnecessary service calls and expensive misdiagnosis.
Many timer issues are resolved at home with proper inspection, careful wiring checks, and safe testing procedures.
When the oven timer is restored to proper operation, cooking returns to a state of confidence and precision. Instead of guessing time and risking overcooked food or forgotten meals, the kitchen regains its rhythm and reliability once again.
I’m Emma J. Caldwell, the founder, lead writer, and home-cooking enthusiast behind KitchenGuideCo.com. With a background in culinary arts and over a decade of cooking experience in both professional and personal kitchens, I created this platform to demystify recipes, offer smart kitchen gadget reviews, and guide readers through meal prep with confidence and clarity.