Installing a garbage disposal alongside a dishwasher might seem intimidating for a first-timer, but with proper guidance, it’s a straightforward home-improvement task.
Both appliances complement each other — the dishwasher cleans your dishes while the disposal handles leftover food particles, ensuring clog-free drains.
According to the U.S. Department of Energy, over 50 percent of modern kitchens now integrate both systems for efficiency and hygiene. A proper installation not only simplifies cleanup but also prevents odors, improves water drainage, and extends plumbing life.
In this comprehensive guide, you’ll learn every step of the process — from selecting compatible components to connecting the dishwasher drain, wiring the disposal, and testing for leaks.
Even as a beginner, you can achieve a professional-grade result using the right tools and careful planning.
Understanding How a Garbage Disposal and Dishwasher Work Together
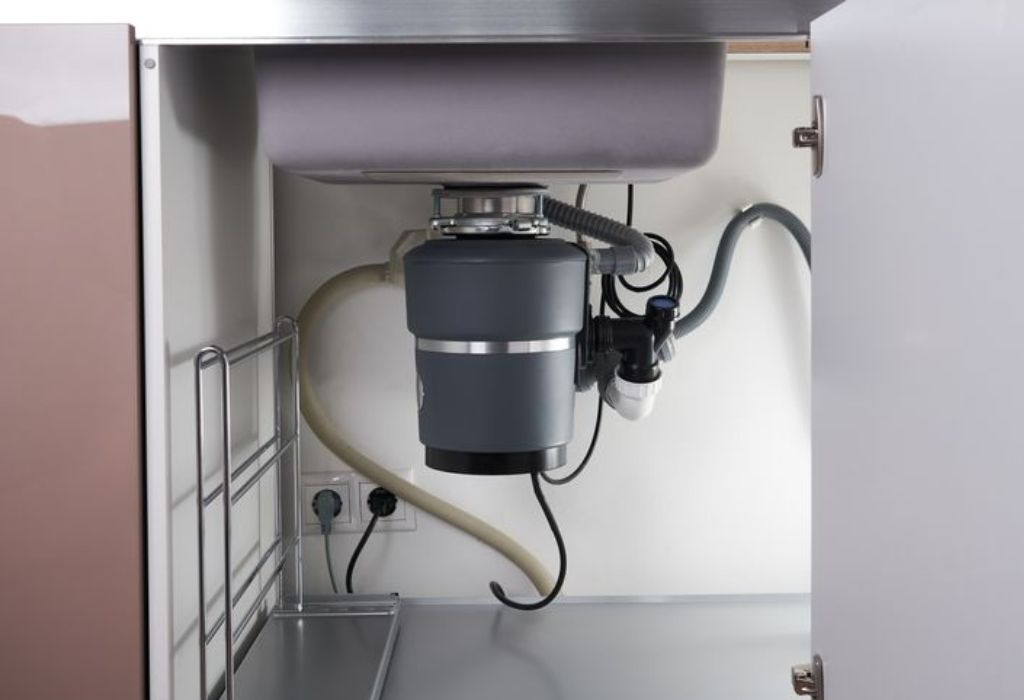
A garbage disposal is installed beneath the kitchen sink, attached to the drain opening. It grinds leftover food into fine particles that easily pass through your plumbing. The dishwasher, on the other hand, pumps wastewater through a drain hose that connects to the disposal’s side inlet port.
When properly connected, the dishwasher drains through the disposal’s chamber, allowing residual food debris to be shredded before entering the main waste line. This integration prevents blockages and keeps the sink system clean.
Without a disposal connection, solid residues from the dishwasher could accumulate in the pipe traps, leading to unpleasant smells and slow drainage. That’s why professional installers always recommend linking both units for an efficient waste-management setup.
Do all dishwashers connect to a disposal?
Most modern dishwashers have an outlet designed to connect to a garbage disposal or a stand-alone drain pipe.
Is the connection mandatory?
No, but connecting through a disposal improves drainage and reduces clogs.
Can I use the disposal without a dishwasher?
Yes, it functions independently if capped properly.
Does the disposal filter water from the dishwasher?
No, it only grinds solid food waste before discharge.
Will this setup affect water pressure?
Not at all — both units operate on separate flow controls.
Tools and Materials You’ll Need
Having the right tools ensures a smooth installation and minimizes the risk of leaks. Gather the following items before beginning:
- New garbage disposal unit
- Dishwasher drain hose
- Mounting assembly and sink flange
- Plumber’s putty or silicone sealant
- Screwdriver set (flathead and Phillips)
- Adjustable wrench or socket set
- Hammer or pliers
- Electrical cord kit (if not pre-wired)
- Wire connectors and electrical tape
- Bucket, sponge, and towels
Verify that your kitchen sink and plumbing setup are compatible with the disposal model you choose. Some older sinks require additional mounting rings or reinforced flanges.
Do disposals come with power cords?
Many don’t — check your packaging before purchase.
Can I reuse my old drain hose?
Only if it’s flexible, undamaged, and long enough for a secure fit.
What type of sealant works best?
Plumber’s putty is ideal for stainless-steel sinks; silicone works for composite or ceramic.
Should I wear gloves?
Yes, especially during mounting and wiring to prevent injury.
How long does installation take?
For beginners, typically 90 minutes to 2 hours.
Choosing the Right Garbage Disposal for Your Kitchen
Selecting the right unit is crucial for performance and longevity. Garbage disposals are categorized by horsepower (HP) and grind stages.
For small households, a 1/3 HP or 1/2 HP unit handles light food scraps. Medium kitchens benefit from a 3/4 HP model, while large families or heavy users should opt for 1 HP or higher.
Consider stainless-steel grinding components for durability and sound insulation for quieter operation. If your dishwasher drains through the disposal, ensure it includes a dishwasher knockout plug — a small sealed port that must be removed during installation.
Continuous-feed models are most common for home use because they allow waste feeding while the unit runs. Batch-feed types are safer for households with children since they operate only when covered with a magnetic stopper.
Can any disposal connect to a dishwasher?
Most models support this connection, but always confirm before purchase.
Are expensive units quieter?
Yes, premium models feature noise-reduction insulation and anti-vibration mounts.
What’s the lifespan of a disposal?
Typically 8–15 years with proper care.
Does higher horsepower consume more energy?
Minimal difference — performance gain outweighs the power cost.
Do disposals work with septic systems?
Yes, but choose septic-safe models with enzyme assist features.
Preparing Your Sink and Workspace
Before starting, disconnect power from the circuit breaker to ensure electrical safety. Clear everything from under the sink and place a towel or pan to catch residual water.
If you’re replacing an old disposal, detach it first by rotating the mounting ring counterclockwise. Remove the existing sink flange and old plumber’s putty using a putty knife. Clean the sink opening thoroughly to ensure a tight new seal.
For first-time installations, verify that the sink drain opening matches your disposal’s mounting hardware, typically 3-1/2 inches in diameter. If not, use an adapter flange. Make sure your plumbing’s P-trap aligns properly with the disposal’s outlet before proceeding.
Can I install a disposal in any sink?
Yes, as long as it has a standard drain opening and sufficient space below.
Do I need a separate circuit?
Ideally, yes. Dedicated 120 V / 15 A circuit recommended.
Should I shut off the water supply?
Yes, turn off both hot and cold valves before beginning.
What if the under-sink area is too small?
Choose a compact or low-profile disposal model.
Is additional ventilation required?
No, but good under-sink airflow helps reduce moisture buildup.
Installing the Sink Flange and Mounting Assembly
Start at the top of the sink. Roll a quarter-inch-thick rope of plumber’s putty and apply it around the underside of the new sink flange. Insert the flange into the drain opening and press firmly to form a watertight seal.
From beneath the sink, slide on the rubber gasket, backup ring, and mounting ring in that order. Tighten the screws evenly in a crisscross pattern to ensure even pressure. Wipe away any excess putty that squeezes out around the flange edge.
If your model includes a mounting collar, rotate and secure it with the provided locking snap ring. Check that the flange remains flush with the sink surface to prevent leaks.
Can I use silicone instead of putty?
Yes, silicone works on composite sinks but may complicate future removal.
How tight should screws be?
Snug but not over-tightened to avoid warping the flange.
What if the flange shifts?
Loosen slightly, realign, and retighten evenly.
Should the gasket face upward or downward?
Rubber gasket faces up toward the sink flange.
How do I confirm a proper seal?
Run a small amount of water — no dripping should appear below.
Connecting the Garbage Disposal to the Sink Flange
Align the disposal under the mounted sink flange. Lift it into place and engage the mounting tabs into the flange grooves. Rotate the locking ring clockwise until it clicks firmly. This step may require gentle upward pressure and rotation simultaneously.
Use the included wrench or a screwdriver through the mounting lug for extra leverage. The disposal should hang solidly with minimal movement. Check that the outlet port faces your drain pipe for easy connection.
Should I lubricate the mounting ring?
No, keep it clean and dry for secure metal-to-metal contact.
Can one person lift it alone?
Most models weigh 10–15 pounds and can be lifted solo.
How do I align it with the drain?
Rotate gently until the discharge port lines up horizontally with the trap.
Will the vibration loosen the ring?
No, once locked correctly, it stays tight during operation.
Should I add extra brackets?
Not necessary; the standard mount supports the full weight safely.
Removing the Dishwasher Knockout Plug
Before connecting the dishwasher drain, remove the knockout plug from the disposal’s side inlet. Insert a screwdriver into the small round opening and tap gently with a hammer. The plastic plug will pop inside the chamber.
Retrieve the plug immediately with needle-nose pliers to prevent it from blocking the impeller later. This simple but essential step activates the dishwasher port.
Do all disposals have a knockout plug?
Yes, most include one sealed port for optional dishwasher connection.
What happens if I forget to remove it?
Your dishwasher won’t drain properly, leading to backflow.
Can I reuse the plug later?
No, once removed, it cannot be reinstalled.
Is it safe to tap hard?
A light hammer tap is enough — avoid cracking the housing.
Should I remove power before doing this?
Always disconnect power before any internal adjustment.
Connecting the Dishwasher Drain Hose
Attach the dishwasher drain hose to the now-open disposal inlet. Slide the rubber hose fully onto the port, then secure it with a stainless-steel clamp. Tighten the clamp screw until snug but not overtightened.
Ensure the hose forms a high loop under the sink to prevent dirty water from flowing back into the dishwasher. Secure the loop with a bracket or zip tie near the countertop underside.
Connect the other end of the hose to the dishwasher’s drain outlet using a factory-approved coupling. Verify the hose path is smooth with no kinks or dips.
Why is a high loop necessary?
It prevents wastewater back-siphoning into the dishwasher.
Can I use an air-gap device instead?
Yes, many local codes require air gaps for added safety.
How do I test for leaks?
Run a short rinse cycle — check all joints for drips.
What if the hose doesn’t fit snugly?
Use a stepped adapter or clamp insert for a tight seal.
Is PVC hose acceptable?
Yes, as long as it’s rated for dishwasher temperature and pressure.
Plumbing Connections: P-Trap and Discharge Assembly
Next, connect the disposal’s discharge outlet to the P-trap using the supplied discharge tube and gasket. Insert the gasket into the discharge outlet, slide the flange over the tube, and tighten with the provided metal clamp.
Align the P-trap so that it slopes slightly downward toward the wall drain. This ensures consistent water flow and prevents standing residue. Hand-tighten slip-nut fittings first, then finish with a quarter turn using pliers.
Place a bucket under the trap and run water for one minute to verify no leaks. Re-seat joints if any moisture appears.
Can I use PVC pipes for this section?
Yes, PVC or ABS materials are standard for under-sink drains.
Is pipe slope important?
Yes, maintain at least a quarter-inch drop per foot of length.
What if my trap doesn’t align?
Use adjustable trap arms or flexible couplers.
Do I need thread tape here?
No, rubber washers seal slip-nut connections effectively.
Should I glue the joints?
Never; they must remain removable for cleaning or repairs.
Wiring the Garbage Disposal
If your disposal doesn’t come pre-wired, install an electrical cord kit. Remove the access plate on the disposal’s bottom and insert the strain-relief clamp into the knockout hole. Feed the power cord through the clamp, leaving six inches of wire inside.
Connect the black (hot) wire to the black terminal, white (neutral) to white, and green (ground) to the grounding screw. Twist connections securely using wire nuts and wrap with electrical tape. Replace the access plate and tighten the strain-relief clamp.
Plug the unit into a grounded outlet controlled by a wall switch. Never hard-wire disposals without following local code requirements.
Can I wire directly without a plug?
Only if your local code allows — most prefer plug-in models.
Do I need GFCI protection?
Recommended near water sources for added safety.
Which wire is ground?
The green or bare copper wire connects to the green screw.
Is voltage standard across models?
Yes, all use 120 V AC / 60 Hz circuits.
Can I share an outlet with the dishwasher?
Only if the circuit handles combined load and follows code.
Testing and Inspecting the Installation
Before turning on the unit, check all plumbing and electrical connections carefully. Run cold water through the sink for 30 seconds while inspecting the discharge and inlet hoses for leaks.
Turn on the wall switch briefly to confirm motor rotation and noise level. If the unit hums but doesn’t spin, unplug it and use the reset button or an Allen wrench on the bottom to free the impeller.
Run the dishwasher through a short cycle to verify proper drainage into the disposal. Observe that water exits smoothly without backing up into the sink.
What if I hear grinding metal sounds?
Turn off immediately — a foreign object may be stuck inside.
Why does the disposal leak from the top?
The sink flange or gasket may be misaligned.
Is it normal for brief vibrations?
Yes, slight vibration occurs during initial operation.
Can I test without the dishwasher connected?
Yes, plug the inlet temporarily and test independently.
Should the water run during disposal use?
Always — it aids grinding and flushes debris effectively.
Maintenance and Safety Practices
Proper maintenance keeps your disposal and dishwasher operating for years. Run cold water before and after each use to clear residues from blades and pipes. Avoid putting fibrous foods like celery, corn husks, or onion skins down the disposal.
Once a week, grind ice cubes mixed with citrus peels to clean and deodorize the chamber naturally. Avoid chemical drain cleaners — they damage seals and metal components.
Periodically inspect hoses and clamps for wear or mineral buildup. Tighten as needed to maintain watertight connections. If you travel or won’t use the system for long periods, disconnect power and leave the drain area dry.
Can I grind coffee grounds?
Small amounts are fine, but large quantities may clog pipes.
Is hot water better than cold?
Cold water solidifies grease for easier grinding.
Should I sharpen blades?
No, grinding action naturally keeps them clean.
How often should I replace hoses?
Every 5–7 years or at the first sign of wear.
Can lemon peels freshen the disposal?
Yes, they help remove lingering odors safely.
Troubleshooting Common Problems
Even well-installed systems can encounter minor issues. If your disposal won’t turn on, check the reset button underneath or inspect the circuit breaker. Persistent jams may result from hard objects like bones or utensils; use tongs or a wooden stick to dislodge them safely.
For slow draining, remove the P-trap and clean debris buildup. Always disconnect power first. If water backs up into the dishwasher, the hose loop may be too low — reposition it higher under the countertop.
Unusual noises or vibrations usually signal loose mounting screws or foreign materials. Tighten hardware and retest under running water.
Why does my dishwasher back up?
Likely a blocked hose or missing high loop.
Why does the disposal smell bad?
Residue buildup; clean with ice and baking soda rinse.
Why does water leak from the bottom?
Internal seal failure — replacement may be required.
Why does it hum but not spin?
The impeller may be jammed; use the manual reset wrench.
Why does it trip the breaker?
Overload, faulty wiring, or shared high-draw circuit.
Energy Efficiency and Environmental Benefits
Using a garbage disposal with a dishwasher promotes environmental responsibility. Both appliances minimize food waste entering landfills and reduce water consumption compared to manual washing.
Modern disposals operate efficiently, using less than 1 kilowatt-hour per month on average. Dishwashers connected to disposals clean faster because residual food particles don’t circulate inside the pump filter.
This combination lowers overall kitchen maintenance costs and keeps plumbing cleaner for years. When paired with water-saving dishwashers, it forms a sustainable household system that conserves resources while maintaining hygiene.
Do disposals consume much energy?
No, usage is minimal — similar to a light bulb.
Is this setup eco-friendly?
Yes, it reduces landfill waste and saves water.
Should I use cold or warm water?
Cold water prevents grease from liquefying.
Do food particles harm septic tanks?
Not if you use septic-safe disposals.
How does this help plumbing longevity?
Fewer clogs mean less wear on drain lines and traps.
Cost, Time, and DIY vs. Professional Installation

A typical garbage disposal installation costs between $150 and $400, including parts and labor. Doing it yourself saves on labor, leaving you to purchase only the unit and accessories. Most homeowners complete the project within two hours.
Professional installation guarantees code compliance and may include electrical and plumbing inspections. However, beginners with basic tools can safely handle the process by following this step-by-step guide.
Is DIY installation safe?
Yes, when power is off and instructions are followed carefully.
Should I hire an electrician?
Only if wiring or outlet modifications are needed.
Do I need permits?
Most regions don’t, but check local plumbing codes.
Will a warranty cover DIY work?
Some manufacturers require licensed installation — verify first.
Is copper plumbing compatible?
Yes, but use dielectric fittings to prevent corrosion.
Conclusion
Installing a garbage disposal with a dishwasher is a manageable project that enhances kitchen efficiency, sanitation, and convenience. With proper tools, attention to detail, and adherence to safety steps, beginners can achieve results that match professional standards.
From preparing your sink and removing the knockout plug to wiring, connecting hoses, and testing the system, each step plays a crucial role in long-term performance. Once installed, regular cleaning, cold-water operation, and periodic inspections will keep both units running smoothly.
Combining these two appliances transforms your kitchen workflow — dishes clean faster, drains stay clear, and food waste is handled responsibly. It’s an investment that improves both daily comfort and your home’s long-term plumbing health.
I’m Emma J. Caldwell, the founder, lead writer, and home-cooking enthusiast behind KitchenGuideCo.com. With a background in culinary arts and over a decade of cooking experience in both professional and personal kitchens, I created this platform to demystify recipes, offer smart kitchen gadget reviews, and guide readers through meal prep with confidence and clarity.