The smell of sizzling oil, rising steam, and lingering smoke often feels like part of everyday cooking. But when those odors remain trapped inside the kitchen, they slowly coat cabinets, walls, and appliances with grease and moisture.
Many homeowners only realize the true value of an oven hood when ventilation problems start affecting air quality, comfort, and even appliance performance. Installing an oven hood is not just about removing odors. It is about protecting the entire cooking environment.
An oven hood captures heat, smoke, grease particles, and moisture directly from the cooking surface before they spread through the living space. Proper installation ensures efficient airflow, quiet operation, and long-term durability.
Poor installation, on the other hand, results in weak suction, excessive noise, electrical hazards, and ineffective ventilation.
Learning how to install an oven hood correctly helps homeowners avoid expensive professional service calls while maintaining full control over kitchen safety.
This guide explains every step in detail, from choosing the right hood type to final airflow testing. With careful preparation and correct technique, oven hood installation becomes a reliable and rewarding DIY project.
What Is an Oven Hood and Why Installation Matters
An oven hood, also called a range hood, is a ventilation appliance installed above the cooking surface. Its primary function is to capture airborne grease, steam, smoke, odors, and heat produced during cooking.
These contaminants are either exhausted outside through ducting or filtered and recirculated back into the kitchen.
Proper installation ensures that the hood pulls air from the correct capture zone. If the hood sits too high, too low, or off-center, airflow efficiency drops dramatically. Misaligned installation causes smoke to escape into the kitchen before being captured.
Installation quality also determines noise level. Poor mounting causes vibration, rattling, and excessive operational sound. These issues often result from improper anchoring, uneven support, or incorrect duct connection.
Electrical safety depends directly on installation accuracy. Incorrect wiring increases the risk of short circuits, fire hazards, and control panel failure. Proper installation protects both the device and the entire household electrical system.
An oven hood becomes a long-term investment only when installed with precision.
Types of Oven Hoods and Their Installation Differences
Oven hoods come in several main types, and each design requires a different installation method. Wall-mounted hoods attach directly to the wall above the cooking surface. These often require heavy structural support and external duct routing.
Under-cabinet hoods mount to the underside of kitchen cabinets. They are lighter and often easier to install but still require careful ventilation planning. These models may operate with ducted or ductless configurations.
Island hoods suspend from the ceiling and vent either through ceiling ducting or recirculating filters. These require precise ceiling anchoring and longer duct runs, making installation more complex.
Downdraft hoods rise vertically from behind the cooktop and pull air downward. These need specialized countertop cutouts and under-floor duct routing.
Each hood type demands different mounting hardware, airflow path planning, and structural reinforcement. Choosing the correct hood type simplifies installation and ensures maximum ventilation performance.
Which oven hood is easiest to install at home?
Under-cabinet hoods are generally the easiest for DIY installation.
Do all wall-mounted hoods require ducting?
Most do, but some offer ductless conversion options.
Are island hoods harder to install than wall hoods?
Yes, ceiling support and longer duct runs make them more complex.
Can downdraft hoods work with regular ovens?
Yes, but they require special cabinet and floor duct planning.
Does hood type affect airflow power?
Yes, design directly influences suction efficiency.
Tools and Materials Needed for Oven Hood Installation
Successful oven hood installation begins with having the right tools and materials ready before starting. A power drill with various drill bit sizes is essential for bracket mounting and duct hole creation. A stud finder helps locate structural support behind walls or ceilings.
Screwdrivers, both flathead and Phillips, are required for electrical cover plates, mounting brackets, and panel fasteners. A tape measure ensures accurate positioning and symmetry above the cooking surface.
Sheet metal snips may be needed for trimming duct sections. Aluminum foil tape seals duct joints and prevents air leakage. A level guarantees that the hood sits perfectly straight during mounting.
Electrical tools include wire strippers, voltage testers, and junction box connectors. Safety equipment such as gloves, safety glasses, and dust masks protect during drilling and duct cutting.
Having all tools staged before starting prevents unnecessary interruptions during critical installation steps.
Measuring and Preparing the Installation Area
Accurate measurement determines both safety and performance of the oven hood. The standard mounting height ranges from 24 to 30 inches above electric cooktops and 28 to 36 inches above gas cooktops. This clearance ensures effective smoke capture while preventing heat damage to the hood.
Width alignment matters equally. The hood should match or slightly exceed the width of the cooking surface. Undersized hoods allow smoke to escape around the edges while oversized hoods improve capture efficiency.
Wall and cabinet surfaces must be checked for structural strength. Hoods are heavier than they appear and require solid anchoring into wall studs or reinforced cabinet bases. Drywall alone cannot support most hood weights safely.
Vent path planning is another critical step. The shortest, straightest duct route delivers the strongest airflow. Every bend and extension reduces suction power.
Proper preparation at this stage prevents later rework and ensures long-term reliability.
How high should an oven hood be installed above the stove?
Usually 24 to 30 inches for electric and 28 to 36 inches for gas.
Should the hood be wider than the cooktop?
Yes, equal or slightly wider is best for airflow capture.
Can drywall hold the weight of an oven hood?
No, wall studs or reinforced framing are required.
Does duct length affect hood performance?
Yes, longer ducts reduce airflow strength.
Is it necessary to level the hood during installation?
Yes, uneven mounting causes vibration and poor airflow.
Electrical and Ventilation Safety Before Installation
Before beginning electrical work, power must be shut off at the circuit breaker. This prevents accidental shock during wiring. A voltage tester confirms that no live current remains at the installation point.
Ventilation planning must comply with local building codes. Some regions require exterior venting instead of ductless operation. Backdraft dampers may also be mandated to prevent outside air from entering the kitchen.
Combustion safety is especially important for gas ovens. Improper ventilation near gas appliances increases the risk of carbon monoxide buildup. Adequate vent pathway design prevents pressure imbalance in the kitchen.
Fire safety clearance must be maintained between the hood and combustible cabinetry. Manufacturer guidelines specify exact spacing requirements that must never be violated.
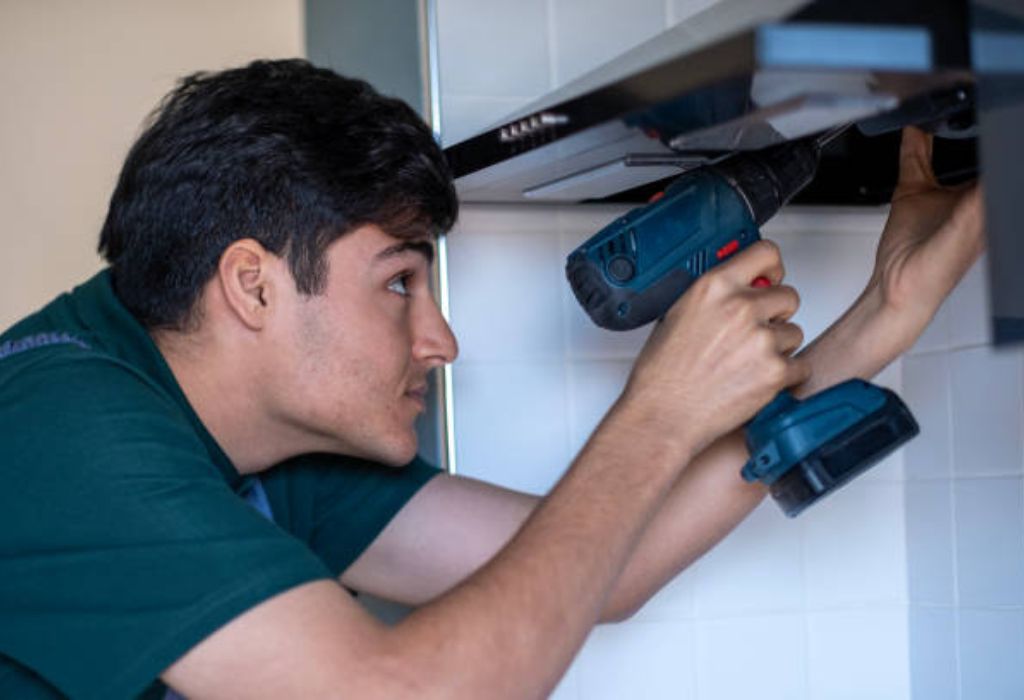
Step-by-Step Wall-Mounted Oven Hood Installation
Wall-mounted oven hoods are among the most common installations in modern kitchens. The first step is marking the exact centerline above the cooktop. This ensures that the hood aligns perfectly with the cooking surface for balanced airflow capture.
Once positioning is confirmed, locate wall studs using a stud finder. The mounting bracket must be anchored directly into these studs to carry the weight of the hood safely. After marking the drill points, pre-drill the holes to prevent wall cracking and to ensure accurate screw placement.
Next, attach the mounting bracket securely to the wall. This bracket supports the full weight of the hood during final placement. With help from another person, lift the hood onto the bracket and lock it into position according to the manufacturer instructions.
After mounting, connect the ductwork if it is a ducted system. The duct collar must align tightly with the hood outlet. Seal all duct joints using aluminum foil tape to prevent air leakage. Finally, secure the chimney cover or decorative shroud if included.
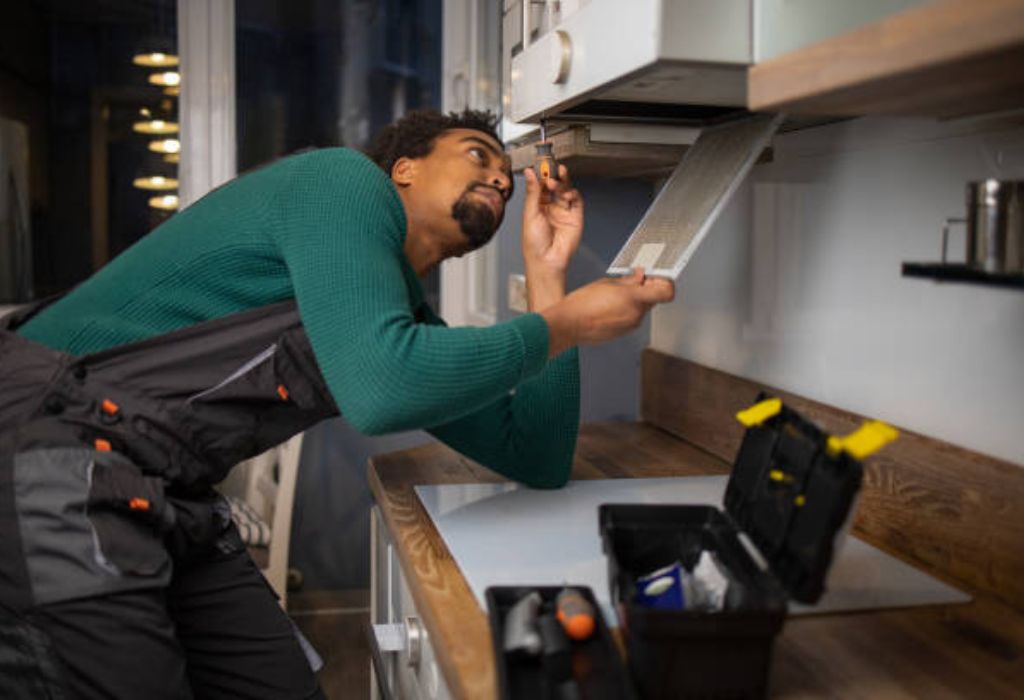
Under-Cabinet Oven Hood Installation Process
Under-cabinet hood installation begins by checking the cabinet base strength. Thin or aging cabinets may require reinforcement before mounting. The hood must sit perfectly centered under the cabinet and above the cooktop.
Mark the screw holes through the hood’s mounting template. Drill pilot holes through the cabinet base. During lifting, support the hood while driving mounting screws upward into the cabinet base to prevent slipping.
For ducted systems, cut a precise opening in the cabinet top for the duct to pass through. Connect the duct section and seal all joints securely. For ductless models, install the charcoal filter and secure the recirculation vent according to manufacturer guidelines.
Electrical wiring is completed through the cabinet interior. Once installed, test both fan speed and light function before finishing cabinet trim adjustments.
Ducted vs Ductless Oven Hood Installation Differences
Ducted oven hoods vent air outside through metal ductwork. Installation requires careful planning of the vent path through walls or ceilings. The advantage is superior air removal and grease elimination.
Ductless oven hoods filter air through charcoal filters and recirculate it back into the kitchen. These are easier to install because no external ducting is required. However, they require frequent filter replacement to maintain performance.
Duct routing length and direction directly affect performance in ducted systems. Short, straight duct paths deliver the best suction. Ductless systems depend entirely on filter quality and fan power.
Local building codes may favor one system over the other depending on kitchen layout and fire safety rules.
Which system removes smoke better, ducted or ductless?
Ducted systems remove smoke more effectively.
Is ductless installation easier for apartments?
Yes, because external venting is not required.
Do ductless hoods remove grease completely?
They trap grease in filters but do not exhaust it outdoors.
Can a ducted hood be converted to ductless?
Many models support conversion with filter kits.
Does duct length affect fan noise?
Yes, longer ducts often increase operational noise.
Final Testing, Airflow Check, and Noise Inspection
Once the hood is fully installed, restore power from the breaker and turn on each fan speed setting. Confirm that the airflow direction matches the duct outlet and that air exits freely outside.
Test for air leaks at duct joints by observing airflow using a small piece of tissue. Any fluttering near the joints indicates leakage that requires resealing with foil tape.
Noise inspection is equally important. Excessive vibration or rattling usually indicates loose mounting screws or misaligned duct connections. Adjust and tighten all fasteners as needed.
Lighting systems should be tested for proper brightness and switch response. All controls must respond smoothly without delay or flickering.
Common Installation Mistakes and How to Avoid Them
One of the most frequent mistakes is improper mounting height. Installing too high reduces capture efficiency, while installing too low risks heat damage and fire hazards. Always follow manufacturer clearance guidelines.
Another common error is weak anchoring. Mounting into drywall instead of wall studs leads to long-term instability and potential injury hazards. Structural support is always mandatory.
Poor duct sealing is another issue. Unsealed joints allow greasy air to escape into walls and cabinets, causing odor buildup and long-term damage.
Ignoring electrical safety standards also leads to serious risk. Incorrect wiring increases the chance of short circuits, power failure, and fire.
What is the most dangerous installation mistake?
Improper electrical wiring poses the greatest hazard.
Can weak mounting cause the hood to fall?
Yes, drywall-only mounting often fails over time.
Is wrong duct size a common problem?
Yes, undersized ducts reduce airflow performance.
Does skipping filter installation affect safety?
Yes, grease buildup increases fire risk.
Can poor sealing cause cabinet damage?
Yes, trapped grease vapors damage wood and paint.
Conclusion
Installing an oven hood correctly transforms a kitchen into a cleaner, safer, and more comfortable cooking environment. Proper installation ensures that heat, smoke, grease, and moisture are captured before they spread through the home.
Every step in the installation process plays a role, from selecting the right hood type to confirming secure mounting and airtight duct connections.
Accurate measurement, solid anchoring, and safe electrical wiring create the foundation for long-term reliability.
Ducted and ductless systems each offer unique advantages depending on kitchen layout and ventilation requirements, but both depend on proper installation to perform effectively.
Final airflow testing and noise inspection confirm that the hood operates efficiently and safely. Avoiding common mistakes such as poor mounting, improper ducting, and incorrect wiring prevents long-term problems and costly repairs.
With the right tools, preparation, and step-by-step execution, oven hood installation becomes a manageable and rewarding DIY project. A properly installed oven hood not only improves indoor air quality but also protects cabinets, walls, and appliances for years to come.
I’m Emma J. Caldwell, the founder, lead writer, and home-cooking enthusiast behind KitchenGuideCo.com. With a background in culinary arts and over a decade of cooking experience in both professional and personal kitchens, I created this platform to demystify recipes, offer smart kitchen gadget reviews, and guide readers through meal prep with confidence and clarity.