Picture this: dinner is done, your sink is stacked, and you load everything into your Whirlpool dishwasher before pressing start.
The cycle finishes, but some dishes still have spots or bits of food clinging to them. It’s a common frustration many Whirlpool owners face—not because the dishwasher failed, but because it wasn’t loaded correctly.
A Whirlpool dishwasher is designed with advanced spray systems, adjustable racks, and precision sensors.
But even the smartest appliance can’t clean well if plates block the jets or utensils nest together. Proper loading is the foundation of clean dishes, efficient water use, and long-lasting performance.
In this complete guide, we’ll walk you through every detail of loading your Whirlpool dishwasher. You’ll learn how to use each rack effectively, where to place utensils, how to load large pots, and how much detergent to use.
With these expert steps, your Whirlpool will deliver spotless, streak-free results after every meal.
Understanding Your Whirlpool Dishwasher Layout
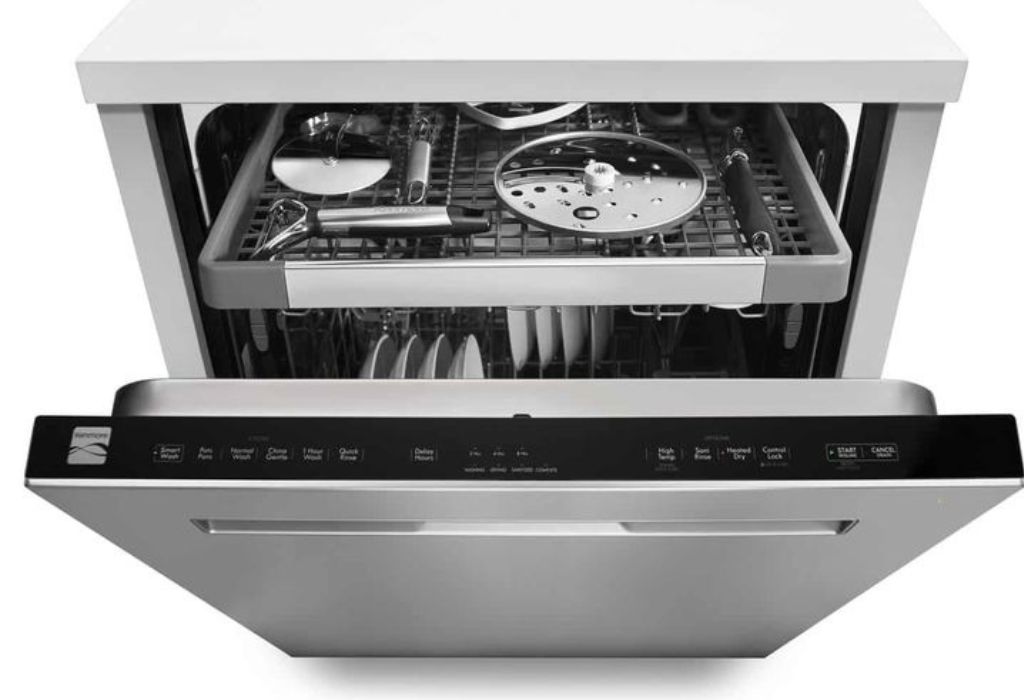
Whirlpool dishwashers come with a highly functional layout designed for versatility. Inside, you’ll find two main racks, a silverware basket, and rotating spray arms that handle different cleaning zones. Knowing what each part does helps you maximize cleaning efficiency.
The bottom rack is the powerhouse for larger, dirtier items such as plates, pots, and pans. It receives the strongest water pressure from the lower spray arm. The top rack, meanwhile, handles cups, glasses, and smaller items that need gentler washing.
Whirlpool’s spray arms spin rapidly to cover every corner with pressurized water. Blocking them with tall items can lead to uneven cleaning. Always check that they can rotate freely before closing the door.
Many Whirlpool models feature foldable tines and adjustable racks. These allow you to fit odd-shaped items and taller cookware easily. Use these features whenever you’re working with bulky loads.
The detergent dispenser and rinse-aid compartment are usually located inside the door. They release their contents at precise times for optimal performance. Make sure no tall pan or plate blocks them.
Understanding how these components interact ensures your dishes get a complete wash every time. Once you know your dishwasher’s anatomy, loading becomes faster, smarter, and much more effective.
Prepping Dishes Before Loading
Before you start loading, a little preparation can make a huge difference. Whirlpool dishwashers are built to handle small food residues, but scraping off large chunks prevents filter clogs. Avoid heavy rinsing—light scraping works best for most modern models.
Inspect the filter and drain area regularly. Remove leftover food particles or seeds that can cause odors or reduced drainage. A clean filter ensures steady water circulation.
Hot water enhances detergent activation, so run the tap at your sink until it feels hot before starting the cycle. This pre-heats the dishwasher’s incoming water and improves cleaning power.
Greasy cookware benefits from a quick warm-water rinse. Too much oil inside the tub can redeposit on glasses and dishes. A few seconds of rinsing prevents this issue entirely.
Check that your items are dishwasher-safe. Avoid washing wooden, non-stick, or delicate crystal pieces that could warp or crack. Reading manufacturer symbols on the bottom of dishes saves expensive replacements.
Lastly, ensure that plastics marked “top-rack safe” go only on the upper rack. This protects them from the heating element located below the bottom rack. Careful preparation sets the stage for a flawless wash.
How to Load the Bottom Rack Efficiently
The bottom rack handles the toughest cleaning jobs. Load dinner plates, serving bowls, pots, and pans here. Each item should face the spray arm for maximum exposure.
Keep plates evenly spaced between tines so water can reach all surfaces. Stacking or overlapping dishes prevents detergent from dissolving grease effectively. Angled placement also promotes better drying.
Place large pots and pans along the sides or back of the rack. Avoid covering the center, where Whirlpool’s primary jets spray upward. Unblocked jets guarantee even distribution of water.
Do not let tall items interfere with detergent-dispenser openings. If soap release is obstructed, you’ll find residue on your dishes later. A quick visual check avoids this.
When using foldable tines, adjust them for oversized cookware or mixing bowls. Whirlpool’s flexible rack design helps fit different shapes without restricting spray movement.
If your model includes a PowerScour or TargetClean zone, place heavily soiled pots there. These high-pressure jets provide an extra-strong wash for stubborn grime.
Once loaded, manually spin the spray arm to confirm it rotates freely. It’s a simple test that ensures all your efforts pay off with spotless dishes.
Should I rinse dishes before loading a Whirlpool dishwasher?
No, light scraping is enough. Modern Whirlpool sensors detect soil levels and adjust accordingly.
Can I put baking trays on the bottom rack?
Yes, but stand them upright along the sides so they don’t block water flow.
Why are my plates still dirty after washing?
Spray arms might be blocked or detergent may not have dispensed properly. Check before each cycle.
Can I wash cast-iron cookware in my Whirlpool dishwasher?
Never. Cast iron rusts and loses its seasoning when exposed to detergent and heat.
Why do plastic items melt at the bottom rack?
They’re too close to the heating element. Place all plastics on the top rack only.
How to Load the Top Rack Properly
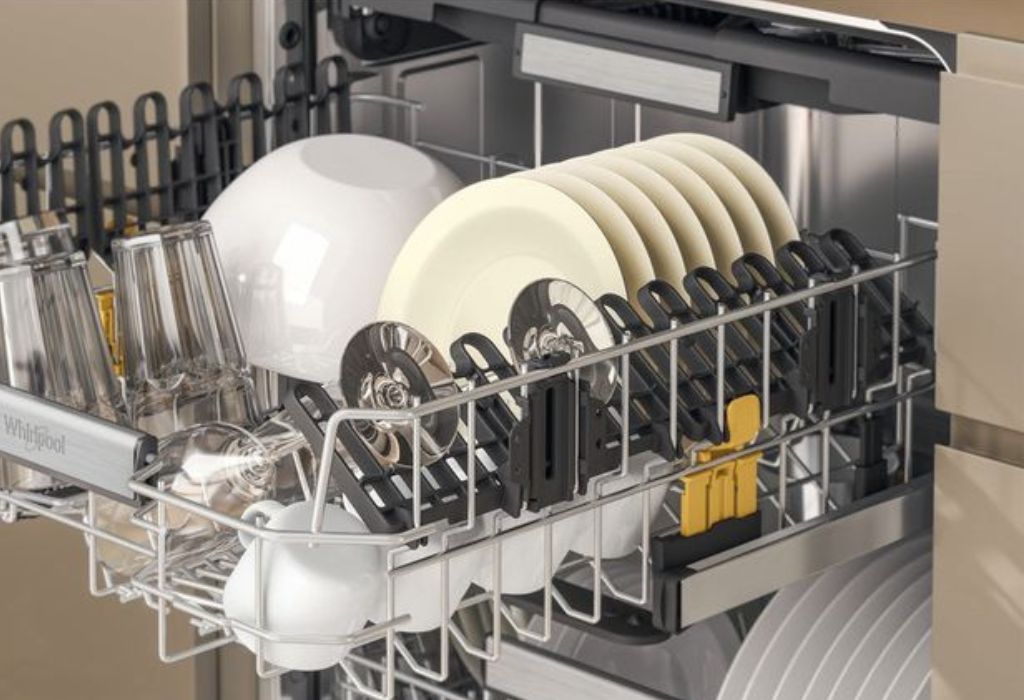
The top rack is for lightweight and delicate dishes. Cups, mugs, bowls, and glassware belong here. Each item should rest securely between tines without touching others.
Tilt glasses slightly so water drains and prevents spotting. Avoid placing them directly above tall plates on the bottom rack, as spray patterns can be blocked. Proper spacing allows for thorough rinsing.
Adjust the rack height if needed. Whirlpool’s adjustable design lets you lower it for tall glassware or raise it to create more space below. This customization helps with irregular loads.
For plastics and small containers, keep them face-down and slightly angled. Secure lids or light pieces with the rack’s clips to prevent flipping. Whirlpool’s top-rack jets are designed to clean gently but effectively.
Do not overload the rack with too many small items. Overcrowding leads to trapped detergent and poor drying. A balanced arrangement ensures airflow during the drying cycle.
If your model includes a dedicated cutlery tray at the top, use it for long utensils like ladles or spatulas. This feature prevents blockage and keeps utensils spotless.
Always give the upper spray arm a quick spin before closing the door. If it hits a glass or utensil, reposition items to guarantee a full 360-degree rotation.
Silverware Basket and Utensil Placement
The silverware basket is often underestimated but crucial for perfect cleaning. Mix forks, knives, and spoons evenly throughout to prevent nesting. Alternating handles up and down ensures water coverage on both ends.
Knives should go handle-up for safety, unless your model has a covered section for blades. This reduces the risk of accidental cuts when unloading. Mixing utensil types avoids clumping and improves wash results.
Avoid overstuffing the basket. Overcrowding limits water circulation and causes streaking. Leave small gaps between utensils for detergent to flow freely.
Stainless steel and silver items should be separated. When these metals touch under high heat, discoloration or pitting can occur. Keeping them apart preserves shine.
If your Whirlpool includes a third-level cutlery tray, use it for flat items. This helps free space below for bowls and small plates. It also keeps long utensils from obstructing spray arms.
Make sure no utensil extends beyond the basket’s top. Protruding pieces can block spray arm movement and reduce coverage. A quick check prevents mid-cycle jams.
Proper silverware loading improves not just cleanliness but also drying performance. It’s a small detail with big results in your Whirlpool dishwasher’s efficiency.
Should utensils be loaded handle up or down?
Alternate directions. Mixing handles improves cleaning and ensures safety during unloading.
Why do my spoons stick together?
They’re nesting. Mix utensil types and avoid stacking similar shapes together.
Can I wash kitchen knives regularly in my Whirlpool dishwasher?
It’s possible but not ideal. Repeated washing dulls blades faster than hand cleaning.
Why are my utensils discolored after washing?
Likely from contact between different metals or harsh detergent. Separate materials before washing.
Is it okay to wash wooden utensils?
No. Wood absorbs moisture, leading to cracks and warping over time.
Loading Large Cookware and Special Items
Whirlpool dishwashers are engineered for flexibility, making it easy to fit big cookware. Baking trays, pots, and pans should be placed at an angle to allow water access. Position them on the sides or back to avoid blocking spray arms.
Avoid laying flat items horizontally on the bottom. Doing so traps water underneath and prevents cleaning of nearby dishes. Upright placement helps water drain efficiently.
Use fold-down tines to adjust space for mixing bowls or casserole dishes. Whirlpool’s rack design lets you adapt to any cookware size without sacrificing spray reach.
Heavily soiled pots should go near the PowerClean or TargetClean zone if available. These high-pressure jets tackle stuck-on residue effectively. Always face the dirtiest part toward the spray arm.
When washing fragile cookware like glass lids or ceramic trays, choose the gentle cycle. Whirlpool’s sensors will reduce pressure and temperature to protect delicate items.
Check that spray arms rotate freely after loading. Large items can easily restrict motion, causing partial cleaning. Small adjustments ensure thorough results.
Finally, never stack smaller bowls or cups inside bigger ones. Trapped detergent and water will leave stains and residues. Give each piece its own space for the best outcome.
Detergent and Rinse Aid Tips for Whirlpool Users
Using the right detergent makes a noticeable difference. Choose high-quality tablets or powder specifically for automatic dishwashers. Inferior products can leave residue or cloudy films.
Measure detergent carefully. Too much can cause oversudsing, while too little leaves food behind. Whirlpool’s dispensers are calibrated for precise release timing, so fill just below the max line.
Rinse aid is vital for spotless drying. It reduces surface tension, allowing water to slide off dishes smoothly. Refill the dispenser whenever the indicator light turns on.
Hard water can cause white spots and film buildup. Use a water-softening additive if needed. This keeps both your dishes and dishwasher free from mineral deposits.
Avoid mixing detergent types in one load. Combining gel, pod, and powder forms may affect cleaning chemistry. Stick with one trusted brand for consistency.
Eco-friendly detergents work well but may need slightly hotter water. Whirlpool’s sensors adapt automatically to water temperature to maintain cleaning strength.
Regularly wipe detergent and rinse-aid compartments to prevent buildup. Clear openings ensure proper dispensing and maintain wash quality.
Are pods or powder better for Whirlpool dishwashers?
Pods offer consistent dosing and convenience, while powder allows flexible measurement for load size.
How often should I refill rinse aid?
Usually every 20–25 cycles. Some Whirlpool models will alert you with a light indicator.
Why are my glasses cloudy?
Likely from hard water or excessive detergent. Adjust rinse aid and use a softening agent.
Can I use hand-washing liquid instead of dishwasher detergent?
Never. It produces too many suds and can flood the dishwasher.
Do eco detergents clean as effectively?
Yes, but ensure the water temperature is sufficiently hot for optimal results.
Final Check Before Starting the Cycle
Before pressing start, take a moment for final inspection. Ensure no utensil or dish blocks spray-arm rotation. This simple step guarantees balanced cleaning.
Spin both spray arms manually to confirm they move freely. Whirlpool’s wash system relies on unobstructed 360-degree spray coverage.
Check that detergent and rinse-aid compartments are closed properly. If either is jammed, detergent may release too early or too late.
Verify that the door seals tightly without resistance. Misaligned racks or handles can prevent proper closure and cause leaks. Adjust items if needed.
Select the correct cycle for your load. Normal or Sensor Wash works for everyday dishes, while Heavy Wash suits greasy pots and pans. Use Eco mode for lightly soiled items to save water.
Balance items evenly to reduce rattling noise during operation. Whirlpool’s Quiet Partner technology performs best with stable loads.
Run hot water from the sink for a few seconds before starting the cycle. This ensures the dishwasher fills with pre-heated water, boosting cleaning power immediately.
Maintenance and Cleaning for Long-Term Performance
Maintaining your Whirlpool dishwasher regularly keeps it performing at its best. Clean the filter monthly to remove food residue and prevent clogs. A simple rinse under warm water does the trick.
Wipe the door gasket and interior edges with a damp cloth weekly. Food buildup in these areas leads to mold and unpleasant smells. Keeping them clean maintains hygiene.
Once a month, run an empty cycle with a cup of white vinegar on the top rack. This dissolves grease and limescale inside the tub. Baking soda can be added afterward for deodorizing.
Inspect the spray arms for mineral buildup or blockages. Remove and rinse them if jets look clogged. Unobstructed spray arms maintain consistent washing pressure.
Check and clean the drain area frequently. Standing water at the bottom signals a clog that needs attention. Keeping the drain clear ensures complete drainage every cycle.
For stainless-steel interiors, use a microfiber cloth and mild cleaner to restore shine. Avoid harsh chemicals that could scratch the surface. Regular polishing keeps your dishwasher looking new.
Finally, leave the door slightly ajar after each cycle. This prevents moisture buildup and eliminates mold risk. Proper maintenance guarantees years of reliable, quiet operation.
How often should I clean my Whirlpool dishwasher filter?
At least once a month or more frequently if you wash heavily soiled loads.
Can I use vinegar regularly for cleaning?
Yes, running a vinegar cycle monthly helps remove grease and mineral deposits safely.
Why does my dishwasher smell bad?
Trapped food or moisture can cause odor. Clean filters and leave the door ajar to dry.
Should I dry dishes inside the dishwasher or remove them early?
Let them finish the drying cycle. Removing early can cause spotting and streaks.
What’s the best way to keep the exterior clean?
Use a damp cloth and mild detergent; avoid abrasive pads or strong chemicals.
Conclusion
Properly loading your Whirlpool dishwasher is the key to spotless, streak-free results. When each item is positioned correctly, water and detergent reach every surface efficiently. A well-loaded dishwasher also saves time, water, and energy.
From understanding rack layouts to using the right detergent, every small habit adds up. Regular maintenance and careful loading keep your Whirlpool running quietly and efficiently for years.
By following this guide step by step, you’ll never have to rewash cloudy dishes again. With your Whirlpool dishwasher, clean perfection becomes part of your daily routine.
I’m Emma J. Caldwell, the founder, lead writer, and home-cooking enthusiast behind KitchenGuideCo.com. With a background in culinary arts and over a decade of cooking experience in both professional and personal kitchens, I created this platform to demystify recipes, offer smart kitchen gadget reviews, and guide readers through meal prep with confidence and clarity.