Installing or replumbing a dishwasher drain hose seems simple until water backs up into the sink, the dishwasher smells terrible or the appliance refuses to drain.
Many homeowners try to fix the problem themselves but feel confused once they see multiple hoses, clamps and fittings under the sink. The moment the dishwasher leaves standing water behind, the frustration grows quickly.
A dishwasher drain hose must be installed correctly to prevent backflow and ensure smooth draining.
If the hose is too low, too long, kinked or connected the wrong way, wastewater returns into the dishwasher instead of exiting the plumbing. That is why knowing how the drain hose works is essential for proper installation.
The good news is that plumbing a dishwasher drain hose does not require advanced tools or complicated skills.
With a clear guide and careful steps, anyone can install or adjust the hose safely and efficiently. Understanding the right position, height and connection points makes the entire process simple.
Why the Dishwasher Drain Hose Is Important
The drain hose removes dirty water from the dishwasher and sends it into the sink plumbing system. It must be installed correctly to avoid siphoning problems or backflow issues. When done wrong, the dishwasher fills with dirty sink water and smells bad.
A properly installed drain hose prevents wastewater from traveling backward. This protection is especially important in kitchens with garbage disposals. Without proper routing, disposal grindings can enter the dishwasher.
The hose also controls drainage speed. A kinked or collapsed hose reduces water flow and leaves standing water in the tub. This can cause the dishwasher to stop mid cycle.
Proper hose placement also protects the pump. The pump relies on smooth flow through the hose to push water out. Incorrect plumbing forces the pump to work harder unnecessarily.
The hose must be connected securely to avoid leaks. Loose fittings allow water to drip under the sink. This leads to mold growth and damaged cabinetry.
Understanding its role helps prevent common issues. Properly plumbing the hose creates a reliable connection. This ensures the dishwasher runs smoothly every time.
Tools and Supplies Needed for Dishwasher Drain Hose Installation
A few simple tools make the process easier. Most installations require only basic hand tools found in many homes. Having them ready speeds up the job.
A screwdriver is essential for tightening clamps. Both flathead and Phillips styles may be needed. Keeping both types nearby is helpful.
Pliers come in handy for adjusting hose clamps. They help secure the hose to the disposal or drain inlet. A strong grip prevents leaking.
A utility knife may be needed to trim excess hose. Cutting carefully avoids damaging the hose. Proper length improves drainage flow.
Hose clamps ensure tight sealing. These clamps prevent the hose from slipping off the connection. Using quality clamps increases durability.
Bucket and towel help prepare for small spills. A small amount of water may escape during installation. Keeping the area dry avoids slipping or water damage.
Having the right tools ensures smooth installation. Preparation prevents unnecessary frustration. Completing the job becomes easier and safer.
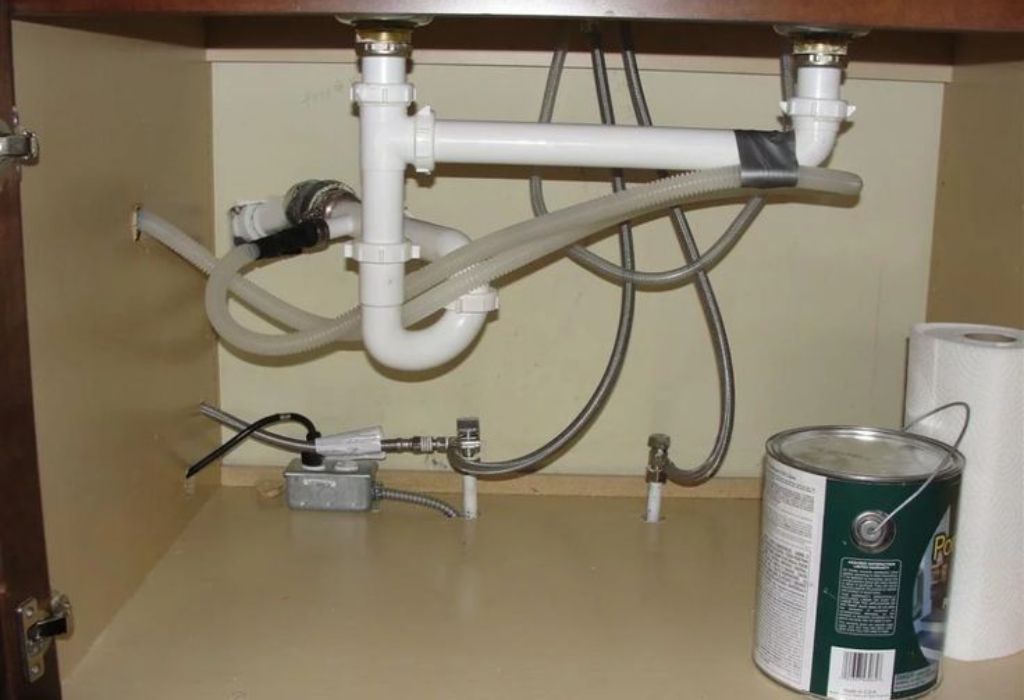
Understanding the Three Main Dishwasher Drain Connection Options
Dishwashers drain in one of three ways. These options depend on kitchen setup and local plumbing codes. Choosing the right method ensures proper water flow.
The first option is connecting the hose to a garbage disposal. This is common in many kitchens. The hose attaches to the disposal inlet near the side.
The second option is connecting to a sink drain tailpiece. This method uses a special dishwasher branch tailpiece. It connects directly under the sink basin.
The third option is using a dedicated air gap. Some plumbing codes require this. The air gap prevents contaminated water from flowing into the dishwasher.
Each method has benefits. Proper installation prevents backflow. Consistent water movement ensures smooth operation.
Knowing the options helps choose the correct setup. Each home may require something different. Following the appropriate method ensures success.
Do I need an air gap for my dishwasher?
Some areas require air gaps by law. They prevent dirty water from returning to the dishwasher. Check local plumbing codes before installing.
Is connecting to a garbage disposal safe?
Yes, it is safe when the knockout plug is removed. Leaving the plug in causes a complete blockage. Removing it ensures proper drainage.
Can I connect the hose directly to the sink drain?
Yes, using a dishwasher branch tailpiece. This fitting is made for dishwasher hoses. It works well without a disposal.
Why does my dishwasher drain into the sink sometimes?
Backflow happens when the hose is installed too low. Raising the hose prevents this. Using a high loop or air gap solves the issue.
Which method drains the fastest?
All methods drain at similar speeds. Performance depends on hose height and alignment. Proper installation matters more than connection style.
The Importance of the High Loop in Dishwasher Plumbing
The high loop prevents backflow into the dishwasher. It works by raising the hose above the sink drain level. This creates a barrier that stops wastewater from returning.
Without a high loop, gravity allows dirty water to flow backward. This backflow brings food particles into the dishwasher. It also causes odors inside the tub.
Installing a high loop is simple. The hose is secured to the underside of the countertop. This elevated position ensures proper function.
Some dishwashers require a high loop even when using an air gap. The extra height gives more protection. It reduces pressure on the system.
The high loop helps the drain pump work efficiently. It maintains proper water direction. This helps the dishwasher drain completely.
Ignoring the high loop causes long term problems. Dirty water repeatedly enters the tub. Maintaining the high loop avoids these issues.
A properly installed high loop ensures clean operation. It keeps water flowing in the correct direction. This improves overall dishwasher performance.
How to Install a High Loop Under the Sink
Start by locating the highest point under the countertop. This location keeps the hose elevated. The height ensures maximum protection.
Use a clamp or bracket to secure the hose. This prevents it from falling out of place. A loose hose reduces effectiveness.
Attach the hose carefully. Avoid bending or twisting it. Sharp bends restrict water flow.
Ensure the hose reaches the disposal or drain comfortably. Avoid stretching the hose. A relaxed fit prevents leaks.
Double check clamp tightness. Loose clamps allow the hose to slide. Keeping it secure ensures long lasting performance.
Test the drain after installation. Running a short cycle confirms proper function. Observing water flow helps detect issues early.
Quality installation makes a difference. A secure high loop improves drainage. It keeps the dishwasher safe from backflow.
Plumbing the Dishwasher Hose to the Garbage Disposal
Connecting to a garbage disposal is a common method. This approach is efficient and simple. The hose attaches to the side inlet.
First, remove the disposal knockout plug. This is essential for proper draining. Leaving it in blocks the hose completely.
Insert the drain hose into the inlet. Push it firmly until secure. Use a clamp to tighten the connection.
Check for kinks in the hose. Kinks slow water flow. Straight hoses drain more efficiently.
Inspect the disposal inlet for debris. Removing buildup improves performance. A clean disposal helps water move freely.
Test the system once connected. Run a quick rinse cycle. Watch for leaks near the clamp.
Proper installation supports smooth operation. The disposal handles food particles easily. This method ensures dependable draining.
Why does water back up when using a disposal connection?
The knockout plug may still be inside. Removing it solves the issue. Disposal must be cleaned regularly.
Is the disposal connection noisy?
No, the hose only drains water. Noise usually comes from the pump. Proper plumbing reduces vibrations.
Do I need plumber’s tape on the connection?
No, hose clamps provide enough sealing. Tape is unnecessary. A tight clamp prevents leaks.
Can the hose fall off the disposal?
Yes, if the clamp is loose. Tightening it prevents slipping. Checking it occasionally is helpful.
Does disposal grinding affect the dishwasher?
Not when installed properly. The high loop prevents backflow. Ground food does not enter the dishwasher.
Connecting the Dishwasher Hose to a Sink Drain Tailpiece
A dishwasher branch tailpiece provides a clean connection. It replaces the standard tailpiece under the sink. This fitting includes a small inlet for the dishwasher hose.
Begin by disconnecting the old tailpiece. Place a bucket underneath for water drips. Loosen the slip nuts carefully.
Install the new dishwasher tailpiece. Align it with the sink drain. Tighten the slip nuts securely.
Attach the drain hose to the small inlet. Push the hose fully onto the inlet. Secure it with a hose clamp.
Avoid bending the hose too sharply. Smooth curves improve water flow. Preventing bends supports strong drainage.
Check for leaks after installation. Run water through the sink. Observe all connections.
This method is simple and effective. It works well without a disposal. The dishwasher drains smoothly through the tailpiece.
How to Install an Air Gap Correctly
An air gap offers maximum protection against backflow. It keeps dirty water from entering the dishwasher. Some building codes require this setup.
Install the air gap on the countertop. It sits near the faucet. This elevated spot ensures proper function.
Connect the dishwasher hose to the smaller air gap fitting. Push the hose fully into place. Tighten the clamp securely.
Attach the air gap outlet hose to the disposal or tailpiece. This hose carries wastewater out. Ensure it slopes downward.
Check both hoses for kinks. They must flow smoothly. Kinks reduce drainage speed.
Test the air gap by running the dishwasher. Water may flow briefly into the sink during operation. This is normal and harmless.
Air gaps provide strong protection. They prevent contamination effectively. Proper installation keeps the dishwasher safe.
Why is water spilling from my air gap?
A clogged hose may be the cause. Cleaning the outlet solves it. Air gap overflow signals a blockage.
Does every home need an air gap?
Not always. Some regions require it by code. Check local rules before installing.
Can I hide the air gap?
It should remain visible. Hiding it reduces function. The airflow is essential.
Why does the air gap make noise?
Small airflow sounds are normal. Loud noise may indicate partial blockage. Cleaning improves it.
Is an air gap better than a high loop?
Both prevent backflow. Air gaps offer the highest protection. High loops work well when allowed.
Avoiding Common Dishwasher Hose Installation Mistakes
One common mistake is installing the hose too low. Low hoses allow backflow. This causes odors and contamination.
Another mistake is using old hoses. Worn hoses crack easily. Fresh hoses last longer.
Some people use the wrong hose length. Extra long hoses sag and trap water. Short hoses stretch and weaken.
Kinks are another issue. They block water movement. Smooth bends ensure consistent flow.
Loose clamps also cause leaks. Weak clamps slip over time. Tightening them prevents problems.
Ignoring the high loop is a major mistake. Many issues start from improper hose height. Correct placement prevents backflow.
Avoiding errors improves performance. Proper installation ensures safety. The dishwasher runs smoothly when installed correctly.
How to Troubleshoot Drain Hose Problems
Clogs are the most common issue. Food particles and debris accumulate inside the hose. Rinsing clears these blockages.
Inspect the hose for kinks. Bends reduce water flow. Straightening improves drainage.
Check for leaks near clamps. Loose clamps cause dripping. Tightening them fixes the problem.
Verify high loop height. A low loop causes backflow. Raising it solves many issues.
Examine the disposal inlet. Clogs inside the inlet block the hose. Cleaning it restores drainage.
Run a test cycle to confirm repair. Watch the draining pattern. Consistent draining confirms success.
Troubleshooting keeps the system efficient. Fixing small issues prevents bigger problems. Proper inspection saves time and money.
Why is my dishwasher not draining fully?
The hose may be clogged. Cleaning it usually solves the problem. Checking the disposal also helps.
Why does water return to the dishwasher?
A low hose or missing loop allows backflow. Raising the hose prevents it. Air gaps also help.
Can plumbers fix hose issues quickly?
Yes, plumbers fix them easily. They diagnose problems fast. Professional help ensures accuracy.
Do hoses wear out over time?
Yes, materials weaken. Replacing hoses prevents leaks. Fresh hoses improve performance.
Why does my hose smell bad?
Trapped debris causes odors. Cleaning the hose removes buildup. Rinse cycles also help.
How to Replace an Old or Damaged Dishwasher Drain Hose
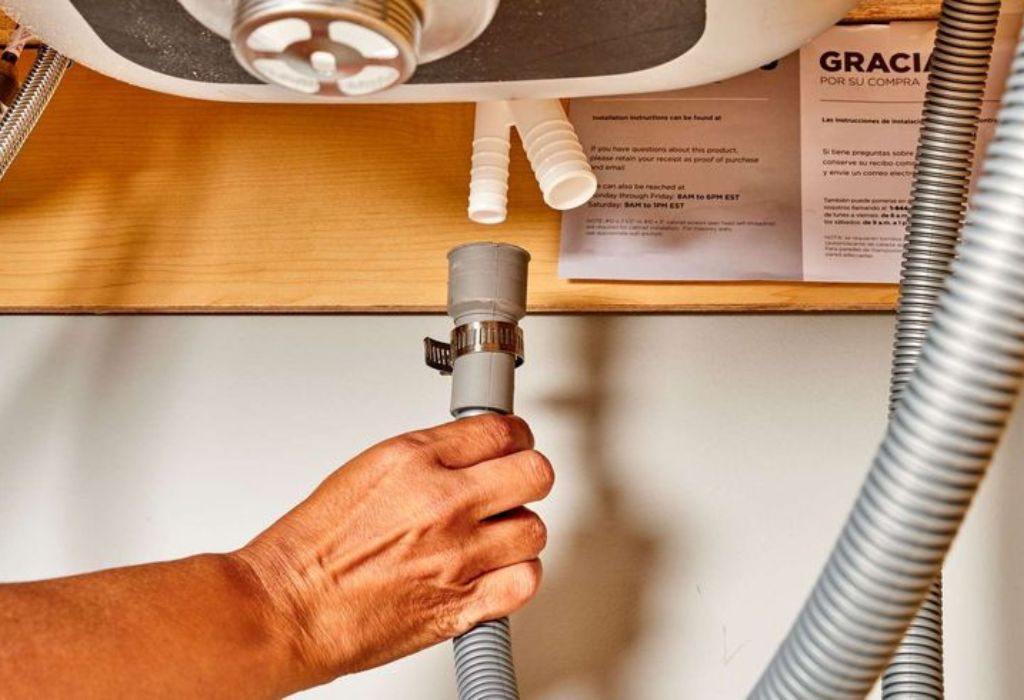
Replacing an old drain hose becomes necessary when leaks, cracks or blockages appear. Over time, the hose weakens due to heat, detergents and constant water flow. A fresh hose restores proper drainage and prevents hidden water damage.
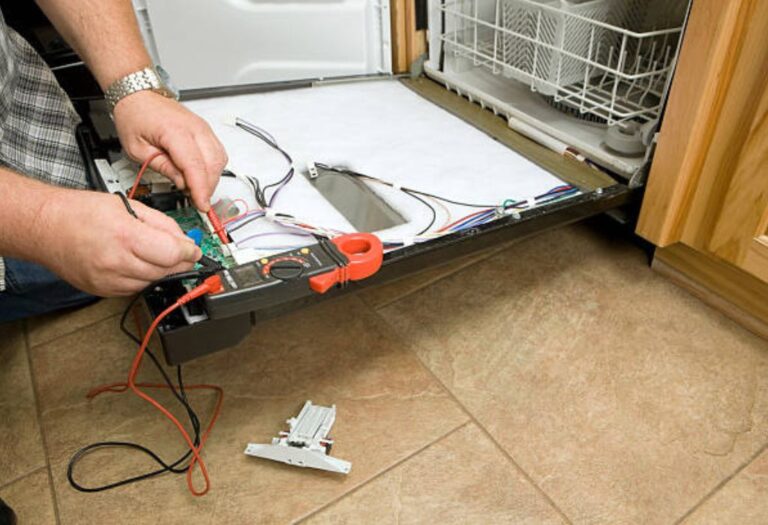
Start by disconnecting the dishwasher from power. This ensures safe handling during repair. Unplugging avoids accidental operation during the process.
Remove the lower access panel from the front of the dishwasher. This panel provides access to the internal hose connection. A simple screwdriver releases the screws easily.
Locate the drain hose attached to the dishwasher pump. The hose is usually secured with a metal clamp. Loosen the clamp and gently pull the hose off the pump.
Move to the under sink area and disconnect the hose from the disposal or tailpiece. Place a towel underneath to catch small spills. Remove the hose completely once both ends are free.
Install the new hose by attaching it to the pump first. Push the hose firmly into place and tighten the clamp securely. Ensuring a tight fit prevents leaks later.
Route the new hose toward the sink connection without twisting. Smooth curves help maintain proper drainage flow. Avoid sharp bends that restrict water movement.
Connect the other end to the disposal or drain inlet. Secure it with a clamp for stability. Double checking both ends ensures the hose is firmly attached.
Test the dishwasher by running a short cycle. Watch for leaks at both connection points. A successful test confirms correct installation.
Why Proper Hose Length Matters for Dishwasher Drainage
Hose length affects drainage performance more than most people realize. A hose that is too long sags and traps dirty water. A hose that is too short pulls tightly and risks disconnecting.
A sagging hose creates a natural dip. This dip fills with dirty water every time the dishwasher drains. Over time, the trapped water causes odors and slow drainage.
Extra long hoses also increase resistance. The dishwasher pump works harder to push water through a longer path. This strain may reduce pump life over time.
Short hoses create tension at both ends. Constant pressure weakens clamps and fittings. A strong pull may cause the hose to slip off and leak.
Finding the correct length ensures smooth water movement. The hose should reach the connection comfortably without extra slack. Adjusting length improves the system’s efficiency.
Trim excess length if needed. Cutting carefully ensures a clean edge that attaches securely. Always leave enough length for the high loop to function.
Route the hose in smooth curves. Curved routing avoids blockage. Straight, stress free lines promote better water flow.
Checking hose length during installation prevents future problems. Proper length keeps the system balanced and reliable. With the right adjustment, the dishwasher drains quickly and consistently.
Conclusion
Plumbing a dishwasher drain hose correctly is essential for preventing backflow, eliminating odors and maintaining strong drainage performance.
A properly routed and secured hose protects the dishwasher from contamination and ensures the pump can move water efficiently. With the right tools and careful steps, the process becomes simple enough for most homeowners to handle without stress.
Understanding each connection method helps you choose the best setup for your kitchen. Whether connecting to a garbage disposal, tailpiece or air gap, the principles remain the same and ensure smooth drainage when followed correctly.
Taking time to install the high loop also prevents dirty sink water from entering the dishwasher and keeps the internal components clean.
Troubleshooting becomes easier once you know the common mistakes and symptoms of poor installation. Issues such as kinks, clogs or low hose placement reveal themselves quickly when the dishwasher begins draining poorly.
Addressing these problems early prevents long term damage and keeps the appliance functioning properly.
Maintaining the drain hose over time also ensures consistent performance. Replacing old hoses, tightening clamps and keeping the plumbing clean help extend the life of both the hose and the dishwasher.
With regular attention and proper plumbing, your dishwasher remains reliable, efficient and free from unpleasant surprises.
I’m Emma J. Caldwell, the founder, lead writer, and home-cooking enthusiast behind KitchenGuideCo.com. With a background in culinary arts and over a decade of cooking experience in both professional and personal kitchens, I created this platform to demystify recipes, offer smart kitchen gadget reviews, and guide readers through meal prep with confidence and clarity.