Replacing an oven heating element may sound complicated, but most homeowners experience this issue at least once.
One day the oven heats perfectly, and the next day the food stays cold while the element barely glows. This sudden change can disrupt daily routines and create frustration in the kitchen.
Many people first notice the problem while preparing dinner for guests or trying to bake something important.
The oven fails halfway, the temperature drops, and panic begins because there is no backup cooking method. Situations like this show why understanding how to replace a heating element can be incredibly useful.
The good news is that most electric ovens use heating elements that are easy to access and replace. With the right tools and a clear guide, anyone can perform this repair safely at home. Learning this skill also saves money on service calls and helps maintain the appliance for years.
This guide walks through every step needed to replace an oven heating element safely. From understanding the signs of failure to installing the new part correctly, each section helps build confidence in the process.
By the end, the task becomes simple, manageable, and safe to perform without professional help.
What Does an Oven Heating Element Do?
The heating element is the main source of heat inside an electric oven. It converts electrical energy into thermal energy through resistance. Without this part the oven cannot reach proper cooking temperatures.
There are two primary heating elements in most ovens. The bake element is located at the bottom and the broil element sits at the top. Both work together to create even heat distribution.
The bake element handles most cooking tasks. It heats food from the bottom and maintains stable temperatures during long baking cycles. When this element fails the oven struggles to cook anything evenly.
The broil element delivers intense direct heat from above. It is used for browning, grilling, and finishing dishes. If it stops working the oven loses its high-heat capabilities.
Heating elements are made from durable metal alloys designed to withstand extreme temperatures. They stay functional for years under normal use. However wear and tear eventually lead to failure.
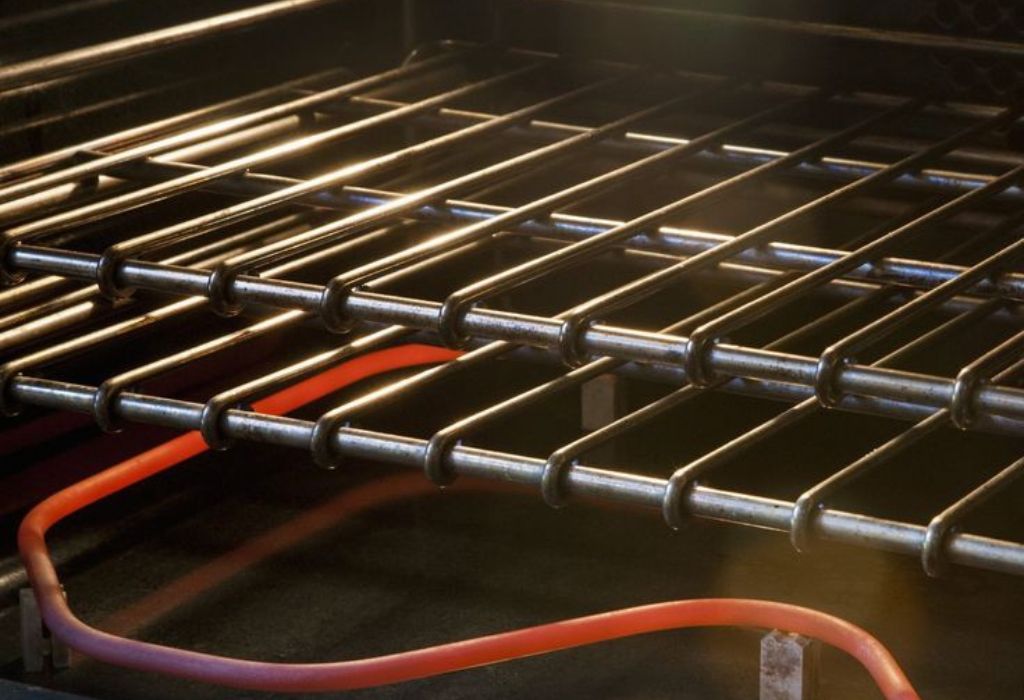
The element glows bright red when operating correctly. This glow indicates proper electrical flow and heat conversion. If the element barely glows it is a clear sign of malfunction.
Even heat distribution depends heavily on both elements working properly. When one fails the oven temperature becomes inconsistent. This affects cooking time accuracy and food quality.
Understanding the role of heating elements helps users diagnose problems quickly. It also makes the replacement process easier and safer. Knowing how the oven generates heat is the first step toward proper maintenance.
Signs Your Oven Heating Element Needs Replacement
A failing heating element often shows visible signs before it stops working completely. Many users first notice unevenly cooked food or irregular heating cycles. These early warnings help identify the problem before it becomes severe.
One common sign is when the element no longer glows red while heating. This glow is a normal indication of power flow and heat production. If the element stays dark it means electricity is not passing through properly.
Slow preheating is another strong indicator. When the oven takes much longer than usual to reach temperature the element may be losing efficiency. This makes everyday cooking tasks frustrating and unpredictable.
Burn spots or bubbling on the element surface signal dangerous deterioration. These marks show that the metal has weakened due to repetitive heat cycles. Continuing to use it can lead to electrical failure.
In some cases the oven may not heat at all. This usually happens when the element breaks internally or burns out. At this point replacement becomes the only solution.
Food cooking inconsistently is also a sign of trouble. One side may burn while the other stays undercooked. This happens when only part of the element is functioning.
Strange noises can occur during operation. Popping or sizzling sounds often happen when a damaged element tries to heat unevenly. These sounds should never be ignored.
Recognizing these symptoms early helps prevent further damage. Replacing the element promptly ensures safe and efficient oven performance. It also prevents stress on other components.
Safety Precautions Before Replacing the Heating Element
Safety should always be the first priority when repairing electrical appliances. Ovens contain high-voltage connections that can be dangerous if handled carelessly. Taking simple precautions prevents accidents during replacement.
The very first step is disconnecting power. Unplug the oven or switch off the circuit breaker supplying electricity. Working on a powered appliance is extremely unsafe.
Allow the oven to cool completely before touching the element. Heating elements stay hot long after the oven is turned off. Handling them too early can cause burns.
Wear insulated gloves to protect your hands. They add a layer of safety against sharp edges and residual heat. Safety goggles are also recommended when dealing with electrical components.
Make sure the workspace is bright and clear. A flashlight helps you see the wiring at the back of the oven clearly. Good visibility reduces mistakes.
Avoid pulling wires forcefully. They are connected to delicate terminals that can break easily. Damaging wiring can turn a simple replacement into an expensive repair.
If you smell burning wires or see melted insulation stop immediately. These signs indicate a deeper electrical problem. In such cases professional help is required.
Following these precautions prepares you for a safe repair. It ensures the replacement process goes smoothly from start to finish. Proper preparation is the foundation of safe DIY work.
Tools Needed for Replacing an Oven Heating Element
Having the right tools makes the replacement process easier and safer. Most ovens require only basic equipment for accessing and removing the element. These tools are commonly available in most homes.
A standard screwdriver is essential. Many ovens use simple screws to secure the element to the back wall. The right screwdriver ensures you do not strip these screws.
A nut driver may also be required. Some models use small nuts instead of screws. Using the correct driver prevents damage to mounting hardware.
A flashlight helps illuminate dark spaces inside the oven. Wiring terminals are often located deep at the back. Good lighting improves accuracy when disconnecting wires.
A multimeter is helpful for testing electrical continuity. This tool helps confirm whether the old element has failed completely. It also checks if the wiring still delivers proper power.
Protective gloves keep your hands safe from heat and scratches. They also provide better grip while handling the element. Safety equipment is always important when working with appliances.
A small bowl or magnetic tray is useful for holding screws. Losing even one screw can cause a major delay. Keeping all parts organized simplifies reassembly.
These tools form the basic kit for heating element replacement. With them on hand the process becomes straightforward. Proper preparation makes the repair efficient and stress-free.
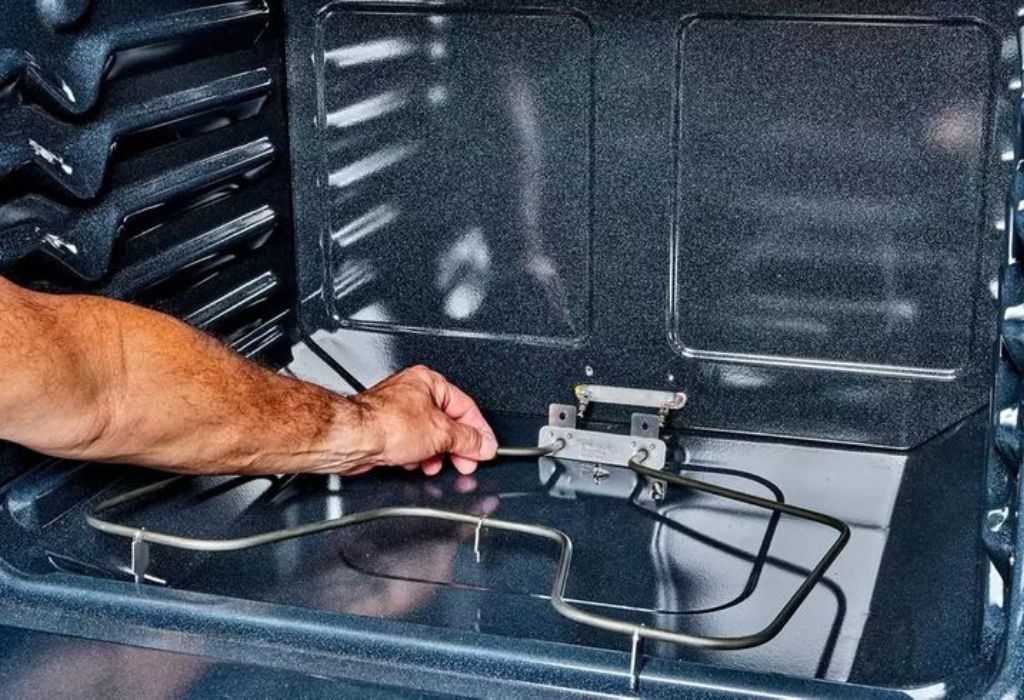
Removing the Old Oven Heating Element
Removing the old element begins with opening the oven door fully. This gives proper access to the interior and provides enough working space. Make sure the oven is cool before touching anything.
The heating element is usually attached with two screws at the back. Remove these screws carefully and place them in a bowl for safekeeping. Once loosened the element should pull forward slightly.
Behind the element are two electrical connectors. These supply power from the oven’s wiring. Gently pull the connectors straight off the terminals without twisting.
Sometimes connectors may feel stuck. In such cases wiggle them slightly while applying gentle pressure. Avoid using excessive force because it may damage the wiring.
Once the wires detach the element becomes completely free. Carefully slide it out of the oven cavity. Handle it gently to avoid bending or cracking it.
If the element has burned through it may break during removal. This is normal for older elements. Just remove all broken pieces and ensure no fragments remain inside.
Inspect the wire terminals for damage. Melted or discolored wires indicate underlying electrical issues. If this occurs professional evaluation is needed.
Removing the old element clears the way for the new one. This step is usually quick and straightforward. With patience and care it becomes a simple task.
Installing the New Oven Heating Element
Installation begins by aligning the new element in the same position as the old one. The mounting holes should match the original locations. Proper alignment ensures smooth and safe operation.
Reconnect the electrical connectors to the new element. Push them gently until they sit firmly on the terminals. A secure connection ensures reliable heat output.
Slide the element into place until the mounting bracket touches the back wall. This positions the element evenly inside the oven cavity. Misalignment can cause uneven heating.
Insert the screws you removed earlier. Tighten them carefully without overtightening. This keeps the element stable during high-temperature operation.
Check that the element sits evenly on both sides. A bent or crooked element affects heat distribution. Correct placement ensures consistent cooking.
Ensure no wires are touching the oven walls. Wires must remain behind the insulation area to prevent heat damage. Proper positioning prevents future electrical problems.
Once everything is secured close the oven door. The new element should appear clean and firmly positioned. This visual confirmation helps verify successful installation.
Installing the new element completes the mechanical process. The next step involves testing the oven for safe operation. This ensures the repair is successful and reliable.
Testing the New Heating Element After Installation
Turn the power back on by plugging in the oven or flipping the breaker. This restores electricity to the appliance. The oven is now ready for testing.
Begin with a low-temperature test. Set the oven to a gentle heat and watch the element carefully. It should start glowing slowly without flickering.
Move on to a higher temperature after the initial test. The element should glow bright red evenly along its entire surface. Uneven glow indicates poor connection or faulty wiring.
Check for smoke or burning smells. A small amount of scent is normal for a new element. However continuous smoke suggests another internal issue.
Monitor the heating performance for a few minutes. The oven should reach temperature faster than before. This indicates proper power delivery to the element.
Listen for unusual sounds. Popping noises may happen briefly as the element settles into place. Continuous noise suggests improper installation.
Use an oven thermometer to confirm temperature accuracy. A functioning heating element restores proper heat regulation. This ensures safe and effective cooking.
Testing verifies the success of the repair. It ensures the oven is safe and ready for regular use. Completing this step gives peace of mind.
Common Mistakes to Avoid During Replacement
Many DIY repairs fail due to simple mistakes. Avoiding these ensures the heating element works as intended. It also prevents future problems.
One common mistake is installing the wrong element model. Each oven requires a specific type based on size and connection points. Using the wrong one affects performance and safety.
Loose wiring creates major risks. If connectors are not firmly attached the element may spark or malfunction. Secure connections are essential.
Another mistake is damaging the internal insulation. Pulling wires roughly can tear protective layers. This exposes wires to heat and increases the chance of short circuits.
Skipping the power shut-off step is extremely dangerous. Even a small amount of electrical current can cause harm. Always disconnect power before beginning any repair.
Leaving screws loose can cause rattling. It may also cause the element to shift during heating. Proper tightening ensures stability.
Not testing the oven after installation is another oversight. Without testing users may not notice installation errors. Early detection prevents long-term issues.
Avoiding these mistakes makes the process safe and efficient. Careful attention to detail ensures lasting success. Smart DIY methods always prioritize safety.
When to Call a Professional Instead of DIY
Not all heating element problems are simple to fix. Some issues point to deeper electrical malfunctions. In these cases a professional technician is necessary.
If the wiring behind the element shows burn marks seek expert help. This indicates overheating or short circuits. These problems require specialized tools and knowledge.
Control panel faults can also mimic element failure. For example the oven may not send proper voltage due to damaged circuits. A technician can diagnose these issues accurately.
Gas ovens require professional service. Their heating systems involve ignition modules and safety valves. DIY work on gas appliances is unsafe without certification.
If the breaker trips repeatedly after installation stop immediately. This signals electrical overload. A trained expert can investigate safely.
Old ovens may have brittle wiring that breaks easily. Replacing multiple components becomes too complex for DIY. Professionals ensure safe and complete repairs.
Calling an expert ensures long-term reliability. It also prevents costly damage caused by incorrect repairs. Sometimes professional intervention is the safest choice.
Maintenance Tips to Extend Heating Element Life
Regular cleaning keeps heating elements efficient. Food spills harden on the element surface and cause uneven heating. Wiping spills quickly prevents buildup.
Avoid scraping the element with sharp tools. Scratching the coating weakens the metal. Gentle cleaning extends longevity.
Do not overload the oven with heavy cookware. Excess weight strains internal parts. Balanced use keeps the element functioning well.
Use temperature settings responsibly. Constant high heat cycles wear down the metal faster. Alternating temperatures helps preserve durability.
Check wiring connections during routine cleaning. Loose wires increase resistance and heat stress. Early adjustments prevent sudden failure.
Keep the oven interior dry. Moisture causes corrosion on metal parts. Drying the oven after use maintains good condition.
Ensure proper ventilation around the oven. Overheating shortens the lifespan of heating components. Good airflow supports stable performance.
Following these maintenance tips increases the element’s lifespan. Proper care also enhances cooking consistency. Prevention is always easier than repair.
Common Questions About Replacing Oven Heating Elements
How long does an oven heating element usually last?
Most heating elements last between five to ten years depending on usage and maintenance.
Can I replace an oven heating element without professional help?
Yes, most people can replace it safely with the correct tools and instructions.
Why is my oven not heating even with a new element installed?
This may indicate wiring issues or problems with the control board.
Is it safe to use the oven if the element is cracked?
No, a cracked element can cause electrical hazards and should be replaced immediately.
What causes a heating element to burn out?
High heat cycles, spills, and long-term wear are the most common causes.
Can I install a higher-watt element for faster heating?
No, using the wrong wattage can damage the oven or cause fire risks.
Should both bake and broil elements be replaced together?
Not necessarily, only replace the one that has failed unless both show signs of wear.
Why does my heating element spark when the oven starts?
Sparking indicates poor wiring connection or metal fatigue in the element.
Can a multimeter confirm if my element is bad?
Yes, a continuity test will show whether the element still conducts electricity.
Will replacing the heating element improve cooking performance?
Yes, a new element restores normal heating speed and temperature accuracy.
Conclusion
Replacing an oven heating element is one of the most manageable DIY appliance repairs for homeowners. With proper tools and careful steps the process becomes safe, efficient, and highly rewarding. Understanding how the element works makes the repair even easier.
A functioning heating element ensures even cooking, fast preheating, and reliable daily performance. When it fails the oven becomes unpredictable and frustrating to use. Replacing it restores confidence in the appliance and prevents further issues.
Following safety precautions is essential for every repair. Disconnecting power, inspecting wiring, and testing the new element all contribute to a safe experience. These steps help avoid accidents while ensuring long-term reliability.
Knowing when to call a professional is just as important as knowing how to perform the repair. Complex wiring issues, burnt connectors, or control board problems require expert attention. This balance between DIY and expert service ensures the oven remains safe.
Finally, consistent maintenance extends the lifespan of the heating element. Keeping the oven clean, monitoring temperature habits, and avoiding unnecessary strain all contribute to better performance. With proper care the oven continues serving the household effectively for many years.
I’m Emma J. Caldwell, the founder, lead writer, and home-cooking enthusiast behind KitchenGuideCo.com. With a background in culinary arts and over a decade of cooking experience in both professional and personal kitchens, I created this platform to demystify recipes, offer smart kitchen gadget reviews, and guide readers through meal prep with confidence and clarity.